Oracle Cloud Infrastructure Source to Prod
In this codelab, you will create a cohesive workflow which takes source code and builds, tests, and promotes it to production.
Building the binary from the source code is done outside of Spinnaker, typically in a CI system such as Jenkins, Travis, etc. Spinnaker is integrated with three CI systems. Workflows can be triggered by jobs in these CI systems. The easiest binary form for Spinnaker to produce machine image is debian or rpm packages.
To simplify this tutorial, we will use tomcat8 debian package as a starting point. It is assumed your CI jobs build and publish packages such as tomcat8 and your CI jobs will be used to trigger the Spinnaker workflow.
This tutorial covers the workflow which takes a package and bakes a machine image and then deploys, tests, and promotes it to production.
This will be accomplished via 3 pipelines:
- Bake & Deploy to Test
- Validate Test
- Promote to Prod
Part 0: Set up environment
Create a compute instance
Create a compute instance on Oracle Cloud Infrastructure (OCI) to host Spinnaker by following these instructions . Spinnaker supports Ubuntu 18.04 or higher.
Install and configure Spinnaker
SSH onto the compute instance you previously created. IP is its public ip address.
ssh ubuntu@IP
-
Set up Oracle Object Storage as your Spinnaker storage by following these steps: Adding Oracle Object Storage to Spinnaker .
-
Set up your Oracle Cloud provider account by following these Adding Oracle Cloud Provider Account to Spinnaker steps.
-
Set up your Oracle Bakery by following these Configuring Oracle Cloud Infrastructure Bakery steps.
Note that Oracle-provided images have a default set of firewall rules which allow only SSH access. To bake an image that allows HTTP access like in this tutorial, you need a custom bake template like this one to place in ~/.hal/default/profiles/rosco/packer/codelab.json.
{% raw %}
{
  "variables": {
    "oracle_availability_domain": null,
    "oracle_region": null,
    "oracle_base_image_id": null,
    "oracle_compartment_id": null,
    "oracle_image_name": null,
    "oracle_instance_shape": null,
    "oracle_ssh_user_name": null,
    "oracle_subnet_id": null,
    "oracle_tenancy_id": null,
    "oracle_user_id": null,
    "oracle_fingerprint": null,
    "oracle_ssh_private_key_file_path": null,
    "oracle_pass_phrase": "",

    "appversion": "",
    "build_host": "",
    "build_info_url": "",
    "repository": "",
    "package_type": "",
    "packages": "",
    "upgrade": "",
    "configDir": null
  },
  "builders": [
    {
      "type": "oracle-oci",
      "availability_domain": "{{user `oracle_availability_domain`}}",
      "region": "{{user `oracle_region`}}",
      "base_image_ocid": "{{user `oracle_base_image_id`}}",
      "compartment_ocid": "{{user `oracle_compartment_id`}}",
      "image_name": "{{user `oracle_image_name`}}",
      "shape": "{{user `oracle_instance_shape`}}",
      "ssh_username": "{{user `oracle_ssh_user_name`}}",
      "subnet_ocid": "{{user `oracle_subnet_id`}}",
      "tenancy_ocid": "{{user `oracle_tenancy_id`}}",
      "user_ocid": "{{user `oracle_user_id`}}",
      "fingerprint": "{{user `oracle_fingerprint`}}",
      "key_file": "{{user `oracle_ssh_private_key_file_path`}}",
      "pass_phrase": "{{user `oracle_pass_phrase`}}"
    }
  ],
  "provisioners": [
    {
      "type": "shell",
      "script": "{{user `configDir`}}/install_packages.sh",
      "environment_vars": [
        "repository={{user `repository`}}",
        "package_type={{user `package_type`}}",
        "packages={{user `packages`}}",
        "upgrade={{user `upgrade`}}"
      ],
      "pause_before": "30s"
    },
    {
      "type": "shell",
      "inline": [
       "sudo iptables -I INPUT 1 -p tcp -m state --state NEW -m tcp --dport 8080 -j ACCEPT",
       "sudo netfilter-persistent save",
       "sudo systemctl restart netfilter-persistent.service"
      ]
    }
  ]
}
{% endraw %}
- Install spinnaker per using a debian installation
Accessing Spinnaker
By default, the Spinnaker UI runs on port 9000. You can use an SSH tunnel to access this from your workstation.
ssh -A -L 9000:localhost:9000 -L 8084:localhost:8084 ubuntu@IP
Now Spinnaker UI is available at http://localhost:9000 .
Part 1: Bake & deploy to test
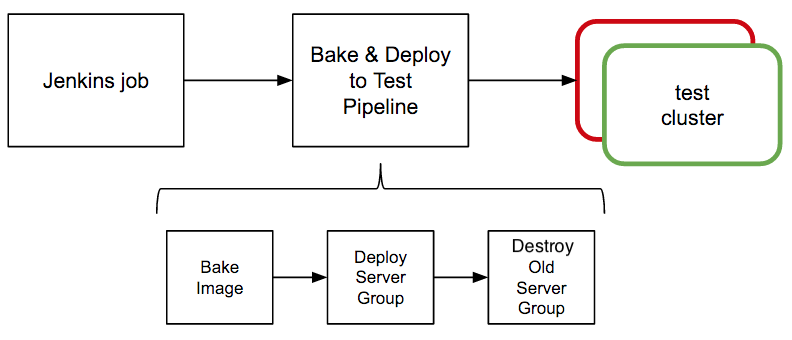
In this first exercise, you’ll set up a pipeline, named Bake & Deploy to Test, which builds an image, deploys it as a server group to a test cluster, then destroys the previous server group in that cluster (also called the “Highlander” strategy).
The workflow is shown in the figure below.
Create a Spinnaker application
Navigate to Spinnaker at http://localhost:9000 .
From the Spinnaker home page, create a new Spinnaker Application by clicking on the Actions drop down at the upper right and clicking on Create Application.
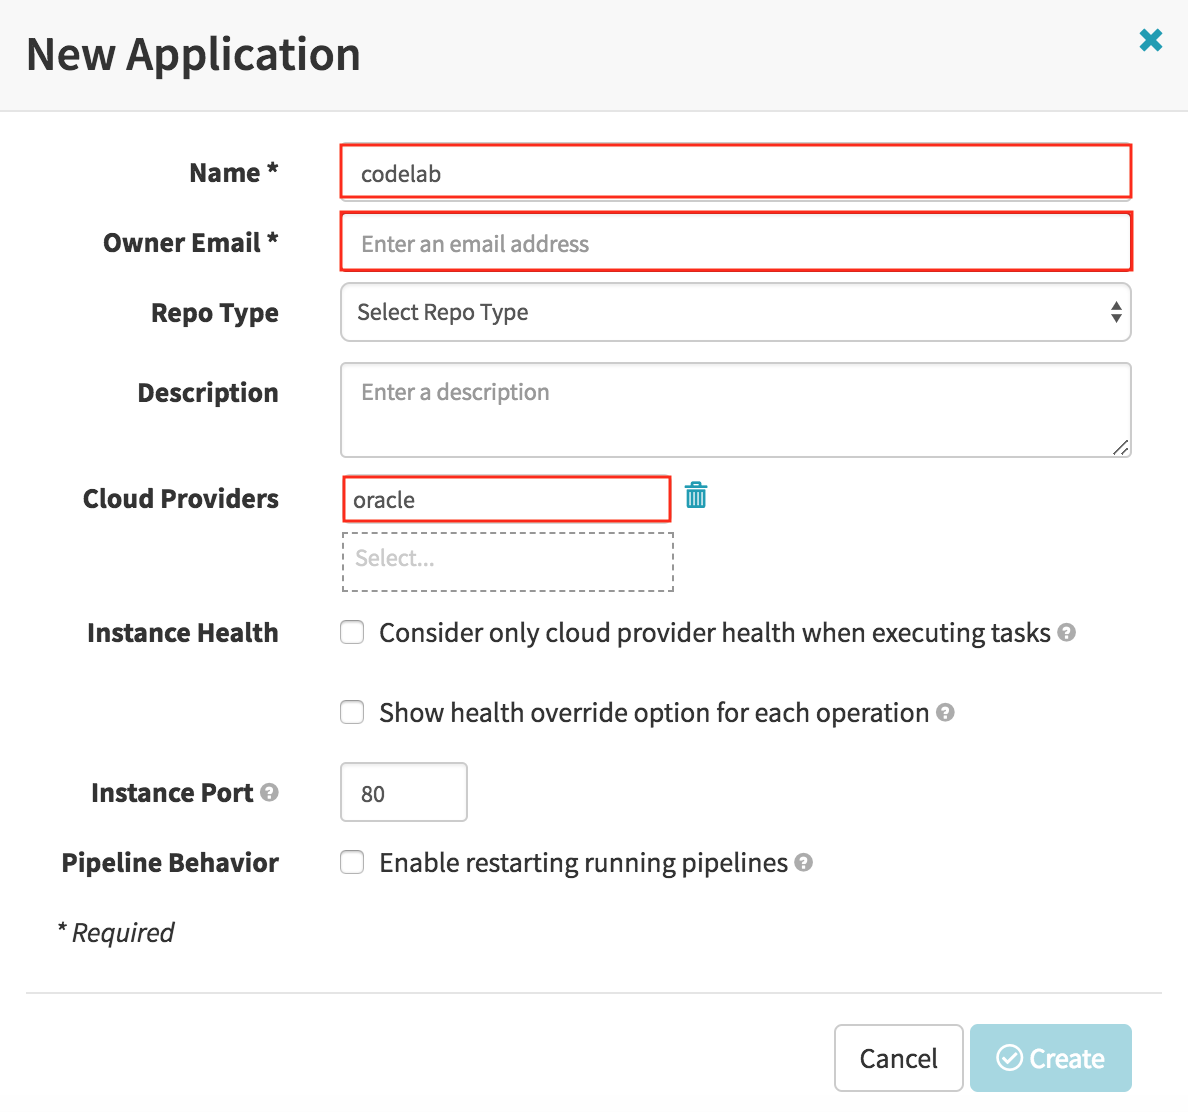
In the New Application dialog:
- Enter “codelab” for Name.
- Enter your email for Owner Email.
- Add “oracle” to Cloud Providers. If “oracle” is the only provider configured, there is no Cloud Providers field and “oracle” is the default provider.
- Click the Create button.
Set up Virtual Cloud Network
Log into the OCI console and create a Virtual Cloud Network “codelabVCN” with “PLUS RELATED RESOURCES” option.
Take all the defaults for “codelabVCN”, with a couple of additions to the Ingress Rules in the “Default Security List for codelabVCN”.
- the instance to be deployed uses port 8080, add an Ingress Rule to allow TCP traffic for port 8080.
- the load balancer to be created in this tutorial listens on port 80, add an Ingress Rule to allow TCP traffic for port 80.
The Oracle Cloud Infrastructure Documentation on Security Lists has more details.
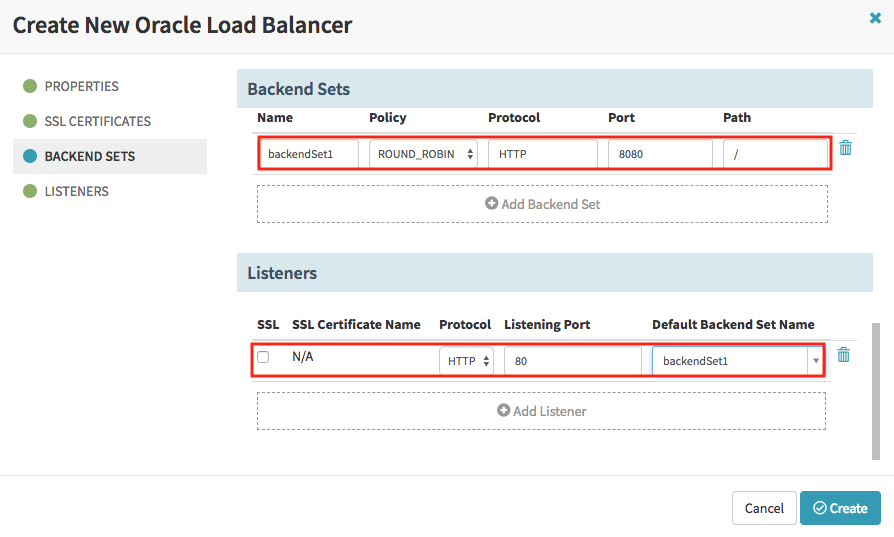
Create a load balancer for test cluster
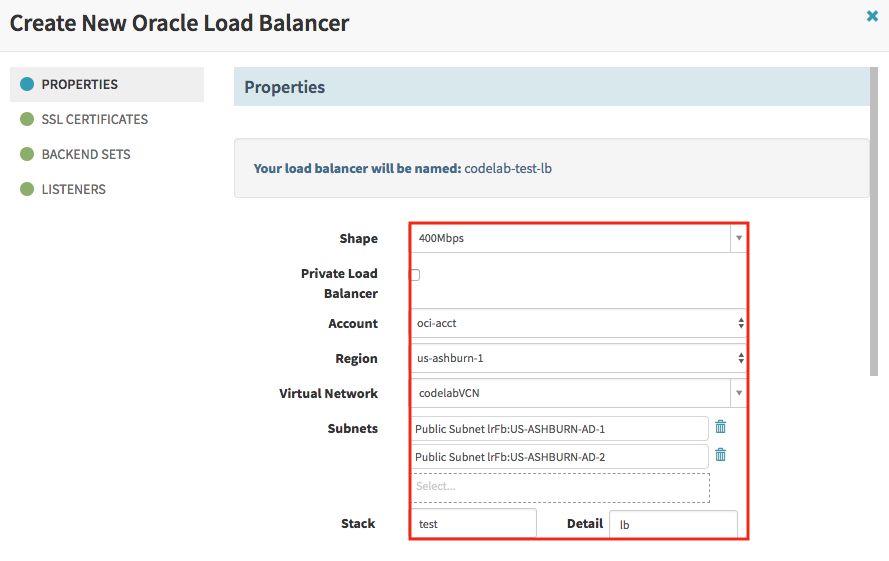
Navigate to the “Load Balancers” tab in Spinnaker and click the Create Load Balancer button:
- Enter “test” for Stack.
- Enter “lb” in the Detail field.
- Select your preferred load balancer shape in the Shape dropdown.
- Check Private Load Balancer only if you want to isolate your load balancer from the internet.
- Select your preferred account in the Account dropdown.
- Select your preferred region in the Region dropdown.
- Select “codelabVCN” in the Virtual Network dropdown.
- Add Subnets. A public load balancer requires two subnets, each in a separate availability domain.
- Edit the Backend Sets section with “8080” for port.
- Edit the Listeners section to use the Backend Set just created on Listening Port “80”.
- Click the Create button.
Set up pipeline: “Bake & Deploy to Test” pipeline
The purpose of this pipeline is to generate an image from a package, and then deploy the image on server groups in the test cluster. We want this pipeline to be kicked off every time the continuous integration job completes.
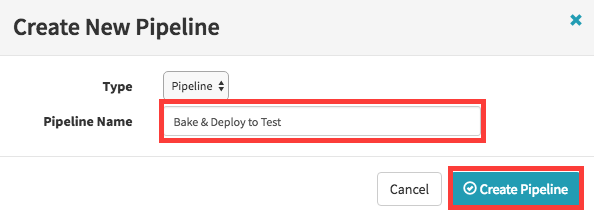
Create a new pipeline by navigating to the PIPELINES tab and clicking the link Configure a new pipeline
- Name the pipeline “Bake & Deploy to Test”.
- Click the Create button.
Configure the pipeline
In reality, we would set up the pipeline with an automated trigger that will kick off the pipeline. Assuming the package is built in CI (Jenkins/Travis/Etc), in the Automated Triggers section of the pipelines form, you would add Jenkins/Travis/Etc. Trigger for your job so that every time these job completes the pipeline would start automatically.
To simplify this tutorial, we will skip the trigger and use tomcat8 package.
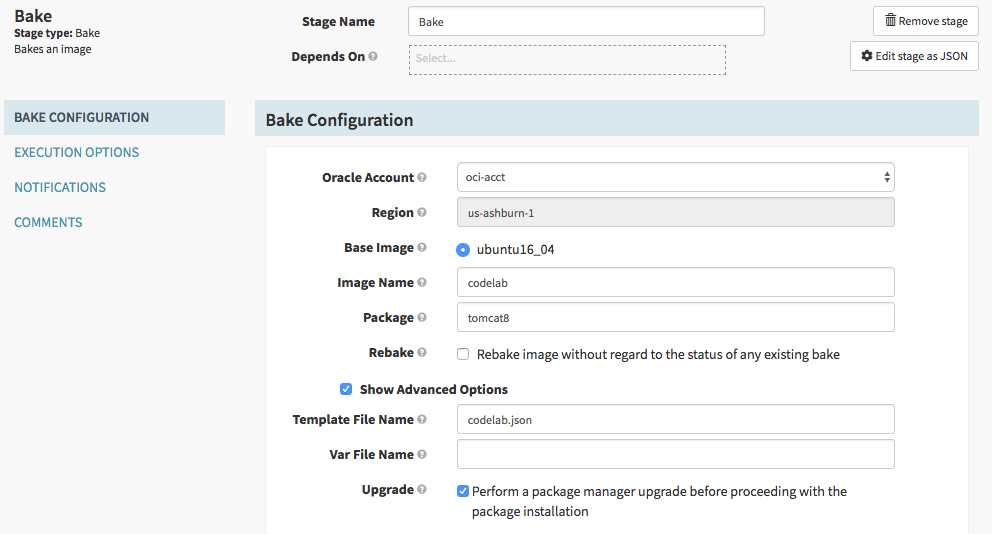
Set up Bake stage
The purpose of our “Bake” stage is to create an image with the package that was built by the CI job that triggered this pipeline. It is tomcat8 in this tutorial.
- Click Add stage.
- Select “Bake” in the Type drop down.
- Select your preferred account in the Oracle Account field.
- Select your preferred region in the Regions field.
- Select your preferred base image as in the Base Image field.
- Enter “codelab” in the Image Name field.
- Enter “tomcat8” in the Package field.
- Enter “codelab.json” in the Template File Name field in the Advanced Options.
- Click the “Save Changes” button.
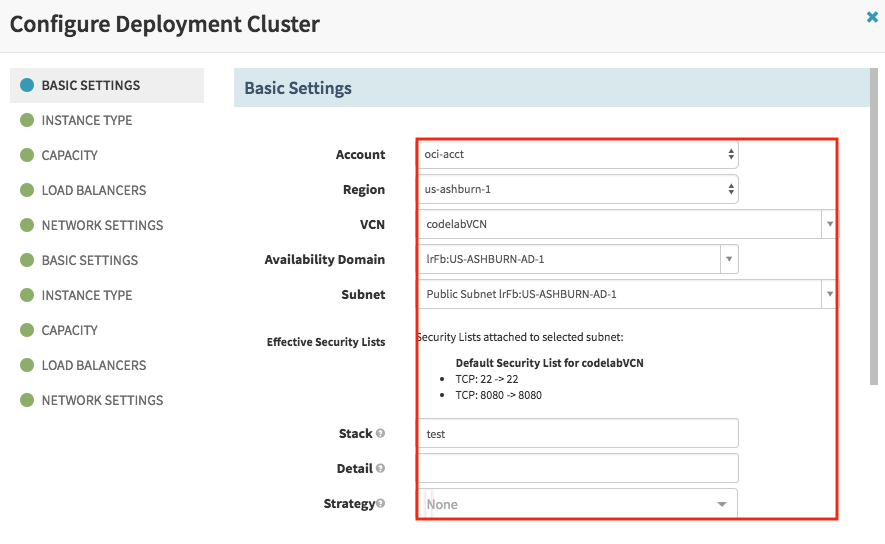
Set up Deploy stage for test cluster
The purpose of the “Deploy” stage is to take the image constructed in the “Bake” stage and deploy it into a test environment.
- Click Add stage.
- Select “Deploy” in the Type drop down.
- In the Deploy Configuration section, click Add server group.
- In the dialog that appears, click Continue without a template.
- In the Basic Settings section, select “codelabVCN” in the VCN drop down, select desired Availability Domain and Subnet, and enter “test” in the Stack field.
- In the Instance Type section, choose your preferred shape in the drop down.
- In the Capacity section, enter your preferred number of instances.
- In the Load Balancers section, select the load balancer and the Backend Set we created earlier.
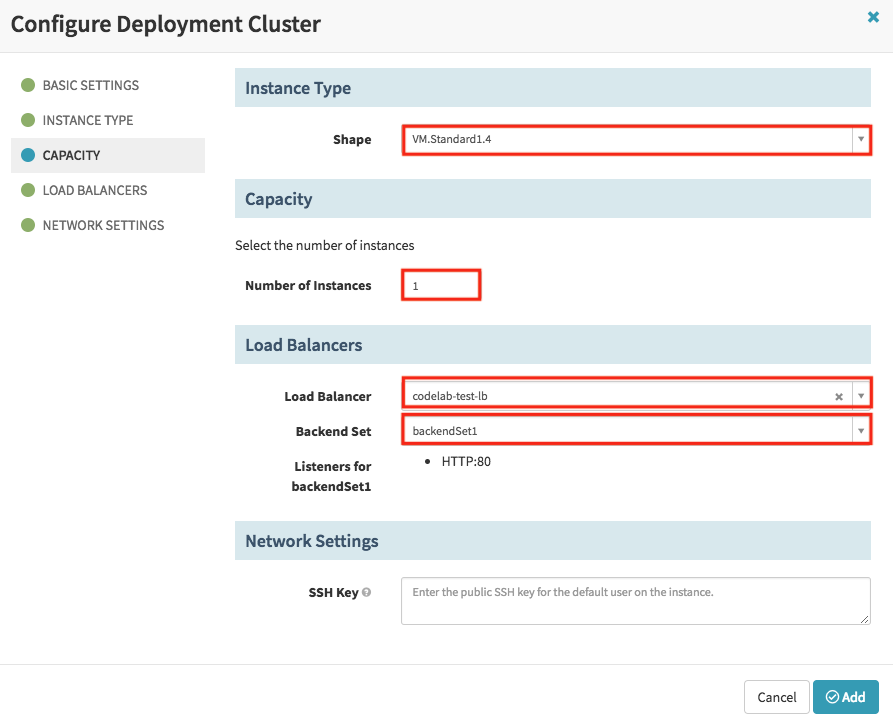
- Click the “Add” button.
- Save this stage of the pipeline.
Destroy previous server group
In this tutorial use case, on successive deployments of new server groups to the test cluster, we don’t need the previous server group anymore.
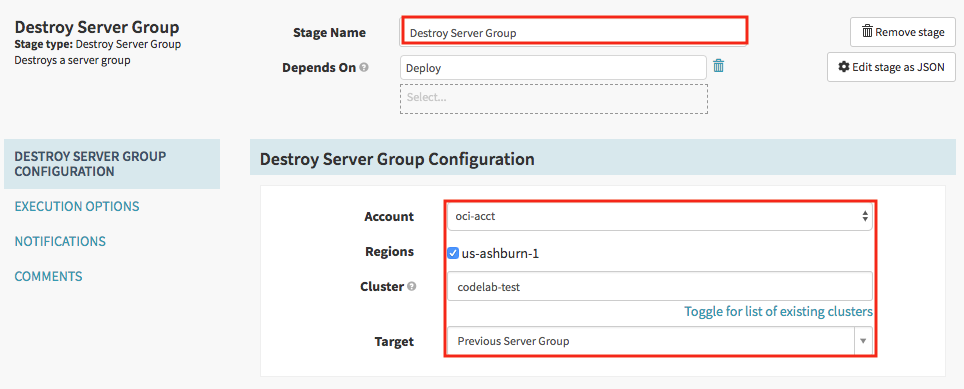
- Click Add Stage.
- Select “Destroy Server Group” for Type.
- Check the region of the previous test server group that you want to destroy.
- Enter “codelab-test” for the Cluster.
- Select “Previous Server Group” for Target.
- Click Save Changes.
The pipeline is now complete. Take a moment to review the stages of this pipeline that you just built.
Trying it out
Now let’s run this pipeline. We trigger it by manually triggering from the PIPELINES tab (click Start Manual Execution).
The first time this pipeline is run, the Destroy Server Group stage will fail, because the selector for “Previous Server Group” will find nothing (no server groups presently in the test cluster). The Deploy stage, however, does succeed, so a test cluster will be created.
Try running it again. It will succeed all the way, and your pipeline execution details will look like below:
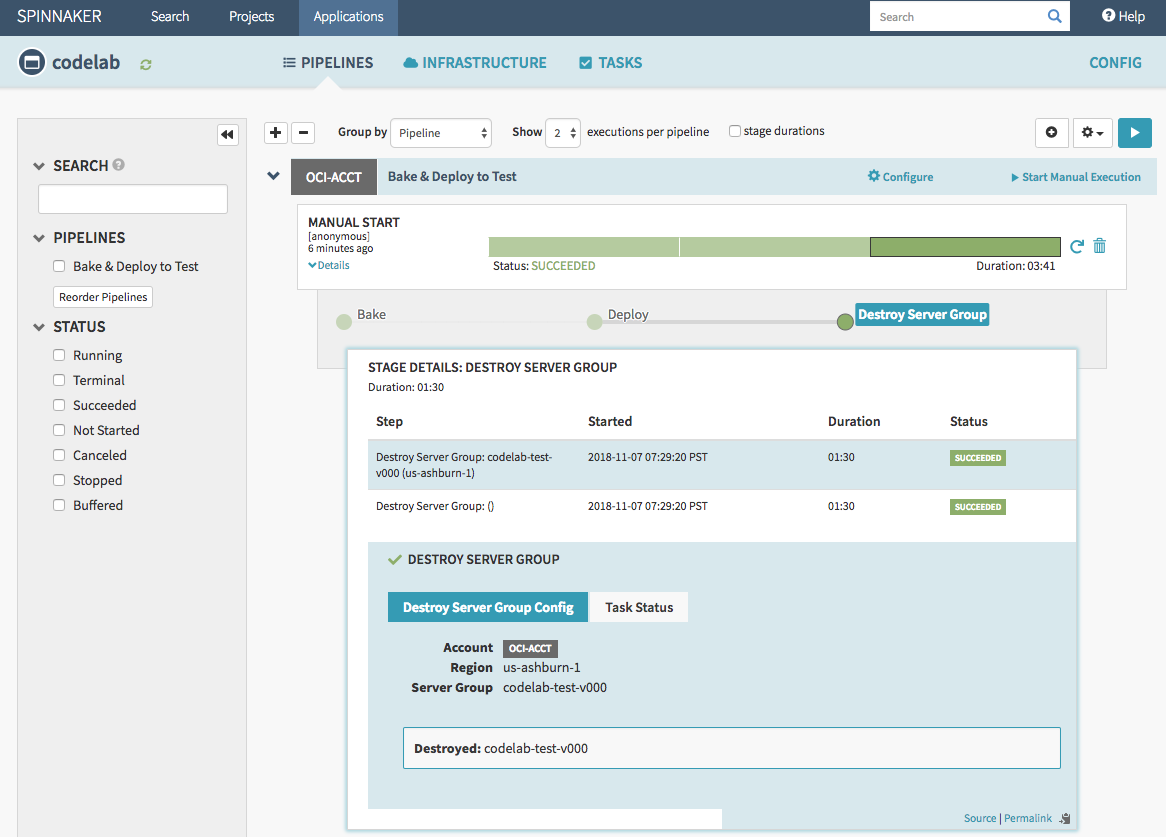
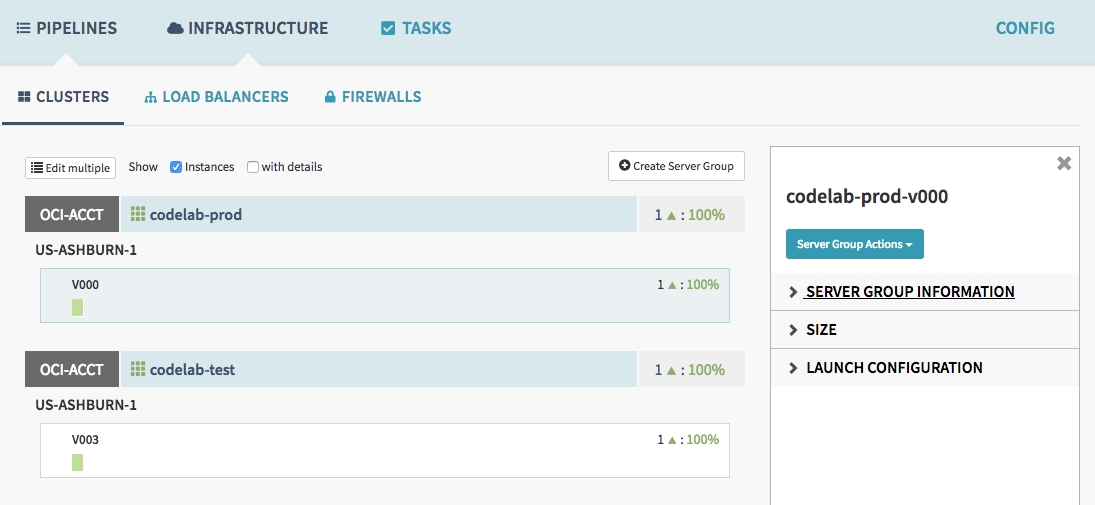
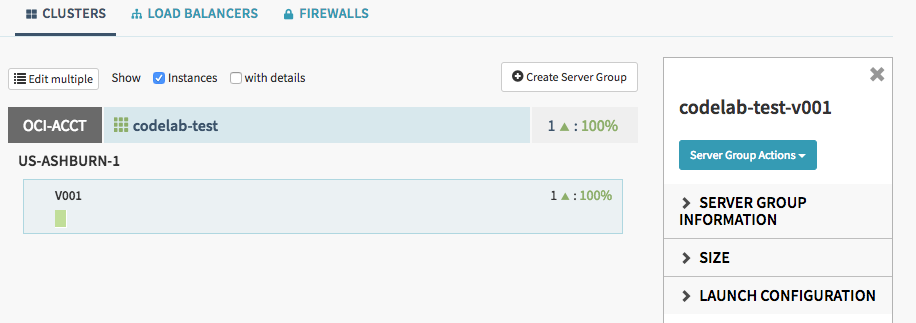
You can now see in the CLUSTERS tab that a new server group (codelab-test-v001) has been deployed to the test cluster, and the previous server group (codelab-test-v000) is destroyed (i.e. does not exist).
Part 2: Validate test
The second pipeline, named “Validate Test”, is a simple one-stage placeholder to represent some gating function before pushing to prod.

Furthermore, you configure the prod deployment to implement the red/black (blue/green) strategy, which means that upon verifying health of the new server group, Spinnaker immediately disables the previous server group in the same cluster. Here you disable rather than destroy, so that rollbacks can be quickly accomplished simply by re-enabling the old server group.
Note: Blue/Green replaces Red/Black in Spinnaker v1.30+.
Set up pipeline: “Validate Test”
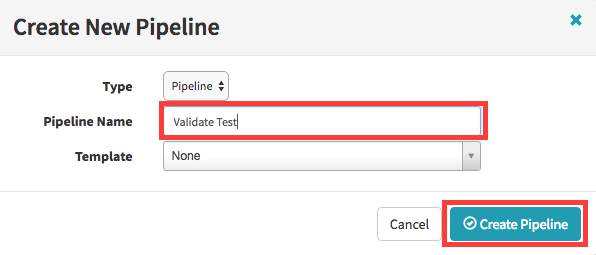
Create a new pipeline by navigating to the PIPELINES tab and clicking Configure, then Create Pipeline or Strategy
- Name the pipeline “Validate Test”.
- Click the Create Pipeline button.
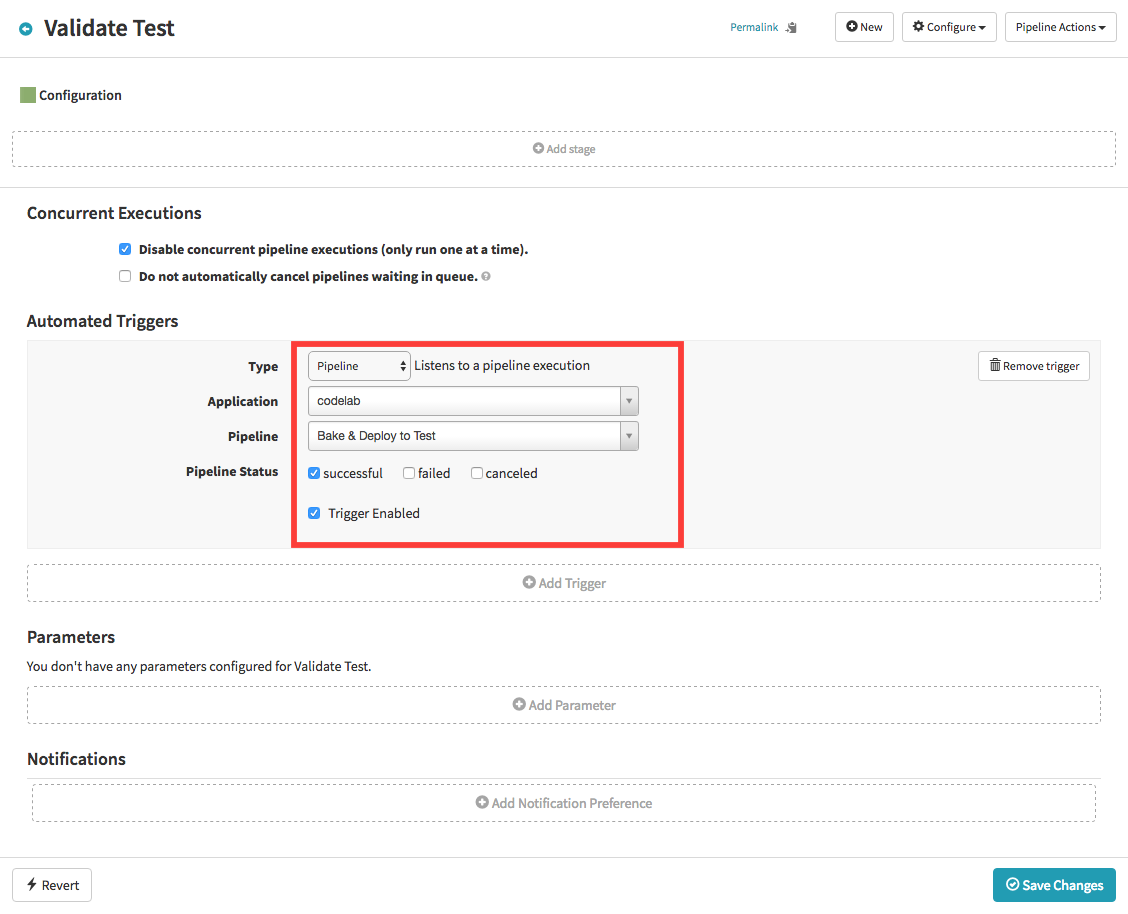
Configure the pipeline
We want this pipeline to kick off when the Bake & Deploy to Test pipeline completes.
- Click Add Trigger.
- Select “Pipeline” from the drop down menu for Type.
- Select your application.
- Select the “Bake & Deploy to Test” pipeline.
- Check “successful”.
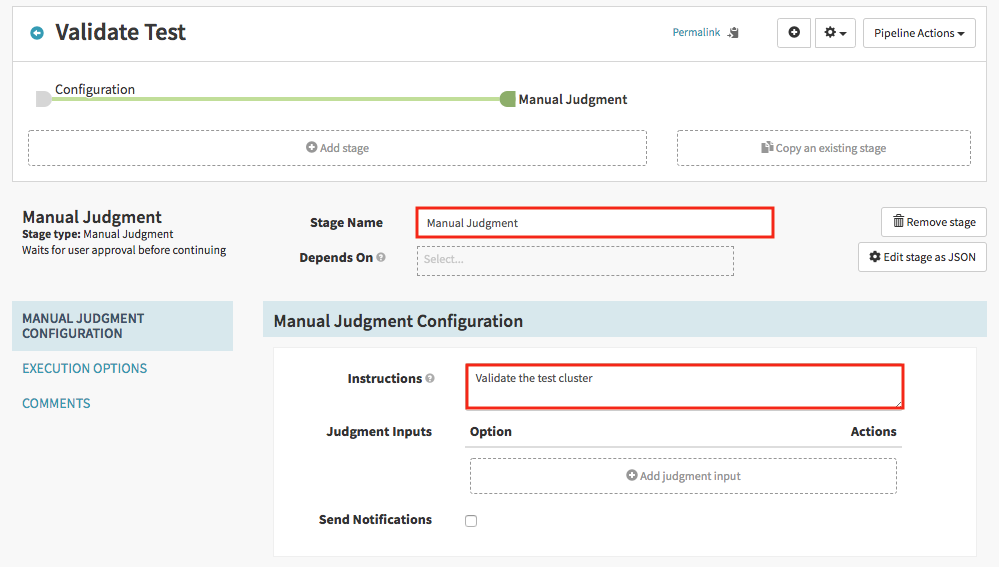
Set up Manual Judgment stage
We stop and wait for human confirmation to continue:
- Click Add stage.
- Select “Manual Judgment” in the Type drop down.
- Specify Instructions, for example “Validate the test cluster”.
- Click Save Changes.
Part 3: Promote to prod
The third pipeline, “Promote to Prod”, takes the image that was deployed in the test cluster, and deploys that image to the prod environment, thereby promoting it.
Create a load balancer for prod cluster
We create a load balancer for the prod cluster. Navigate to the LOAD BALANCERS tab and click the Create Load Balancer button. Everything is the same as the “codelab-test-lb” load balancer created before. The only exception is to use “prod” instead of “test” for Stack.
Set up pipeline: “Promote to Prod” pipeline
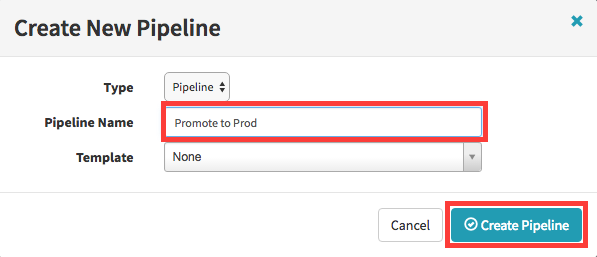
Create a new pipeline by navigating to the PIPELINES tab and clicking Configure, then Create New …
- Name the pipeline “Promote to Prod”.
- Click the Create Pipeline button.
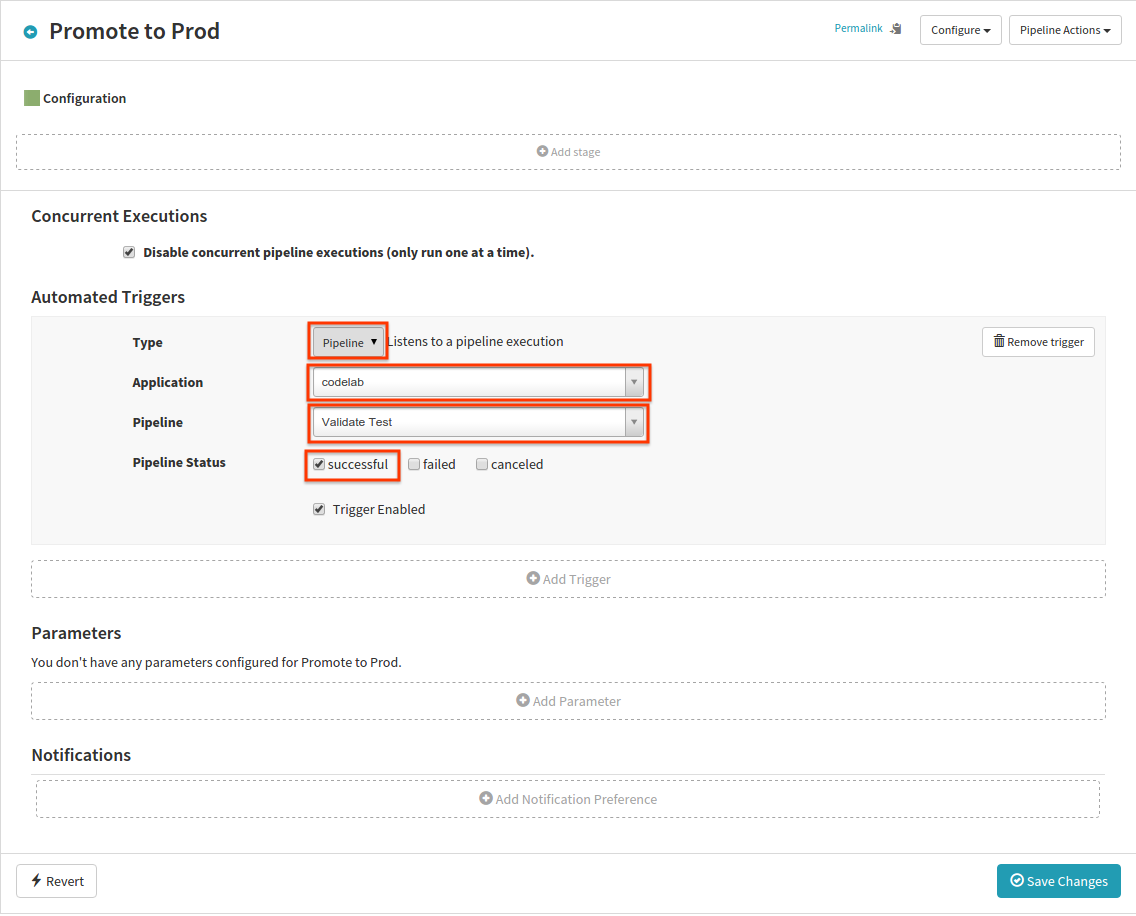
Configure the pipeline
We want this pipeline to kick off when the Validate Test pipeline completes.
- Click Add Trigger.
- Select “Pipeline” from the drop down menu for Type.
- Select your application.
- Select the “Validate Test” pipeline.
- Check “successful”.
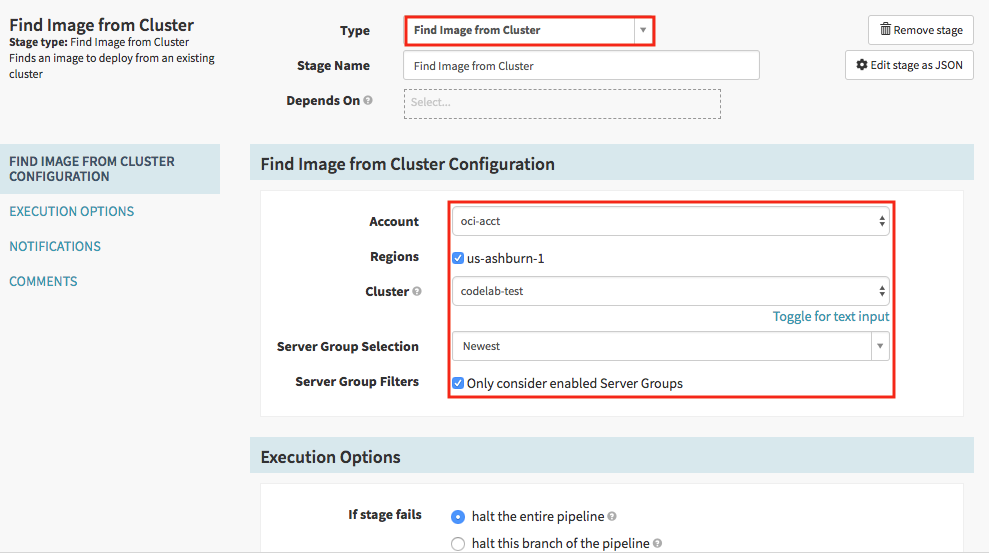
Set up Find Image stage
In this stage, we select the image that was deployed in the test cluster.
Click the Add stage button:
- Select “Find Image from Cluster” for the stage Type.
- Check the region of the test server group to pick the image from.
- Enter “codelab-test” for the Cluster.
- Choose “Newest” for the Server Group Selection.
Set up Deploy stage for prod cluster
We deploy the image that was picked, to the prod cluster.
- Click Add stage.
- Select “Deploy” in the Type drop down.
- In the Server group section, click Add server group.
- In the dialog that appears, click Continue without a template.
- In the Basic Settings section, everything is the same as the “codelab-test” server group created before. The only exception is to use “prod” instead of “test” for Stack.
- In the Load Balancers section, add the “codelab-prod-lb” Load Balancer and the Backend Set previously created.
- Click the Add button.
- Click Save Changes to save your prod pipeline.
Trying it out
Now let’s run through it all. Run a “Start Manual Execution” in Bake & Deploy to Test pipeline.
When the Bake & Deploy to Test pipeline completes, the Validate Test pipeline will trigger and wait for user input.
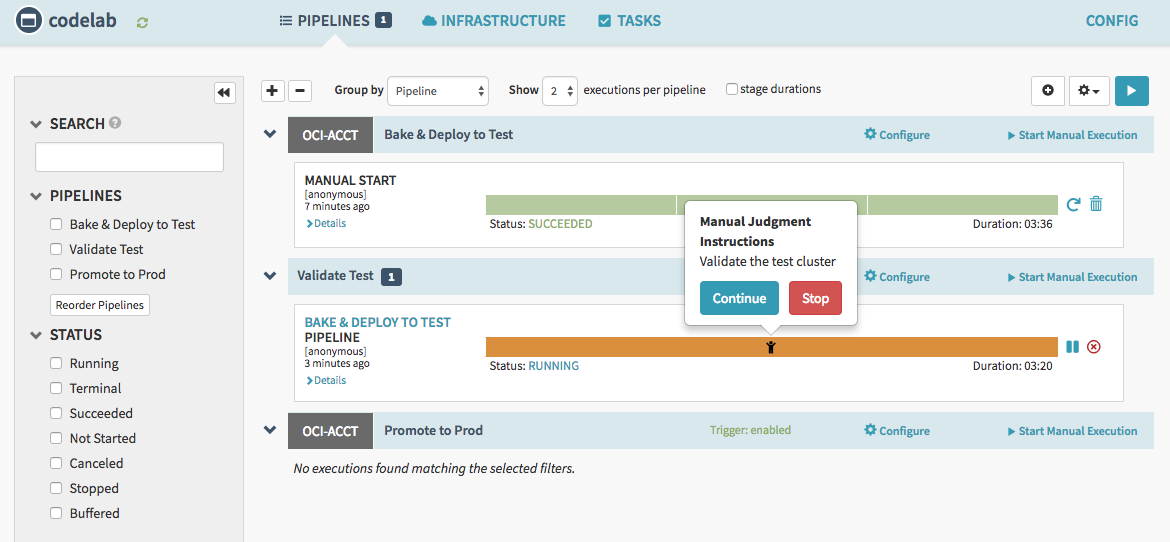
Click Continue. This will trigger the Promote to Prod pipeline:
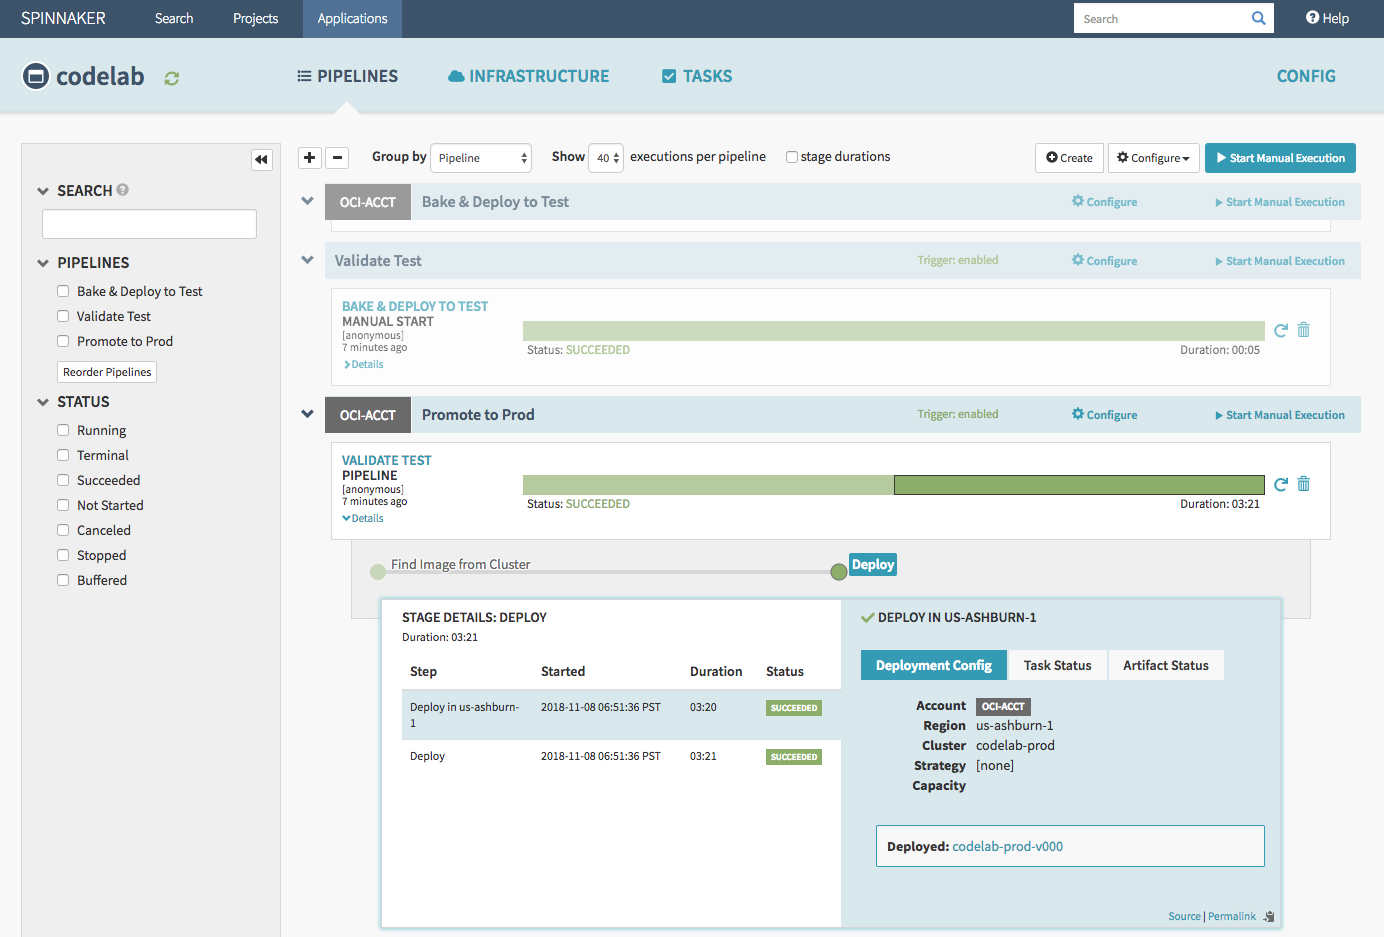
In the CLUSTERS tab, you can see that a server group has been deployed to the prod cluster.