X.509 Client Certificates
X.509 client certificates utilize public-key infrastructure (PKI) in order to authenticate clients. X.509 can be used simultaneously with one of the other authentication methods or by itself. Users commonly generate a certificate for their non-UI or script based clients, as this is generally easier than dynamically obtaining an OAuth Bearer token or SAML assertion.
Certificates
If you followed the
SSL
guide, you may already have generated a certificate
authority
(CA). Using this CA, we can generate a client certificate using openssl.
-
Create the client key. Keep this file safe!
openssl genrsa -des3 -out client.key 4096 -
Generate a certificate signing request for the server. Ensure the
Common Nameis set to a non-empty value.openssl req -new -key client.key -out client.csr -
Use the CA to sign the server’s request. If using an external CA, they will do this for you.
openssl x509 -req -days 365 -in client.csr -CA ca.crt -CAkey ca.key -CAcreateserial -out client.crt -
(Optional) Format the client certificate into browser importable form.
openssl pkcs12 -export -clcerts -in client.crt -inkey client.key -out client.p12
Encoding role information in x509 extensions
The certificates generated here only allow for the authentication of a user’s identity, not user roles. If using Fiat, these certificates are not sufficient for authorization.
roleOid is used for this example.
Client certificates with role information are parsed when roleOid is provided. This OID is configurable and is set in
your gate-local.yml file. The OID provided in the example below is
defined
here
.
Encoding with any other OID can be done by editing the openssl.conf.
Creating an x509 client certificate with user role information
-
Create a new Openssl config file
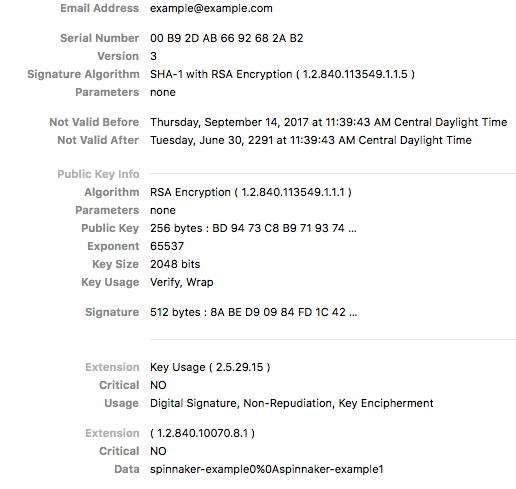
openssl.confwith the following contents:[ req ] #default_bits = 2048 #default_md = sha256 #default_keyfile = privkey.pem distinguished_name = req_distinguished_name attributes = req_attributes req_extensions = v3_req [ req_distinguished_name ] countryName = Country Name (2 letter code) countryName_min = 2 countryName_max = 2 stateOrProvinceName = State or Province Name (full name) localityName = Locality Name (eg, city) 0.organizationName = Organization Name (eg, company) organizationalUnitName = Organizational Unit Name (eg, section) commonName = Common Name (eg, fully qualified host name) commonName_max = 64 emailAddress = Email Address emailAddress_max = 64 [ req_attributes ] challengePassword = A challenge password challengePassword_min = 4 challengePassword_max = 20 [ v3_req ] keyUsage = nonRepudiation, digitalSignature, keyEncipherment 1.2.840.10070.8.1 = ASN1:UTF8String:spinnaker-example0\nspinnaker-example1The final line in this file
1.2.840.10070.8.1= ASN1:UTF8String:spinnaker-example0\nspinnaker-example1is what matters for creating a client certificate with user role information, as anything afterUTF8String:is encoded inside of the x509 certificate under the given OID.Where:
- 1.2.840.10070.8.1 - OID
- spinnaker-example0\nspinnaker-example1 - Spinnaker user groups
Note: If providing multiple groups, as in this example, separate them with a new line (
\n). The new line\nshows as a%0Ain the certificate. -
Generate a CSR for a new x509 certificate and the given
openssl.conf:openssl req -nodes -newkey rsa:2048 -keyout key.out -out client.csr \ -subj "/C=US/ST=CA/L=Oakland/O=Spinnaker/CN=example@example.com" -config openssl.conf -
Create extention config file
extension.confto apply roles when signing the server requests.[ v3_req ] keyUsage = nonRepudiation, digitalSignature, keyEncipherment 1.2.840.10070.8.1 = ASN1:UTF8String:spinnaker-example0\nspinnaker-example1The same rule for the roles definition applied to this section, as it’s explained in the first step of this section.
-
Use the CA to sign the server’s request. (If using an external CA, they do this for you.)
openssl x509 -req -days 365 -in client.csr -CA ca.crt -CAkey ca.key -CAcreateserial -out client.crt -extensions v3_req -extfile ./extension.conf
Issuing the client certificate using AWS Certificate Manager
If you are using AWS Certificate Manager’s Private Certificate Authority to issue client certificates containing role information, you will need to provide a certificate template that allows passthrough of these extensions from the Certificate Signing Request. BlankEndEntityCertificate_CSRPassthrough/V1 is one such template. To issue the certificate using ACM Private CA, first generate the CSR following steps 1 and 2 above. Then, run the following to issue the certificate:
aws acm-pca issue-certificate --csr fileb://client.csr \
    --template-arn arn:aws:acm-pca:::template/BlankEndEntityCertificate_CSRPassthrough/V1 \
    --certificate-authority-arn [private CA ARN] \
    --signing-algorithm SHA256WITHRSA \
    --validity Value=365,Type="DAYS"
You can then fetch the issued client certificate and output it into a file with:
aws acm-pca get-certificate --certificate-authority-arn [private CA ARN] \
    --certificate-arn [ARN of previously generated certificate] \
    --query Certificate \
    --output text > client.crt
Configure Spinnaker
Add the following to your gate-local.yml
x509:
  enabled: true
  #regix: if you want to use the "Email Address" field from the certificate, the regex would be: EMAILADDRESS=(.*?)(?:,|$)
  subject-principal-regex:  <Optional > regex
  role-oid: 1.2.840.10070.8.1
  required-roles:
  - admin
  - some-random-group
  ## HIGHLY recommend setting this as it reduces the fiat login operations by only logging in every 5 minutes
  ## instead of on EVERY x509 call
  loginDebounce:
     enabled: true
     ## Defaults to 5 minutes
     debounceWindowSeconds: 300

## Required if you want SSL as a required option
server:
  ssl:
    enabled: true

## This sets up a dedicated API port for MTLS that NEEDS x509 auth.  Used with an NLB
## or LB service to expose gate directly and REQUIRE x509 auth.
## this requires ALSO that ssl be enabled.  WITHOUT this, the user may be prompted
## for a (optional) certificate to login with instead of any other login configuration. The x509 cert
## in those cases is a "WANT" which is what would prompt the user for a cert.
default:
  apiPort: 8085
API port
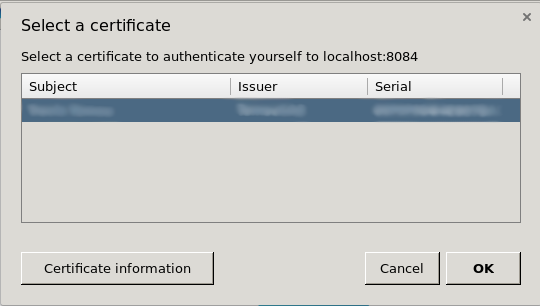
By enabling X.509 on the main 8084 port, it causes the browser to ask the user to present their client certificate. Many end-users can get confused or annoyed by this message, so it is preferable to move this off of the main port.
You can move the client certificate-enabled port by setting default.apiPort value to something other than 8084. This
enables an additional port configuration that
is
hardcoded
to need a valid X.509 certificate before allowing the request to proceed.
Workflow
Unlike the other authentication methods, X.509 does not have any redirects or fancy control passing between Deck, Gate, and a third-party identity provider. Connections are either established with a valid certificate or they’re not.
Next steps
Now that you’ve authenticated the user, proceed to setting up their authorization .
Troubleshooting
-
Review the general authentication guide .
-
Review the authentication reference guide .
-
Use an incognito window .