Manage Traffic Using Kubernetes Manifests
This guide shows the basics of how to manage traffic during deployments using the Kubernetes provider . This includes automatically attaching a Service to a workload during deployment, and defining pipelines to perform blue/green deployments.
Attach a Service to a Workload
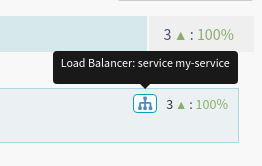
Kubernetes manages the relationship between Pods and Services using Labels and Selectors . Spinnaker acknowledges this relationship with the blue load balancer icon on a workload as shown here:
You can also tell Spinnaker which Service objects a workload should be associated with for its lifetime using the <code>traffic.spinnaker.io/load-balancers</code> annotation. To try this out, do the following:
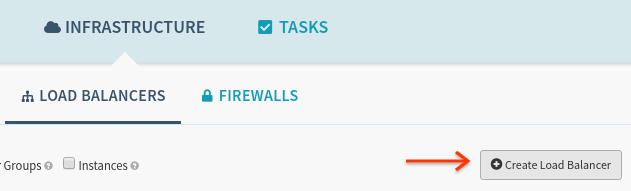
Deploy the following Service using the “Create Load Balancer” button:
kind: Service
apiVersion: v1
metadata:
  name: my-service
spec:
  selector:
    app: myapp
  ports:
  - protocol: TCP
    port: 80
And then deploy the following Replica Set using the “Create Server Group” button:
apiVersion: apps/v1
kind: ReplicaSet
metadata:
  name: frontend
  labels:
    tier: frontend
  annotations:
    traffic.spinnaker.io/load-balancers: '["service my-service"]' # <-- annotation
spec:
  replicas: 3
  selector:
    matchLabels:
      tier: frontend
  template:
    metadata:
      labels:
        tier: frontend
    spec:
      containers:
      - name: frontend
        image: us-docker.pkg.dev/google-samples/containers/gke/gb-frontend:v5
Notice that the selector app: myapp appearing on the Service did not have to
be specified on the Replica Set’s PodSpec; Spinnaker adds this automatically.
Caveats
There are a few caveats when using this annotation:
The list of Services supplied in this annotation does not need to specify all Services a workload may be attached to. If your workload’s labels already attach it Service A, and you list Service B in the annotation, both Service A and B will route requests to this workload.
You can think of this annotation as only supplying the list of additional services to attach to, not as an exhaustive list.
If you use this annotation, Spinnaker will edit the workload’s labels, either in the
metadata.labels, orspec.template.metadata.labelssections. As a result, if the labels added to or removed from thespec.template.metadata.labelsconflict with the label requirements in the object’sspec.selector.match[Labels/Expressions]section, the deployment will fail.This annotation tells Spinnaker which service or services to make traffic changes to. For example, if you specify service “A” in the annotation of a manifest and subsequently disable it, only traffic from service “A” will be disabled, even if you receive traffic from both services “A” and “B”.
Route Traffic During a Deployment (Blue/Green)
Spinnaker supports dynamically enabling and disabling traffic to a particular Kubernetes resource. This can be used in a pipeline to configure Blue/Green rollouts, as shown below.
You Must Use Replica Sets
Spinnaker manages traffic using labels, and has to edit them on running resources. Given that edits to Deployment objects trigger rollouts, the only way to carry out Blue/Green deployments without editing the Service object directly is using Replica Sets, which are safely edited in-place by Spinnaker. To be clear, these label edits are abstracted into higher-level “Enable” and “Disable” stages to manage traffic, and are described below.
In turn, when a user submits a change to a Replica Set (either ad-hoc, or using
a pipeline) to update an image, configuration, etc… Spinnaker makes sure to
deploy a new Replica Set with a unique -vNNN suffix. This is in contrast with
the edits to labels Spinnaker performs in place to manage traffic. The
interaction between edits to Replica Sets made by users and those made by
Spinnaker will be made clear in the below sample pipeline walkthrough.
Sample Blue/Green Pipeline
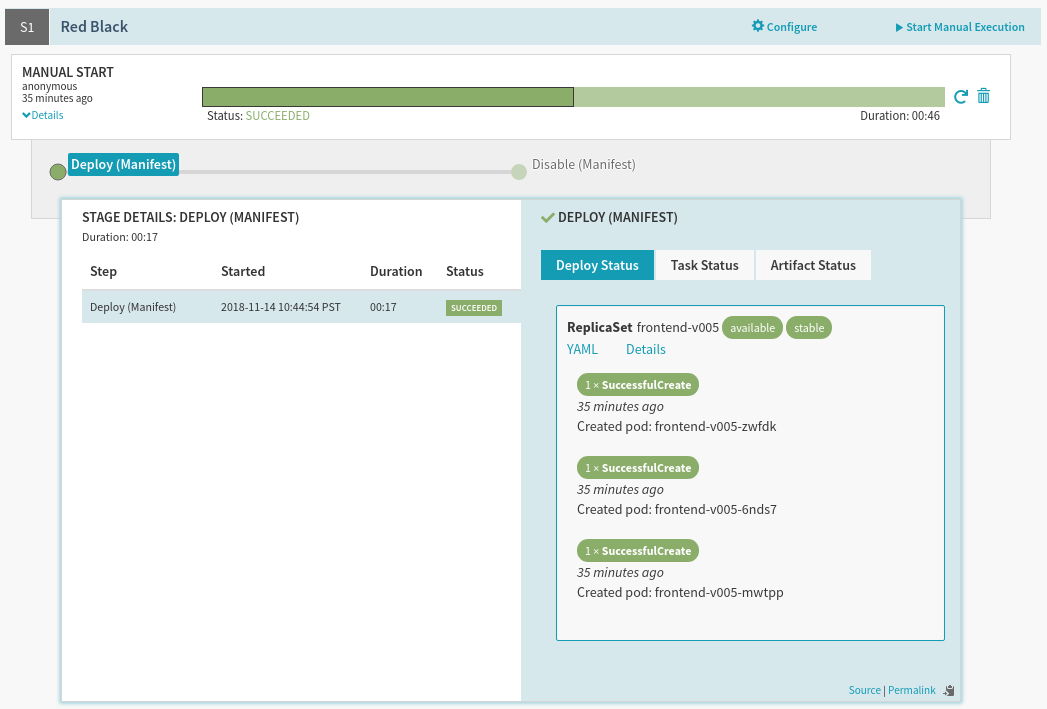
We will create a pipeline with two stages: Deploy, and Disable. The goal is to first deploy a new version of your application, have the stage wait until all Pods’ health checks pass, and then disable the prior version of your application. When completed, an execution of this pipeline will look like:
Prerequisites
You need the following:
Spinnaker with the Kubernetes provider configured
One service called
my-servicerunning in the cluster and namespace your pipeline will deploy to. For the purpose of this example we will assume it has the following specification:
kind: Service
apiVersion: v1
metadata:
  name: my-service
spec:
  selector:
    frontedBy: my-service # will be applied to backends by Spinnaker
  ports:
  - protocol: TCP
    port: 80
Configure the Deploy Stage
Create a pipeline and add a “Deploy (Manifest)” stage, and configure the following (text) manifest to deploy:
apiVersion: apps/v1
kind: ReplicaSet
metadata:
  annotations:
    strategy.spinnaker.io/max-version-history: '2'
    traffic.spinnaker.io/load-balancers: '["service my-service"]'
  labels:
    app: myapp
  name: myapp-frontend
spec:
  replicas: 3
  selector:
    matchLabels:
      app: myapp
  template:
    metadata:
      labels:
        app: myapp
    spec:
      containers:
        - image: 'us-docker.pkg.dev/google-samples/containers/gke/gb-frontend:v5'
          name: frontend
The stage configuration should look like this:

There are two important annotations to pay attention to here:
traffic.spinnaker.io/load-balancersThis annotation is explained above , and is used here to both indicate to Spinnaker which Service to attach during deployment time, and which Service to detach during the disable stage.
strategy.spinnaker.io/max-version-historyThis annotation is explained in the reference section , and is used to ensure that no more than a certain number of versions of this Replica Set are running for garbage collection purposes.
Configure the Disable Stage
Add a “Disable (Manifest)” stage after the Deploy stage, and set the following values:
| Field | Value |
|---|---|
| Namespace | default |
| Kind | replicaSet |
| Selector | Choose a target dynamically |
| Cluster | replicaSet frontend |
| Target | Second Newest |
The stage configuration should look like this:
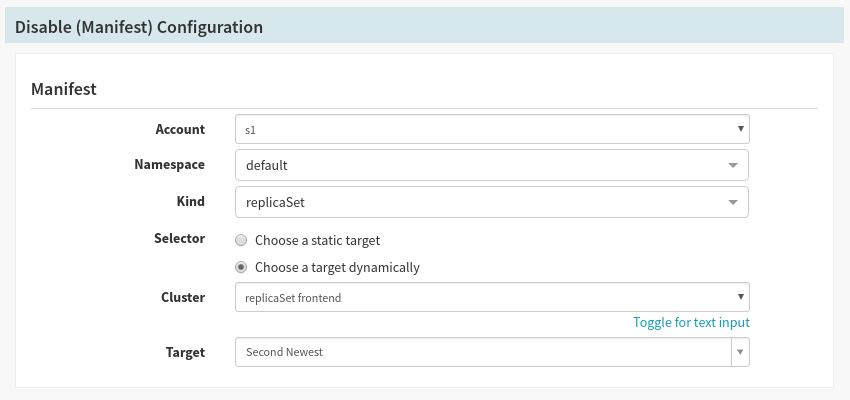
There are two important fields here:
Selector:
Choose a target dynamicallyWith every run of the pipeline a new Replica Set is created, and therefore we cannot know ahead of time which version of the Replica Set to disable. This field allows us to pick a Replica Set based on the Target value.
Target:
Second NewestBy picking the
Second Newesttarget, we select the second newest Replica Set when this stage starts, or in other words, what was just previously serving traffic.
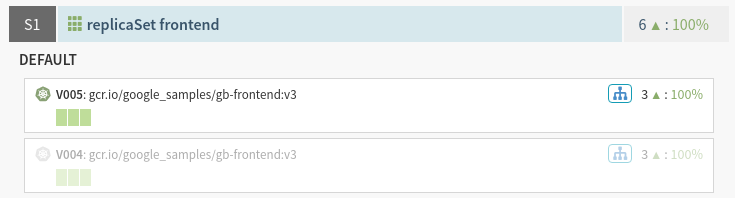
Run the Pipeline
After a few runs of the pipeline, you should see the following in your cluster screen: