Kubernetes Source to Prod
Overview
In this codelab you will configure:
A GitHub repo containing both your code to be deployed, and the Kubernetes manifests that will run your code.
A set of Spinnaker pipelines to deploy changes to your code, manifests, and application configuration from source to production.
0: Prerequisites
Before we begin, we need to do the following:
You need some source code and manifests to deploy stored in GitHub. We have a repository you can fork to follow along easily.
The source code in GitHub will be configured to build automatically on tag pushes.
Two Kubernetes clusters, one for staging and one for prod.
A running Spinnaker instance, able to deploy to Kubernetes and download artifacts from GitHub.
GitHub & DockerHub webhooks pointing at Spinnaker, alerting when commits and docker images are pushed respectively.
Configure GitHub
The code we’ll be deploying is stored here . Feel free to fork this into your own account, and make changes/deploy from there.
☞ Note: The manifests in this repository point to a specific docker image . If you want to trigger off of changes made to your own docker image, change the image name to reflect that.
Configure DockerHub
If you’re completely unfamiliar with Docker, start here .
This guide covers how to get your GitHub repository (from above) to trigger Docker builds in DockerHub. We’ll be relying on this to automatically push code changes into your staging environment. In the end your repository should look something like this .
☞ Note: Before continuing, run the created trigger at least once to both push a
:latestimage, as well as validate that your configuration is working. This can be done by pushing a commit to your GitHub repo to trigger a Docker build.
Configure Kubernetes
Create two clusters following one of the guides
here
. Once you are
finished, make sure that you have an up-to-date ~/.kube/config
file that has entries for both clusters you want to deploy to. Details on
kubeconfig files
here
.
Configure Spinnaker
We will be deploying Spinnaker to one of your Kubernetes clusters. To do so, start by installing halyard .
Choose a storage service
Pick a storage service
here
, and run the required
hal commands.
Add your Kubernetes accounts
You will need to configure two Kubernetes accounts. See the Kubernetes contexts created in the prior step using:
kubectl config get-contexts
The output should look like (although the names may vary):
CURRENT   NAME                       CLUSTER        AUTHINFO       NAMESPACE
*         staging-demo-us-central1   staging-demo   staging-demo
          prod-demo-us-central1      prod-demo      prod-demo
Record the names of the contexts as $STAGING_CONTEXT and $PROD_CONTEXT.
Now we will register both contexts with Spinnaker.
hal config provider kubernetes account add prod-demo \
  --context $PROD_CONTEXT

hal config provider kubernetes account add staging-demo \
  --context $STAGING_CONTEXT
Configure GitHub artifact credentials
Make sure to add GitHub as an artifact account . This will allow us to fetch the manifests later.
Configure Docker Registry account
Make sure to add a Docker Registry provider account . This will allow us to configure a Spinnaker pipeline to trigger on a Docker image update.
Deploy Spinnaker
Pick a version & specify that you want to deploy Spinnaker inside the staging cluster:
hal config version edit --version $(hal version latest -q)

hal config deploy edit --type distributed --account-name staging-demo
And finally, deploy Spinnaker.
hal deploy apply
Configure webhooks
Now that Spinnaker is running, you need to point both Docker and GitHub webhooks at Spinnaker to send events when Docker images and manifest changes happen respectively.
Give Spinnaker an external endpoint
:warning: This is for the codelab only! Do not do this in production. We’re giving an unsecured Spinnaker an external endpoint to easily do this codelab, and are taking limited measures to ensure only GitHub and Docker can trigger pipelines. Tear down Spinnaker once you’re done with this codelab, or remove any firewall changes to your Kubernetes cluster.
First, edit the Gate service to bind a node port. This means every node in your Kubernetes cluster will forward traffic from that node port to your Spinnaker gate service. Your nodes should not be accepting requests from external IPs by default, so making this change doesn’t immediately open Spinnaker to public access.
To do this, first run (this will open the service manifest in your text editor):
kubectl edit svc spin-gate -n spinnaker --context $STAGING_CONTEXT
and then change the field
type: ClusterIP
to
type: NodePort
Next, get the port that spin-gate has bound to. You can check this with
kubectl get svc spin-gate -n spinnaker --context $STAGING_CONTEXT
In my case, I see the port is 31355, which I record into $NODE_PORT (8084
is the port gate is listening on inside the cluster):
NAME        TYPE       CLUSTER-IP    EXTERNAL-IP   PORT(S)          AGE
spin-gate   NodePort   10.7.255.85   <none>        8084:31355/TCP   32m
Now pick any node in the cluster and record its IP as $NODE_IP. In order to
get the IP of a node, first get the nodes in the cluster and record one of the
names as $NODE_NAME:
kubectl get nodes
Next run the following command to get information about the node and record the
ExternalIP as $NODE_IP:
kubectl describe node $NODE_NAME
For the purposes of this codelab, we’ll be sending external webhooks to
$NODE_PORT on that node. In order for these webhooks to work, for this codelab
only, open your firewall on that node to all addresses for TCP connections on
$NODE_PORT. If you were running Spinnaker in production with
authentication
,
only webhooks would be allowed, which you can reject by header or payload. See
the webhook guide for more details
.
Allow Docker to post build events
These will be used to trigger pipelines based on new Docker images being
published. Follow the steps shown
here
for your repository. The
endpoint you configure must be
http://${NODE_IP}:${NODE_PORT}/webhooks/webhook/dockerhub.
Allow GitHub to post push events
Follow the steps shown
here
, where
ENDPOINT=http://${NODE_IP}:${NODE_PORT}. Keep track of what you pick as the
$SECRET!
1: Create a Spinnaker application
When you first open Spinnaker (if you’ve followed the above
prerequisites
) it’ll be running on localhost:9000) you’ll
be greeted with the following Applications screen.
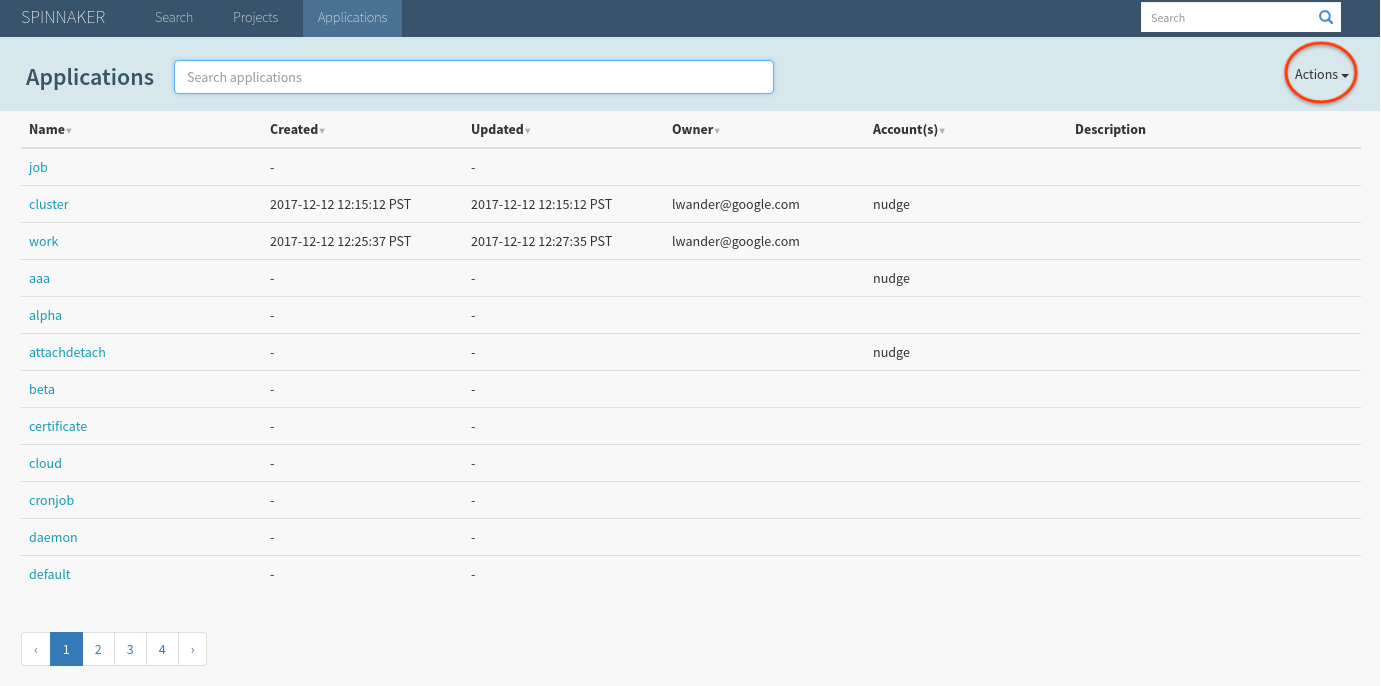
By default, Spinnaker indexes your entire cluster, which explains why the screen is prepopulated with unrelated infrastructure. This can be changed by omiting namespaces as shown here.
Select Actions > Create Application, and fill out the form as shown (the owner email will of course be different):
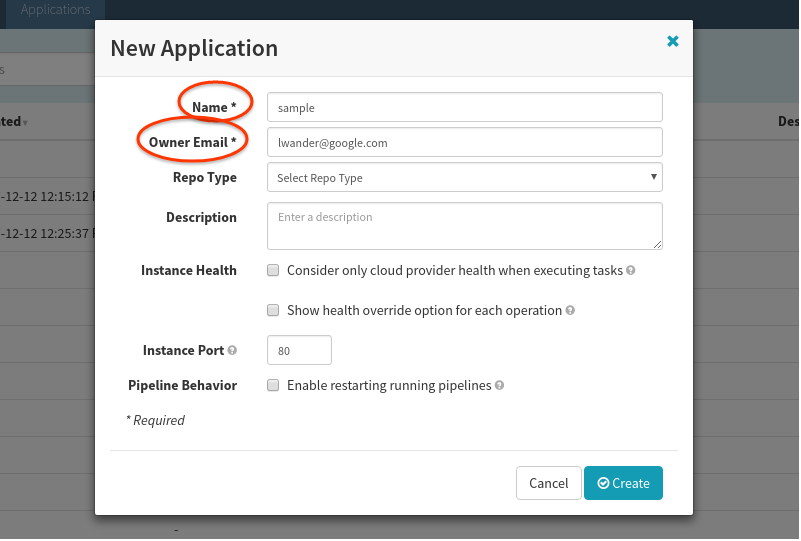
After hitting Create, you should be brought to an empty Clusters tab:
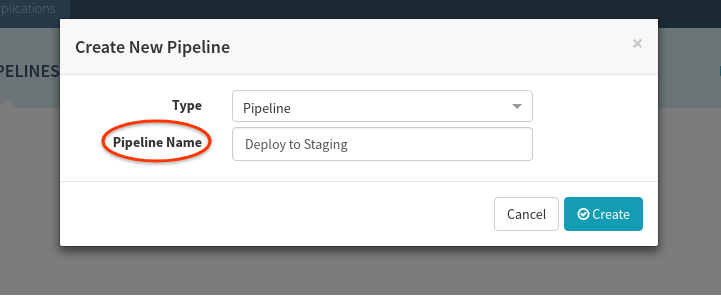
2: Create a “Deploy to Staging” pipeline
Let’s deploy the manifests and code in our staging cluster by setting up automated pipelines to do so. Start by navigating to Pipelines > Configure a new Pipeline. Name the pipeline as shown and hit create:
At this point we want to add the manifest from GitHub as an expected artifact in this pipeline, meaning we expect each time that this pipeline executes, either a GitHub event will supply us with a new manifest to deploy, or we will use some default or prior manifest.
Select Add Trigger:

Supply the following configuration values:
| Field | Value |
|---|---|
| Type | “Git” |
| Repo Type | “GitHub” |
| Organization or User | The user you forked the above code into. |
| Project | “spin-kub-v2-demo” |
| Secret | The $SECRET chosen
above
. |
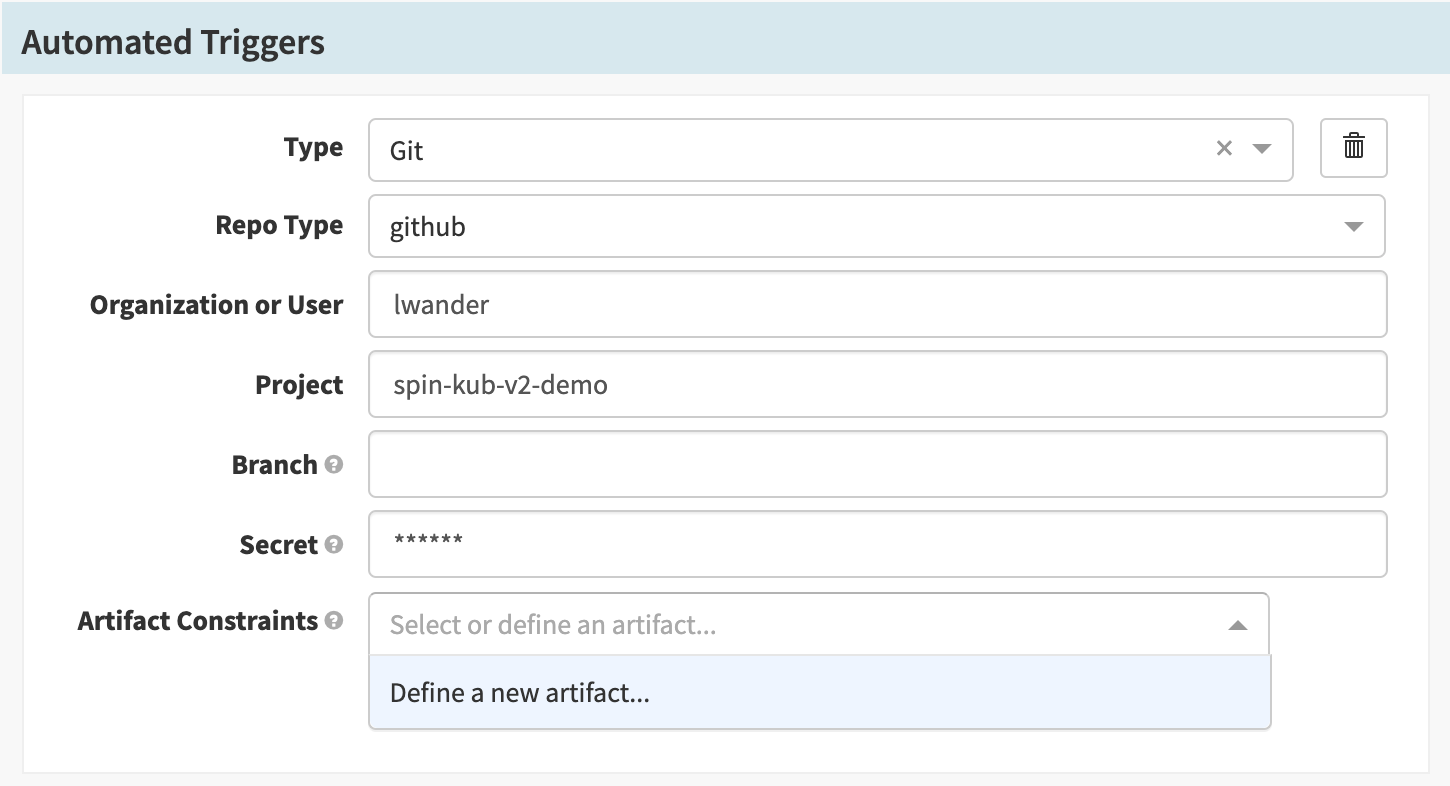
We supply the expected artifact to be sure that we only trigger the pipeline when that file changes.
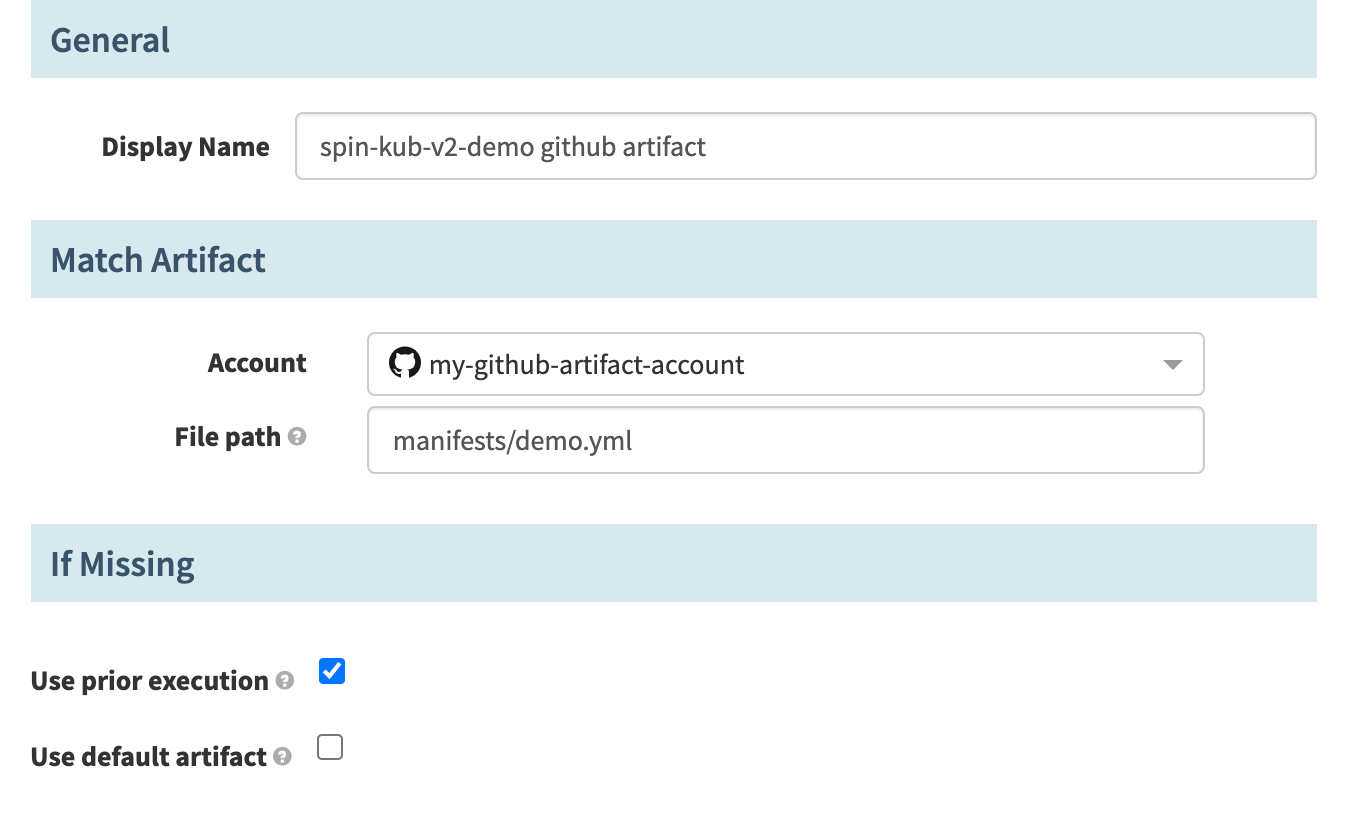
Next we will define a new artifact in the Artifact Constraints field.
For Account, select the GitHub artifact account created earlier and then set
the File Path to manifests/demo.yml. Lastly, select
Use Prior Execution, to tell Spinnaker that if no matching artifact is
found, use the last execution’s value. (This will be useful later).
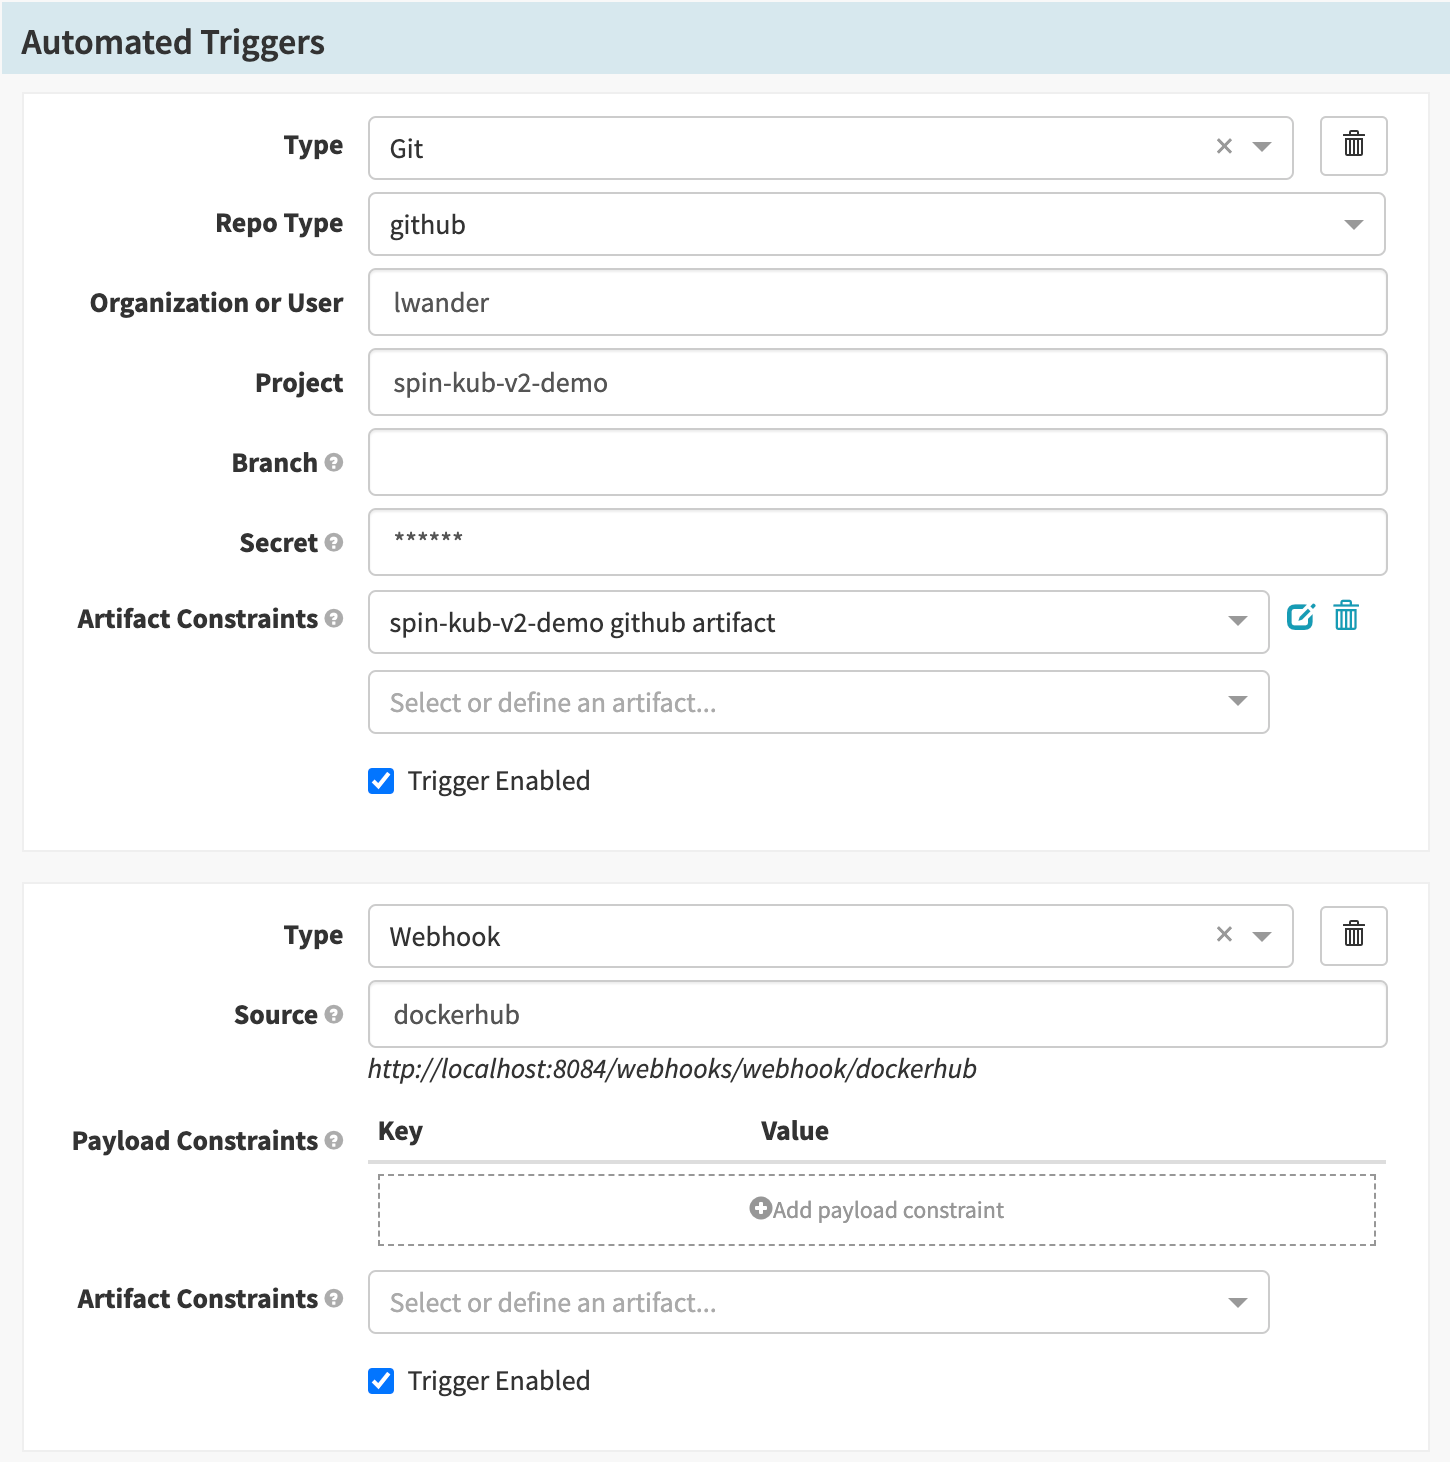
Supply the following configuration values:
| Field | Value |
|---|---|
| Type | “Git” |
| Repo Type | “GitHub” |
| Organization or User | The user you forked the above code into. |
| Project | “spin-kub-v2-demo” |
| Secret | The $SECRET chosen
above
. |
| Expected Artifacts | Must reference the manifests/demo.yml artifact. |
We supply the expected artifact to be sure that we only trigger the pipeline when that file changes.
Next we will define a new artifact in the Artifact Constraints field.
For Account, select the GitHub artifact account created earlier and then set
the File Path to manifests/demo.yml. Lastly, select
Use Prior Execution, to tell Spinnaker that if no matching artifact is
found, use the last execution’s value. (This will be useful later).
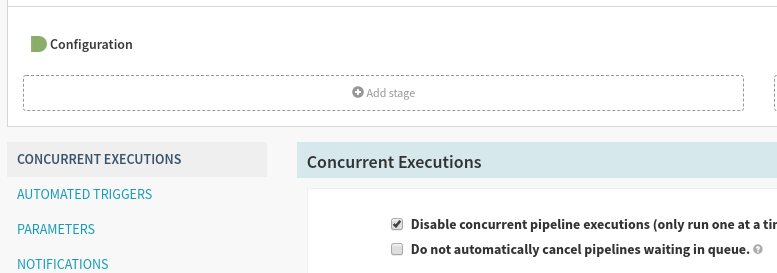
With the trigger configuration in place, let’s configure a “Deploy manifest” stage.
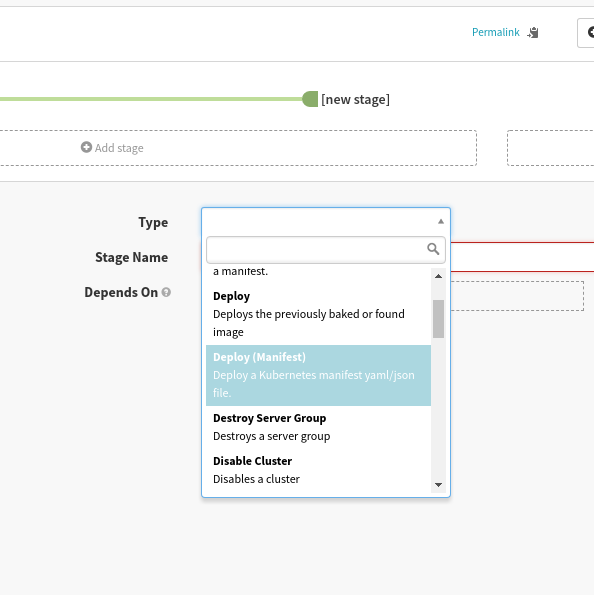
First add a stage:
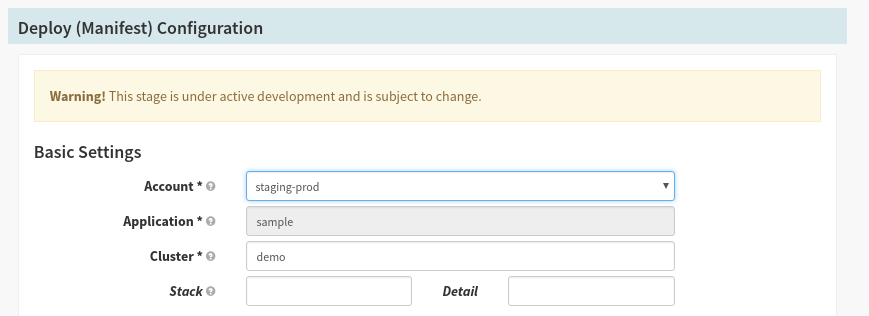
Then select the “Deploy (Manifest)” stage type:
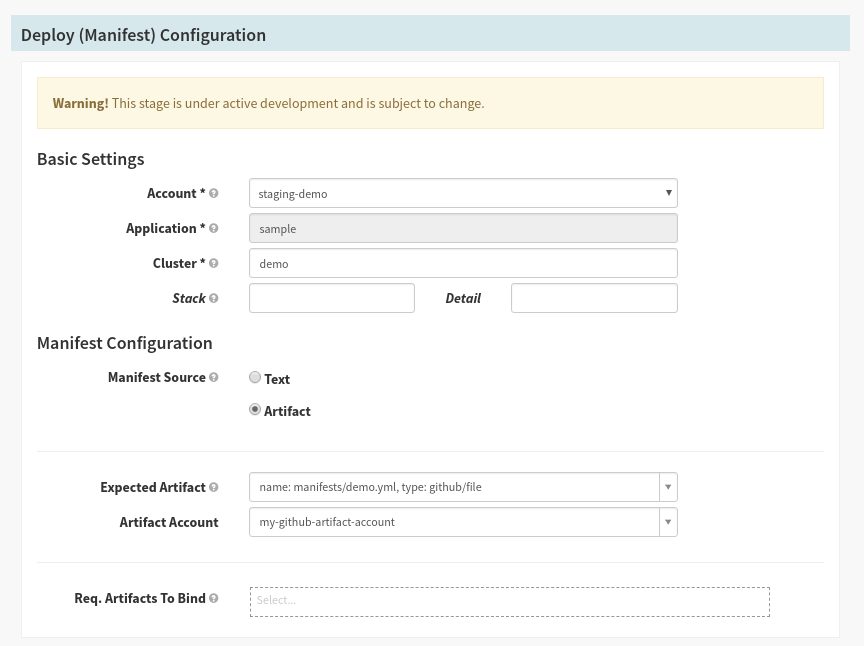
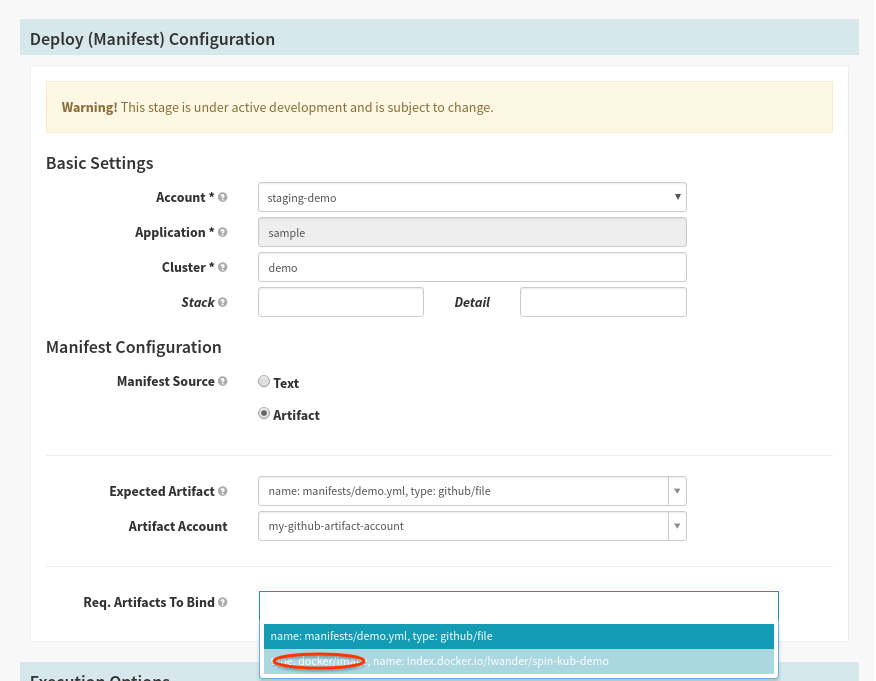
Finally, configure the stage with the following values:
| Field | Value |
|---|---|
| Account | “staging-demo” |
| Cluster | “demo” |
| Manifest Source | “Artifact” |
| Expected Artifact | Must reference the manifests/demo.yml artifact. |
| Artifact Account | The GitHub artifact account configured above. |
Save the pipeline.
3. Deploy manifests to staging
Trigger the pipeline by pushing a commit to the manifests/demo.yml file in
your repository. The pipeline should start in a few seconds. When it completes,
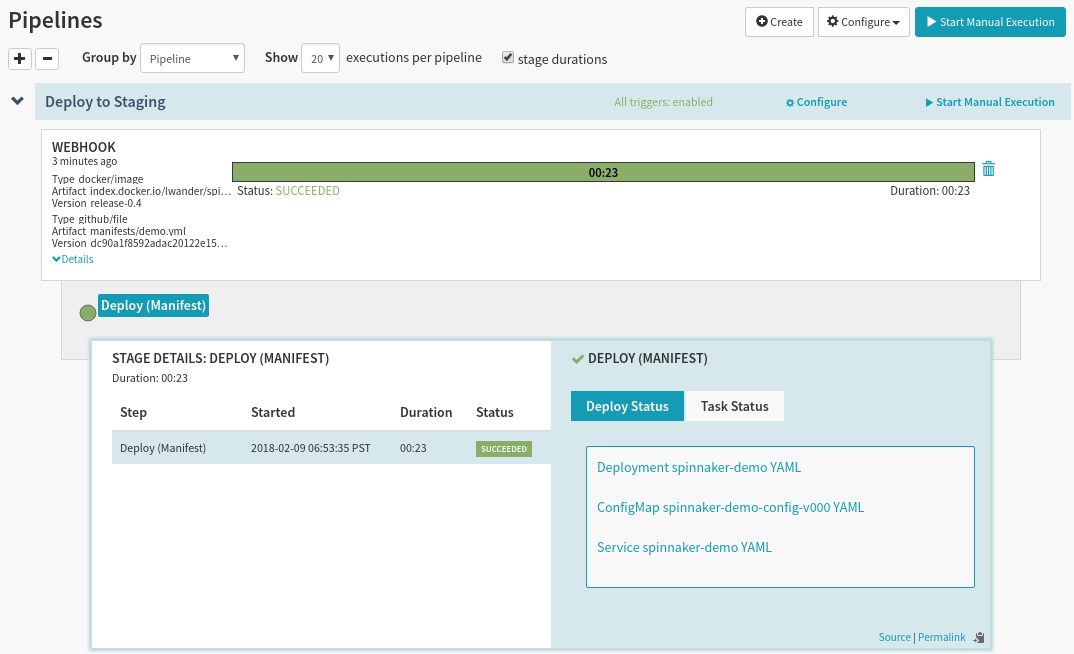
click Details to see information about the execution:
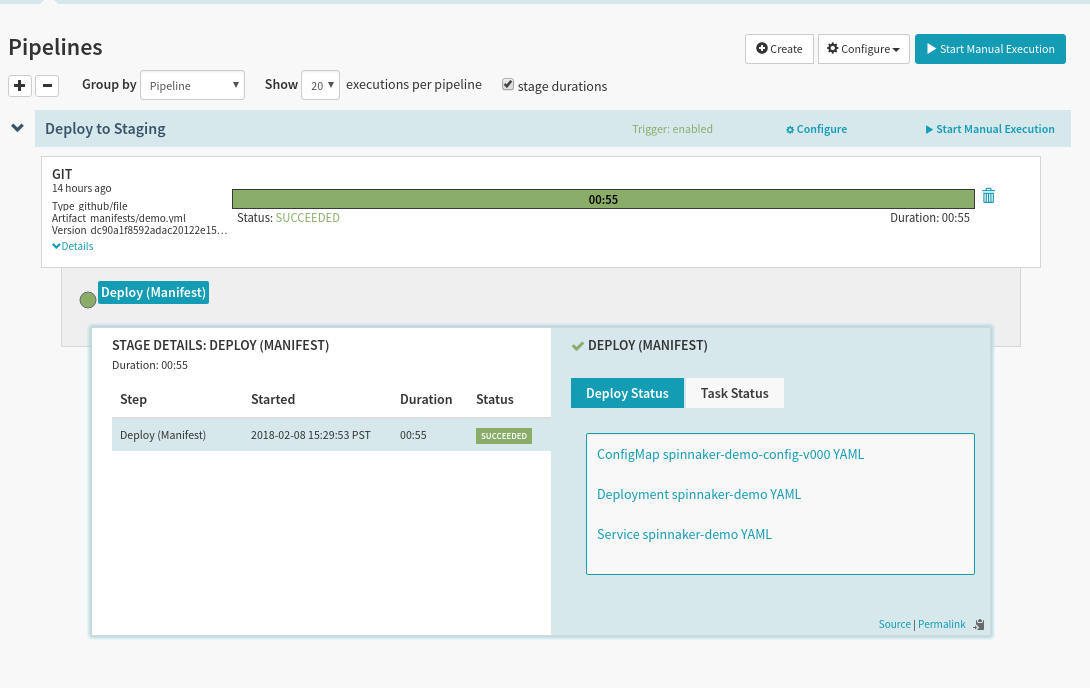
There are a couple of things to notice here:
In the top left we get details about the commit that triggered this pipeline.
In the Deploy Status we can see what the YAML was that Spinnaker deployed.
We see that the ConfigMap that we deployed was assigned version
-v000. This was done to ensure that you can statically reference this ConfigMap, insulating any Pod that references it from accidental changes.
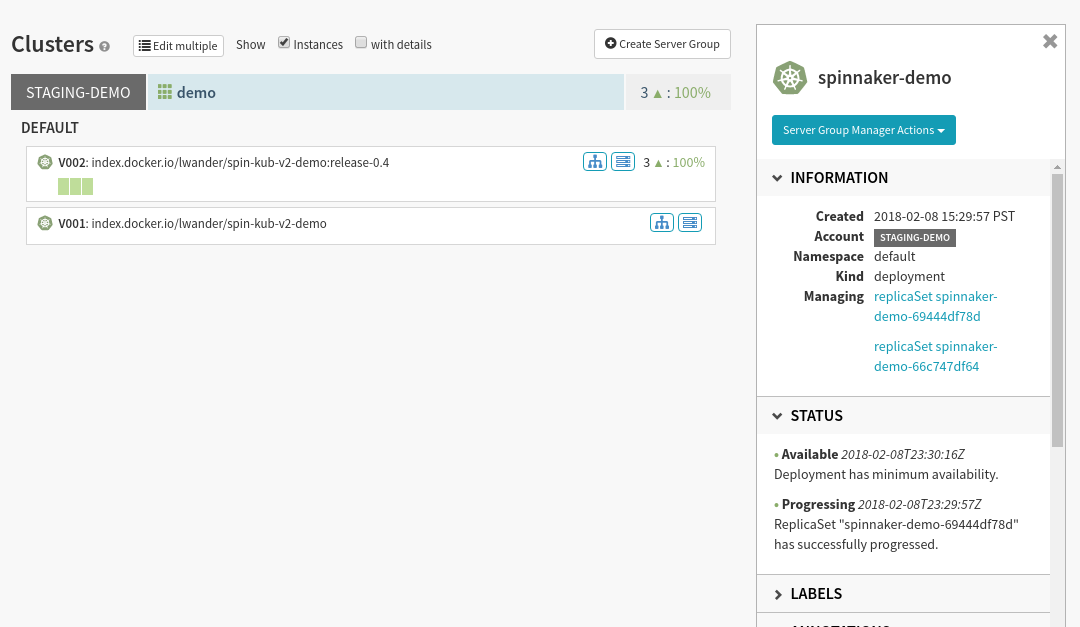
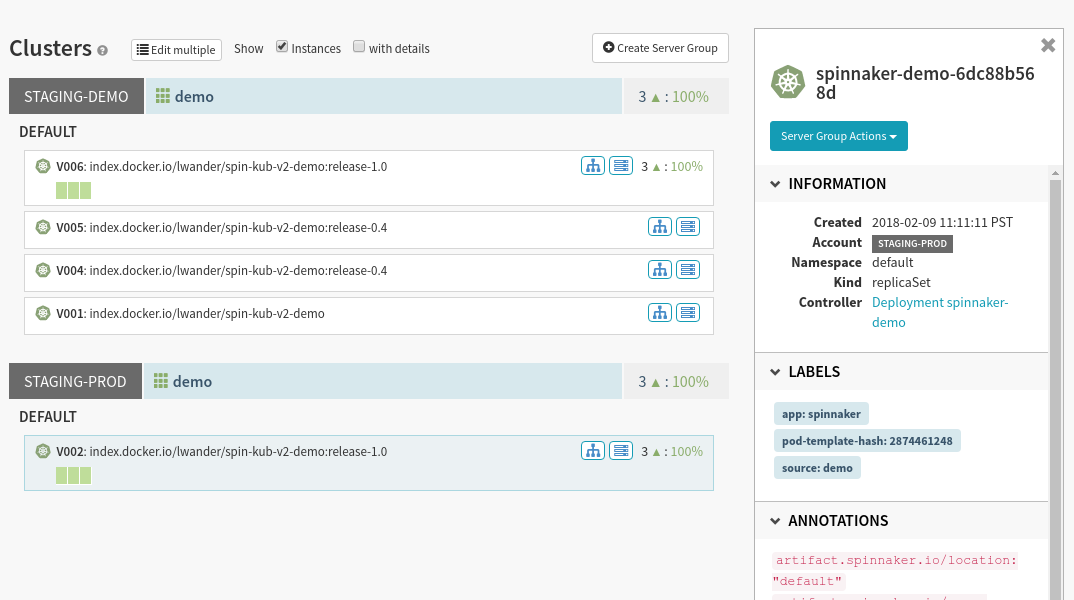
Next, let’s see what this infrastructure looks like in Spinnaker. Navigate to the Clusters tab, and select the blue Deployment object attached to the Replica Set shown below:

We can see in the Artifact section on the right that we have bound our Docker image as well as our ConfigMap.
Let’s see what our application is serving. Run:
kubectl proxy --context $STAGING_CONTEXT
And then visit the sample service in your browser. Let’s make a change to this service, and configure Spinnaker to listen to Docker builds.
4. Configure Docker triggers
Important: We need to configure DockerHub to build on Tag events only, if we build on every commit, this particular setup will trigger both when manifests & code are changed at once. This can be configured under your Docker repository’s Build Settings tab as shown here:
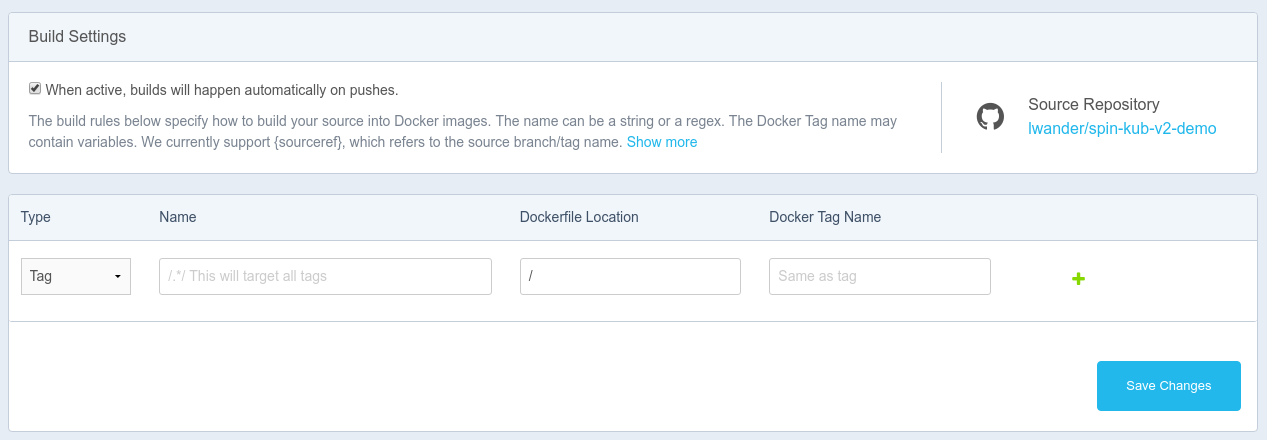
This build rule will create a matching image tag each time you push a git tag.
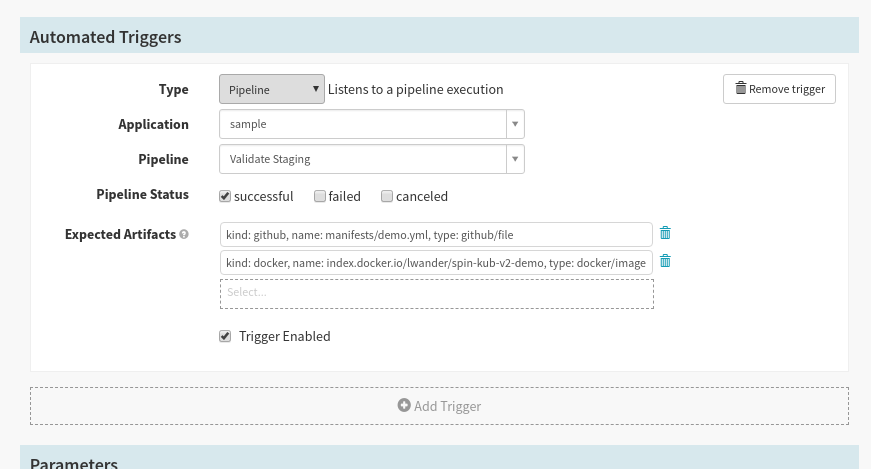
Next, in Spinnaker, let’s edit our Pipeline to allow Docker images to trigger a deployment:
First, add another automated trigger next to our Git trigger. Select Type Webhook and input dockerhub for the Source.
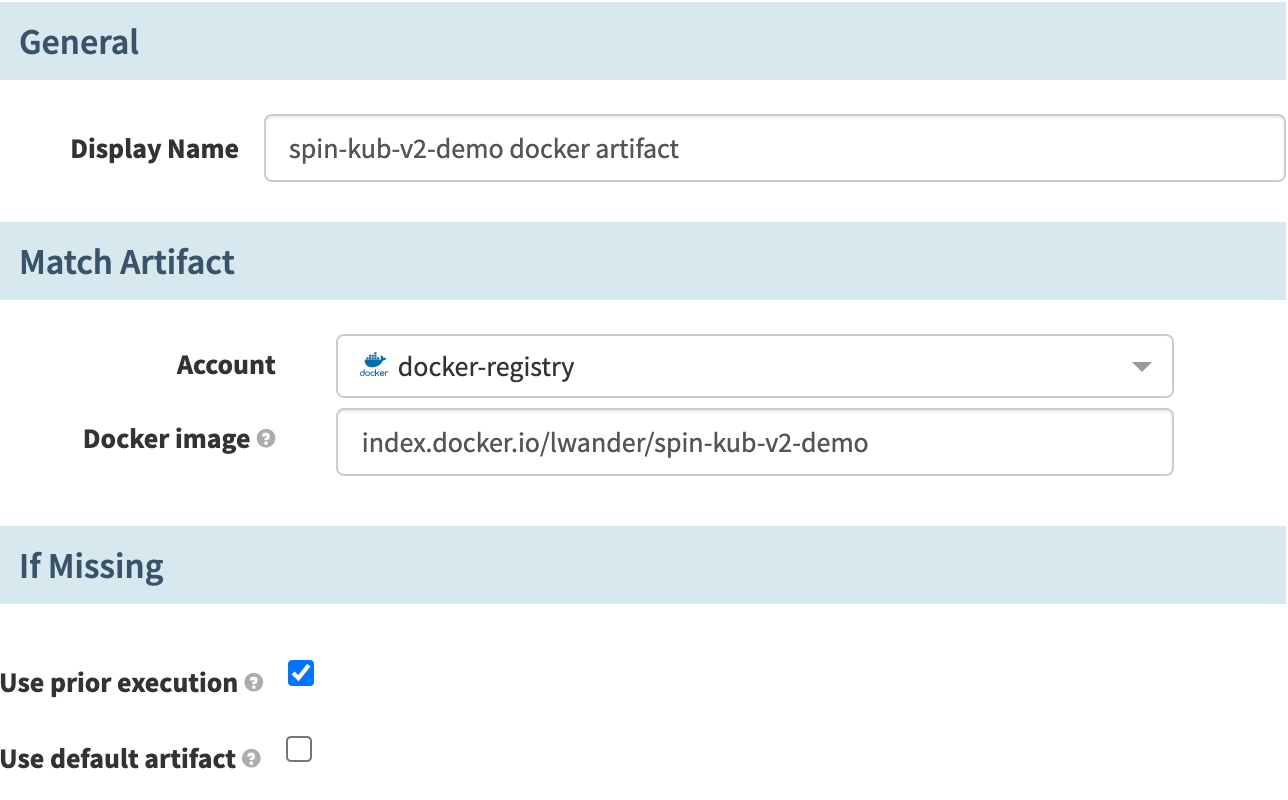
Next, define a new artifact in the Artifact Constraints field. For Account, select the Docker Registry account created earlier and input your docker image under Docker image.
Finally, back in the “Deploy (Manifest)” stage configuration, select the Docker artifact to bind in this deployment:
Save the pipeline.
5. Deploy Docker to staging
You can push a tag to your repository by running:
git tag release-1.0
git push origin release-1.0
Notice that this time the trigger was a Webhook trigger, and we see details
about both types of artifacts that we deployed. Since the GitHub file artifact
was configured to Use Prior Execution, we redeployed the same manifests as
last time, but with a new Docker image. Because of this, we did not deploy a
new ConfigMap, and kept the version at -v000.
This deployment is a lot faster than the last one, since the docker image was already pulled into our cluster, meaning it took less time for the images to start running and appear as “Healthy”.
Back on the Clusters tab we can see the deployment has rolled out our new image:
6. Configure a validation pipeline
For the sake of a simple codelab, we will control which deployments make it to production by adding a “Manual Judgement” pipeline. In practice, this can be replaced by a canary, integration test suite, or other mechanism for validating staging; however, keeping the manual judgement stage is fine too.
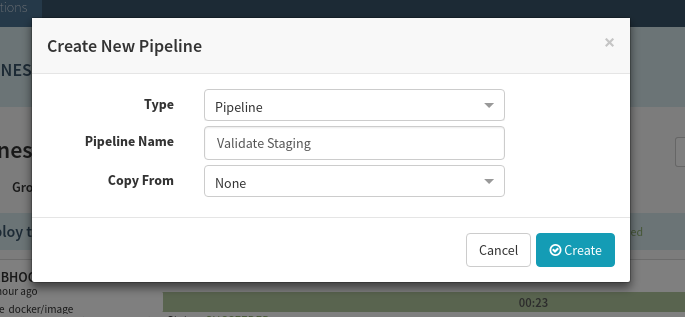
Start by creating a new pipeline, and call it “Validate Staging”:
We only want this pipeline to run when we successfully deploy to our staging environment, so create a Pipeline trigger in this new pipeline like shown:
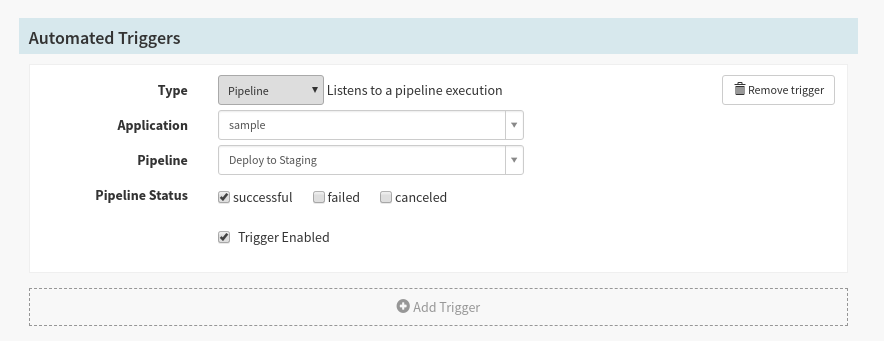
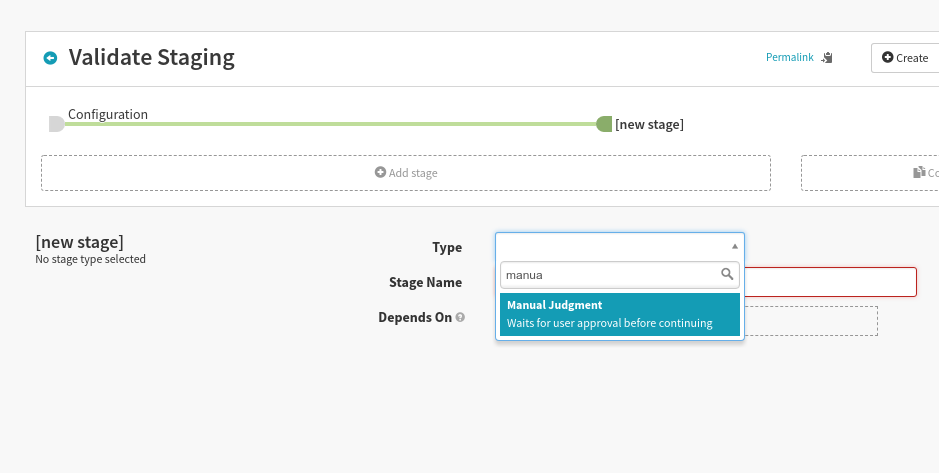
Add a single stage with type “Manual judgement”:
If desired, you can add additional “Instructions” for how to validate the cluster:
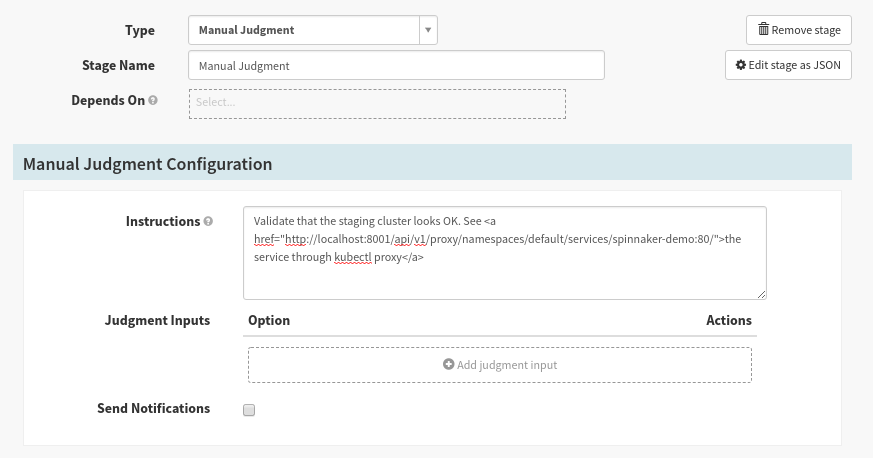
Save the Pipeline.
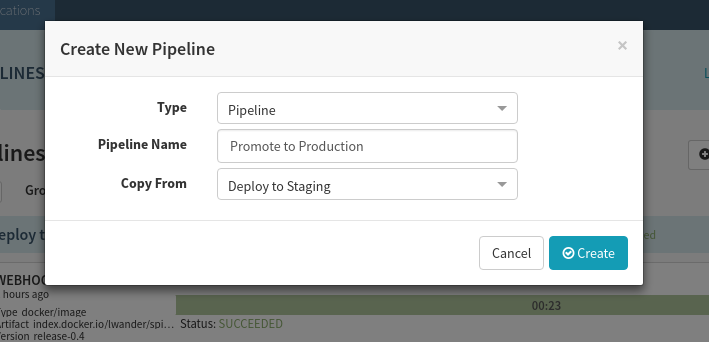
7. Promote to production
Let’s promote these artifacts into our production cluster. Create a new pipeline, but instead of creating it from scratch, let’s copy the “Deploy to Staging” pipeline like this:
We need to make two changes to this pipeline:
First, delete the webhook and Git triggers, and replace it with a pipeline trigger that depends on the “Validate Staging” pipeline:
Next, change the Account the “Deploy (Manifest)” stage deploys to point at prod-demo:
8. Run the full flow
Now our full flow is ready to go - let’s kick it off by changing the background color of our application.
Open content/index.html in your text editor, and change the background color
attribute, and generate a new commit. We can safely push this commit to GitHub
without running our pipeline because we are only listening to change to the
manifests/demo.yml file in our “Deploy to Staging” trigger. Tag and push this
commit to generate a new docker build:
git tag release-1.1
git push origin release-1.1
When Spinnaker prompts you, accept (or reject) the manual judgement:
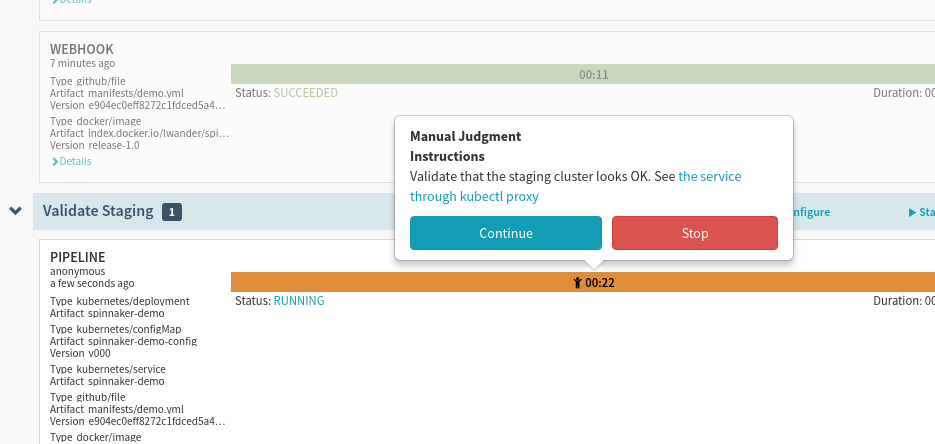
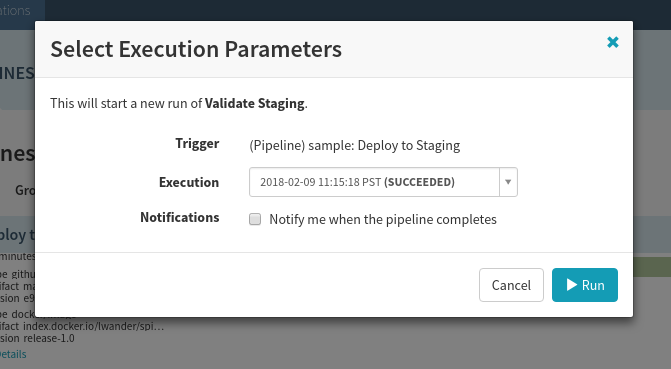
Keep in mind, if you reject the manual judgement, but later change your mind, you can always trigger this pipeline again using the same context by selecting Start manual execution, and picking the latest parent execution:
Once all three pipelines complete, you should have your docker image running in both environments:
9. Extra credit
At this point there are few things you can play with:
Change the ConfigMap definition in the manifest file. In particular, flip the single flag from “false” to “true”. See what happens to the ConfigMap version.
Roll back a “broken” change either in prod or staging using the “Undo Rollout” stage.
Insert pipeline expressions into your manifest files.
10. Teardown
As referenced above, please teardown Spinnaker once you are done:
hal deploy clean