GCE Source To Prod
In this codelab, you create a cohesive workflow which takes source code and builds, tests and promotes it to production. You can also watch a video of this codelab in this Youtube playlist .
This will be accomplished via 3 pipelines:
- Bake & Deploy to Test
- Validate Test
- Promote to Prod
You will be using a custom-built image that includes sample application source code, a Jenkins instance, a Debian repository (aptly) and a Spinnaker instance.
This codelab is an extension of the Hello World Deployment tutorial. It runs specifically on the Google Cloud Platform, and requires a billing-enabled GCP project.
Part 0: Set up environment
Install gcloud
If you have gcloud installed, skip to the next section, “
Provision an instance of Spinnaker
”.
Install gcloud by running the following command and following through the prompts:
curl https://sdk.cloud.google.com | bash
Authenticate gcloud to your account with your email address:
gcloud auth login <your email address>
Enable the Compute Engine API
Navigate to the Google Cloud Console and enable the Compute Engine API .
Provision an instance of Spinnaker and Jenkins
We’ve created a single GCE image that includes Spinnaker, Jenkins, and aptly, along with embedded startup scripts that configure everything together for you. Create an instance of this image by running the following commands.
Fill in your project for $MY_PROJECT
MY_PROJECT=<your project>
INSTANCE_NAME=spinnaker-codelab
ZONE=us-east1-b

gcloud compute instances create $INSTANCE_NAME \
    --project $MY_PROJECT \
    --zone $ZONE \
    --image spinnaker-codelab \
    --image-project marketplace-spinnaker-release \
    --machine-type n1-highmem-4 \
    --scopes cloud-platform \
    --metadata startup-script=/var/spinnaker/startup/first_codelab_boot.sh,gce_account=my-google-account
Spinnaker will take a few minutes to auto configure and start up. Take 3 minutes to skim through Part 1 of this codelab below…
Open an SSH tunnel through which your local workstation will connect to Spinnaker:
gcloud compute ssh $INSTANCE_NAME \
    --project $MY_PROJECT \
    --zone $ZONE \
    --ssh-flag="-L 8084:localhost:8084" \
    --ssh-flag="-L 9000:localhost:9000" \
    --ssh-flag="-L 5656:localhost:5656"
Part 1: Bake & deploy to test
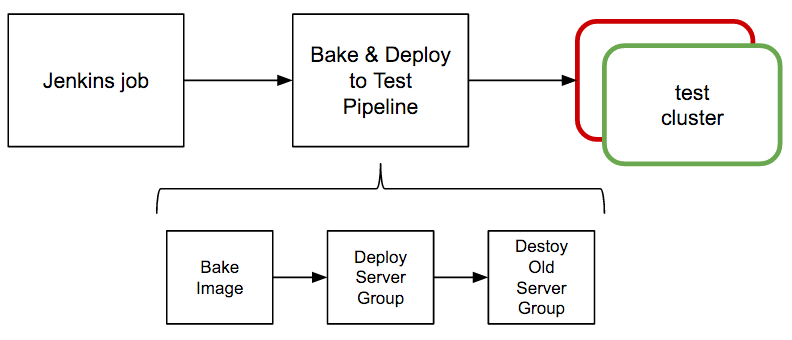
In this first exercise, you’ll set up a pipeline, named Bake & Deploy to Test, which builds a GCE image, deploys it as a server group to a test cluster, then destroys the previous server group in that cluster (also called the “Highlander” strategy). The pipeline is triggered by a Jenkins continuous integration job.
The workflow is shown in the figure below.
Create a Spinnaker application
Navigate to Spinnaker at http://localhost:9000 .
From the Spinnaker home page, create a new Spinnaker Application by clicking on the Actions drop down at the upper right and clicking on Create Application.
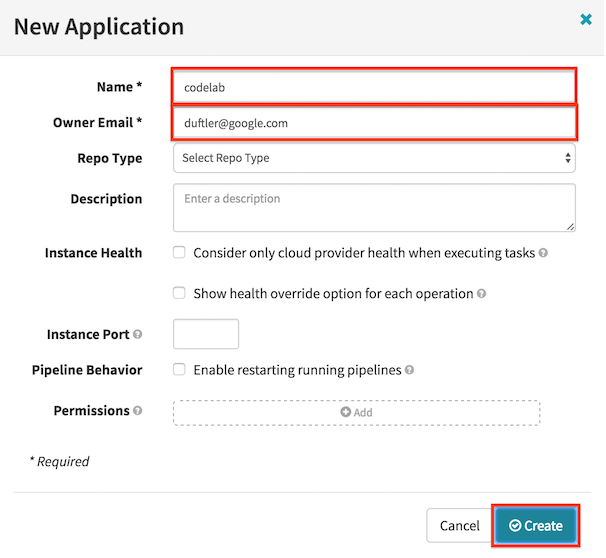
In the New Application dialog:
- Enter “codelab” for Name.
- Enter your email for Owner Email.
- Click the Create button.
Create a load balancer
First we create a load balancer for your cluster. Navigate to the LOAD BALANCERS tab, click the Create Load Balancer button, and select Network as the type of load balancer.
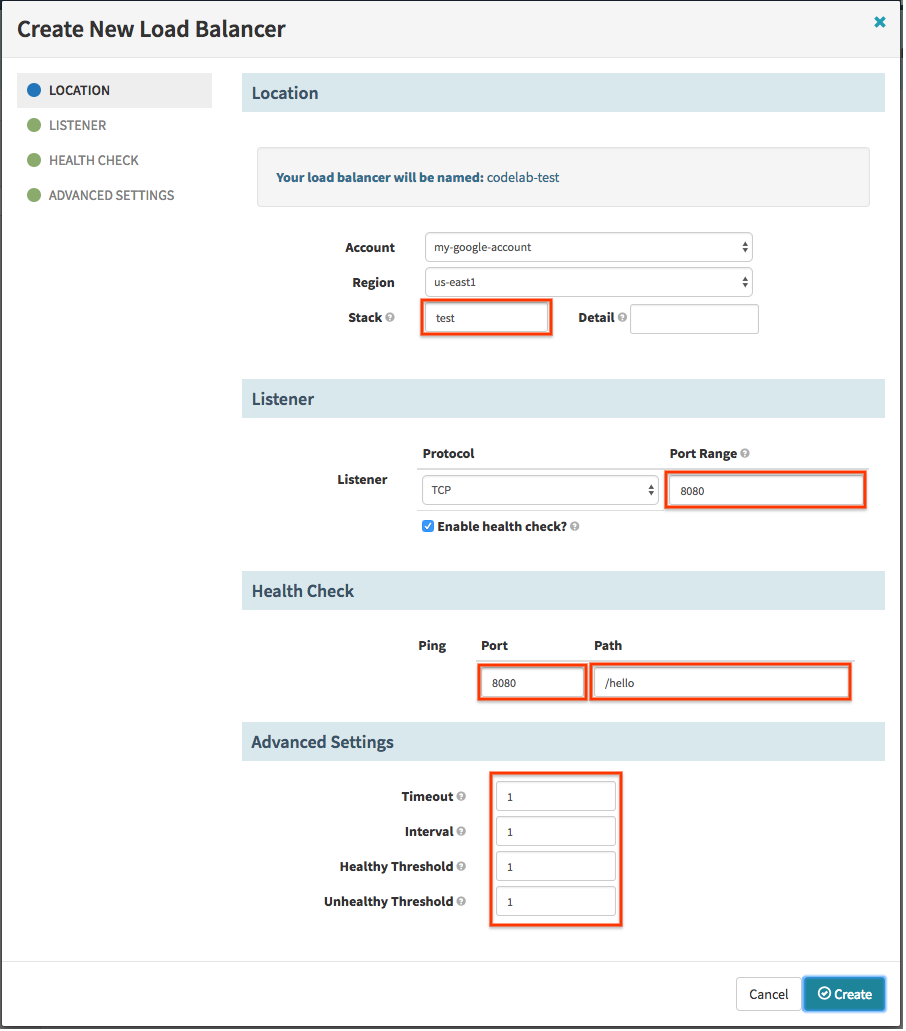
- Enter “test” for Stack.
- In the Listener section, set the Port Range to be 8080, as that’s the port that our sample application listens on.
- In the Health Check section, enter “8080” for Port and “/hello” for Path.
- Optionally, enter 1 for all advanced settings values so server groups report healthy much faster.
- Click the Create button.
Set up pipeline: “Bake & Deploy to Test” pipeline
The purpose of this pipeline is to generate a GCE image from a package, and then deploy the image on server groups in the test cluster. We want this pipeline to be kicked off every time the Jenkins continuous integration job completes.
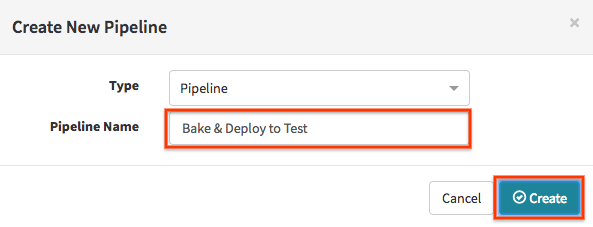
Create a new pipeline by navigating to the PIPELINES tab and clicking the Create button
- Name the pipeline “Bake & Deploy to Test”.
- Click the Create button.
Configure the pipeline
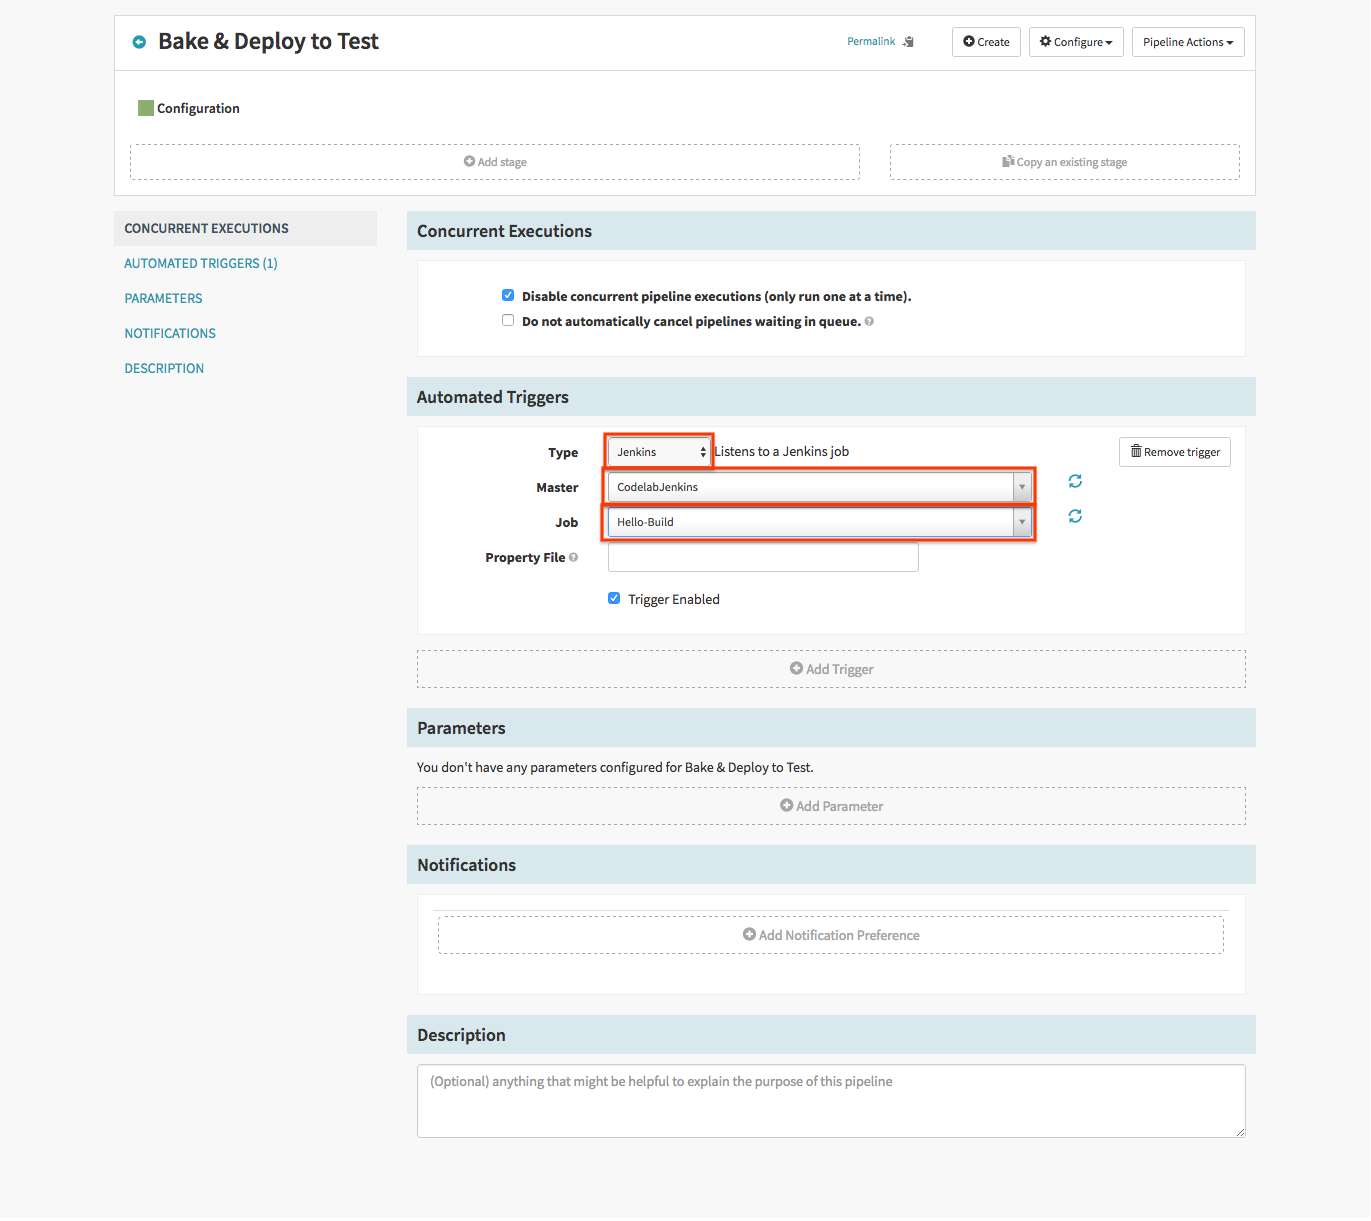
The first step in setting up a pipeline is to configure the pipeline. In particular, we need to specify an automated trigger that will kick off the pipeline.
We want this pipeline to kick off every time our Jenkins job completes. In the Automated Triggers section of the pipelines form:
- Click Add Trigger.
- Select “Jenkins” from the drop down menu for Type.
- Specify “CodelabJenkins” for the Master Jenkins instance.
- Specify “Hello-Build” for Job.
Refer to the figure below for an illustration of what the pipeline’s Configuration form looks like when we’re done.
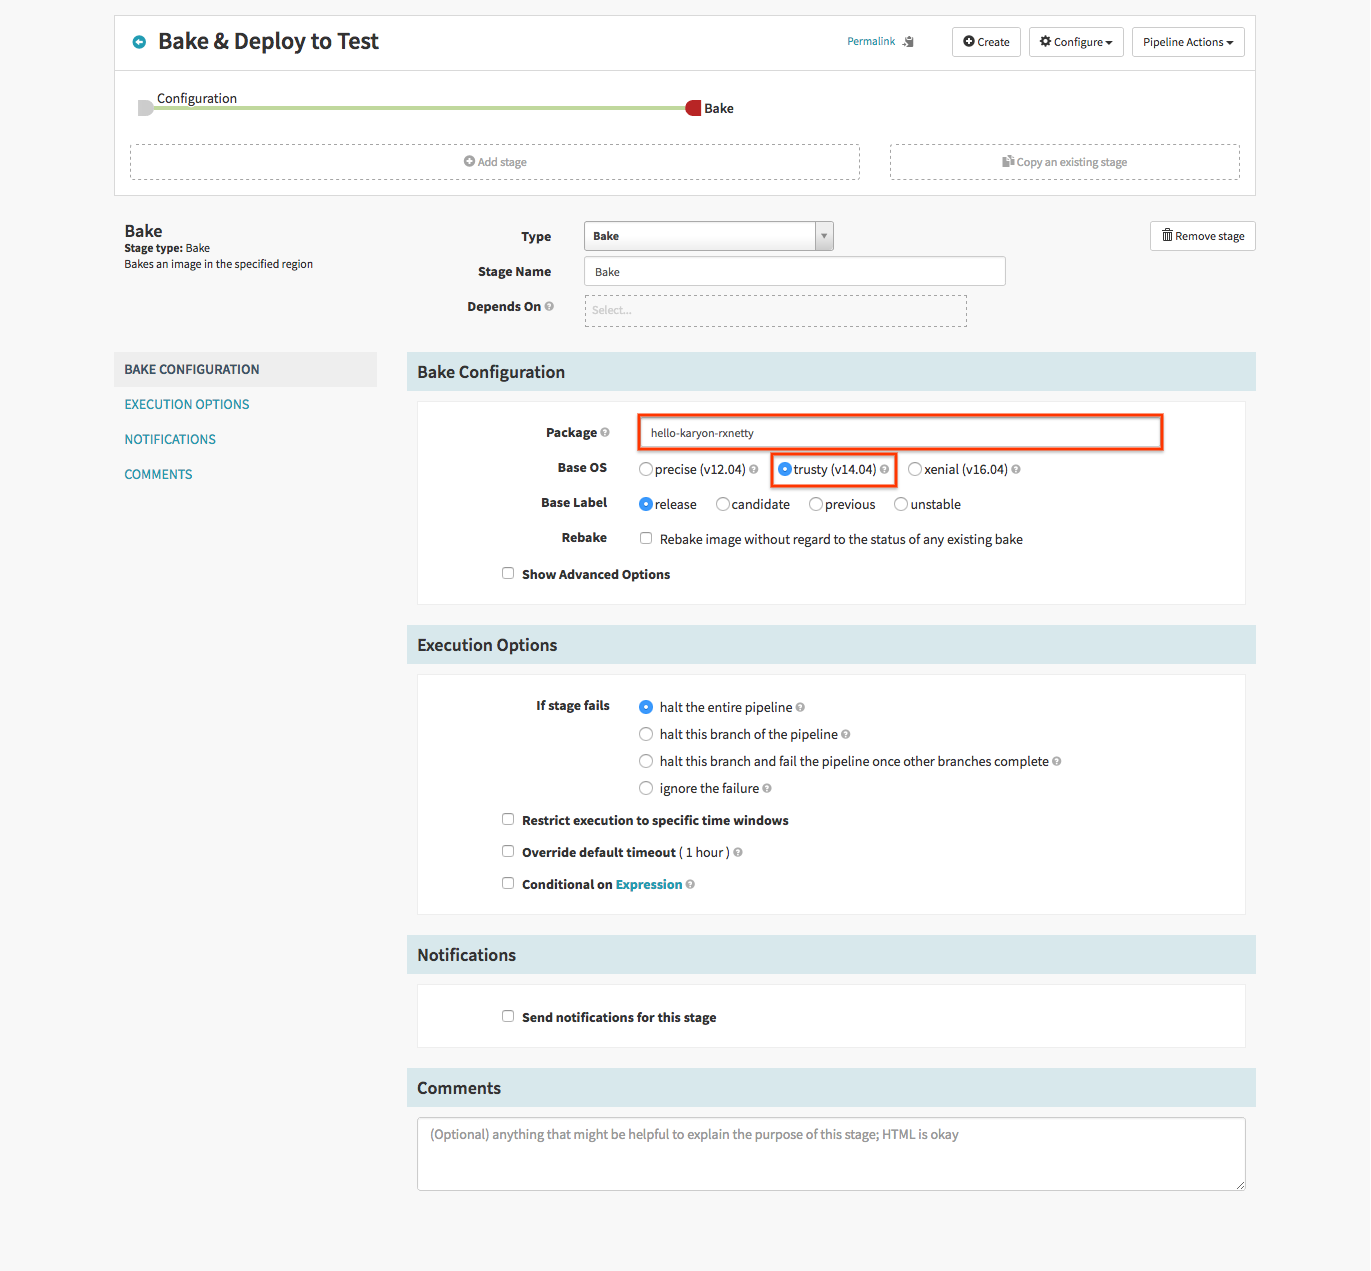
Set up Bake stage
The purpose of our “Bake” stage is to create a GCE image with the package that was built by the Jenkins job that triggered this pipeline.
- Click Add stage.
- Select “Bake” in the Type drop down.
- Enter the Debian package you wish to include, “hello-karyon-rxnetty”, in the Package field.
- Select “trusty” as the Base OS.
Set up Deploy stage
The purpose of the “Deploy” stage is to take the GCE image constructed in the “Bake” stage and deploy it into a test environment.
- Click Add stage.
- Select “Deploy” in the Type drop down.
- In the Deploy Configuration section, click Add server group.
- In the dialog that appears, click Continue without a template.
- In the Basic Settings section, enter “test” in the Stack field.
- In the Load Balancers section, add your load balancer (“codelab-test”).

Security groups map to GCP firewall rules, along with the use of target tags to route traffic. There are default firewall rules in place which are sufficient for our use here.
- Click on the Instance Type tab on the left.
- In the Instance Type section, choose “f1-micro” in the drop down.
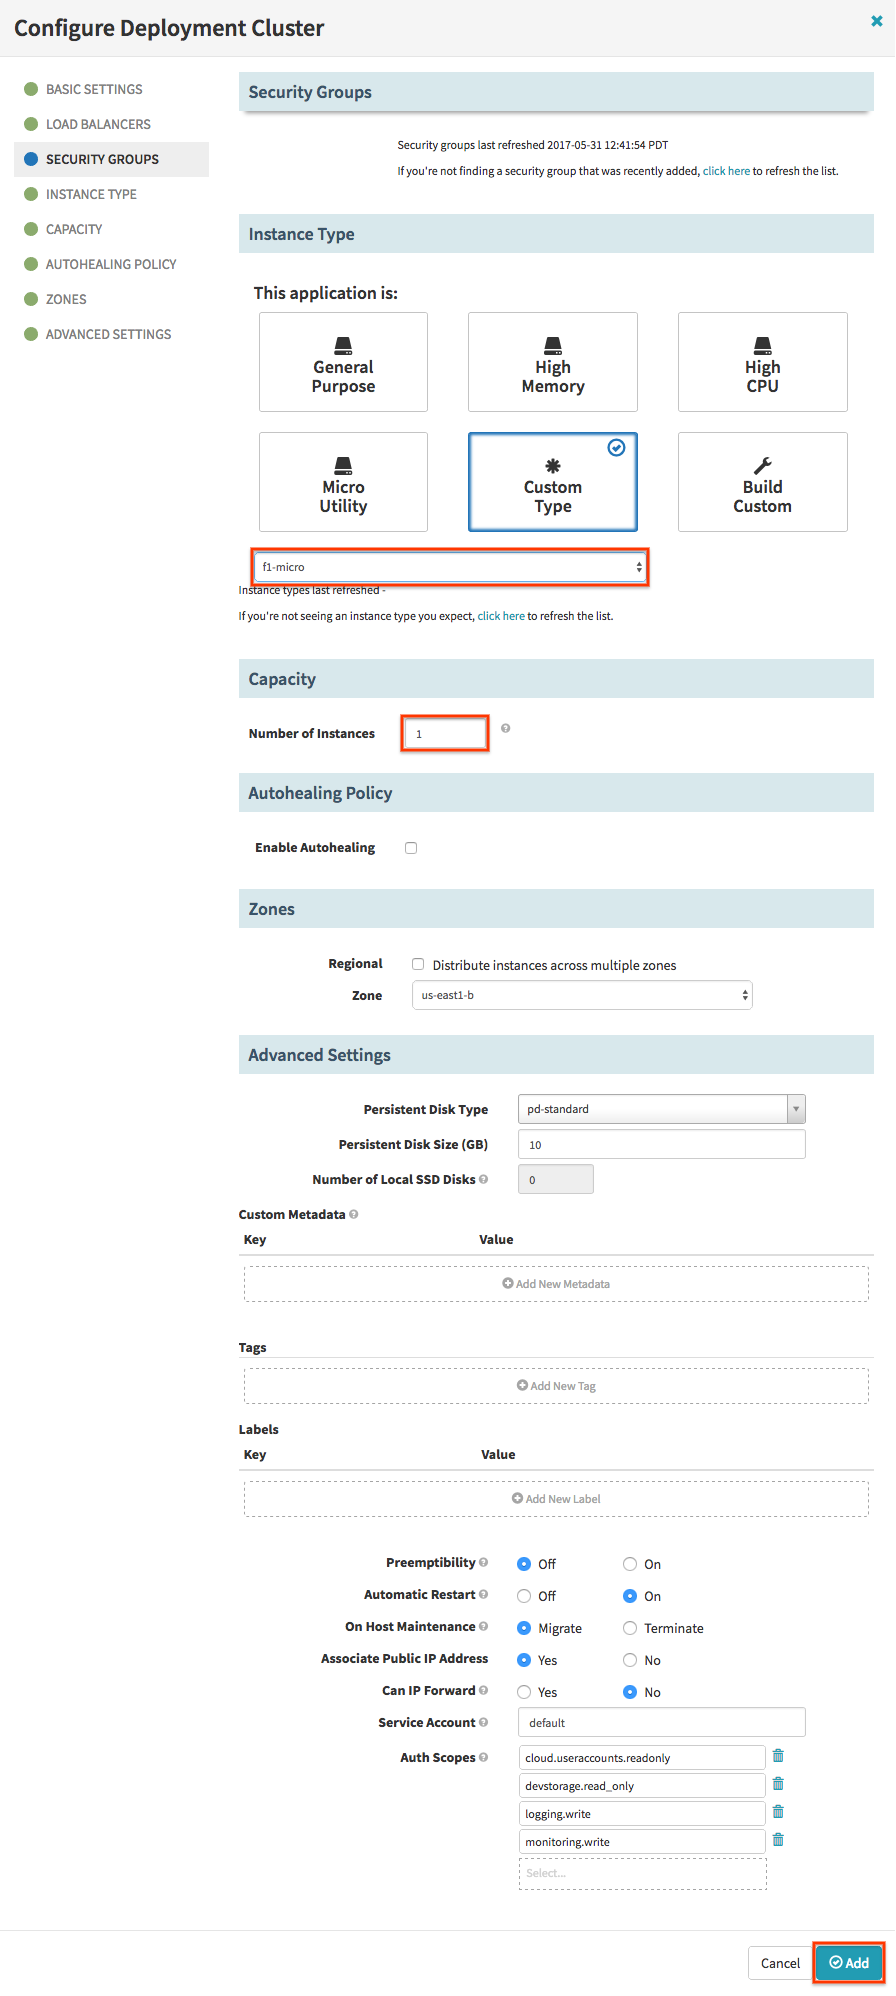
- In the Capacity section, leave 1 as the number of instances and click Add.
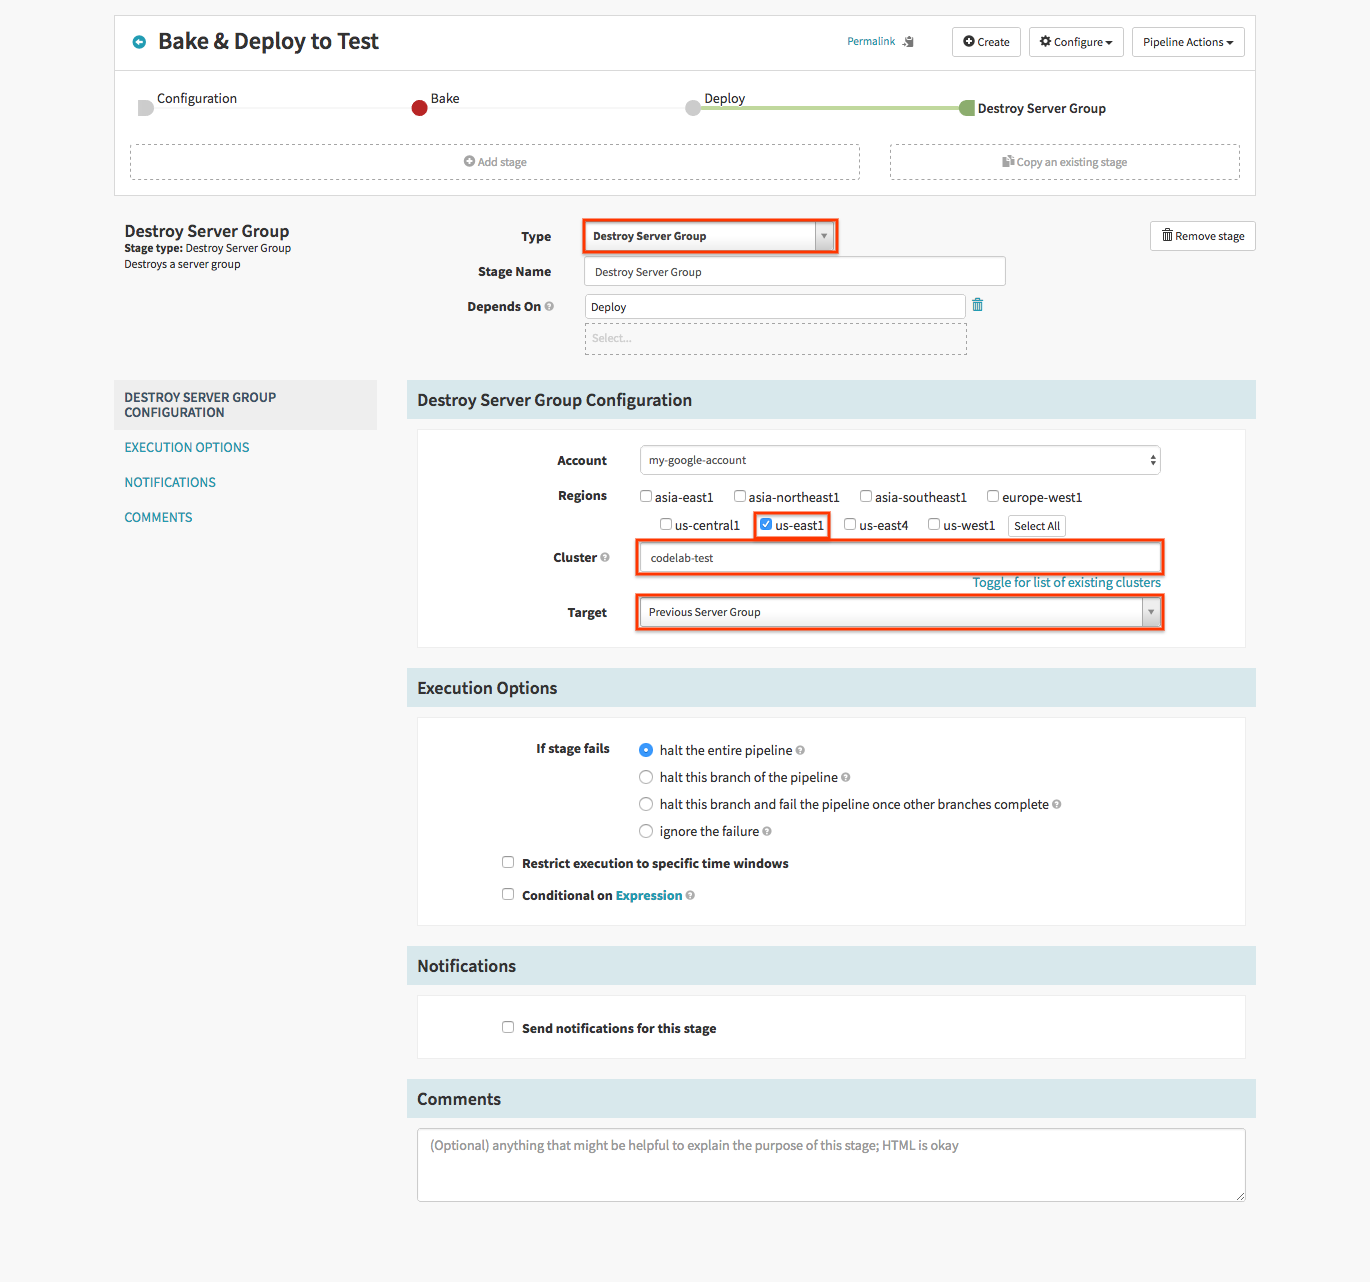
Set up Destroy Previous Server Group stage
In this tutorial use case, on successive deployments of new server groups to the test cluster, we don’t need the previous server group anymore.
- Click Add Stage.
- Select “Destroy Server Group” for Type.
- Check us-east1, the region of the previous test server group that you want to destroy.
- Enter codelab-test for the Cluster.
- Select “Previous Server Group” for Target.
- Click Save Changes.
The pipeline is now complete. Take a moment to review the stages of this pipeline that you just built.
Try it out
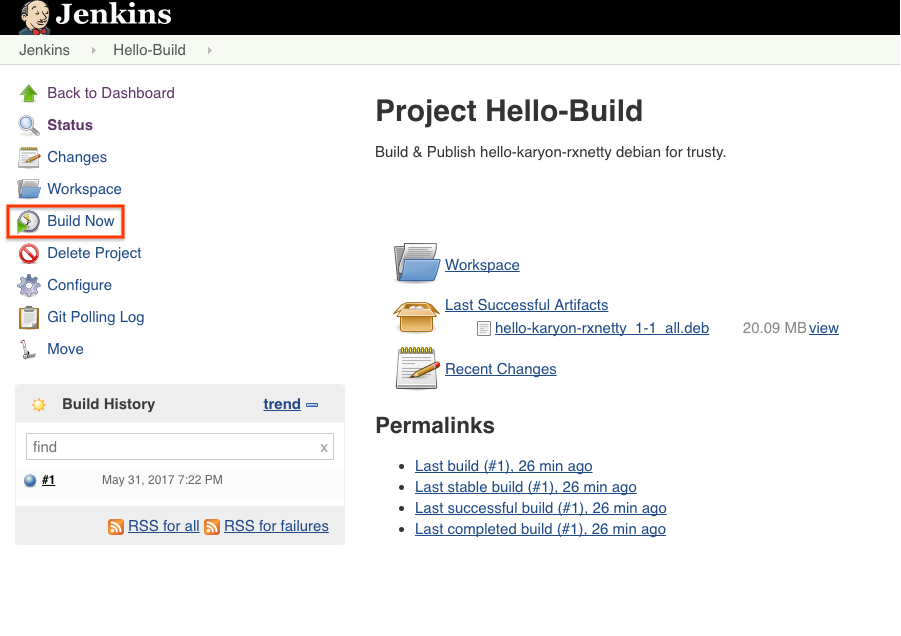
Now let’s run this pipeline. We trigger it by manually running a Build of the Jenkins job.
- Navigate to your Jenkins console at
http://localhost:5656
.
- Username: admin
- Password: admin
- Click on the “Hello-Build” job.
- Click Build Now.
It may take a while for the polling to trigger the job, but soon in the PIPELINES tab you can see progress, status and details.
The first time this pipeline is run, the Destroy Server Group stage will fail, because the selector for “Previous Server Group” will find nothing (no server groups presently in the test cluster). The Deploy stage, however, does succeed, so a test cluster will be created.
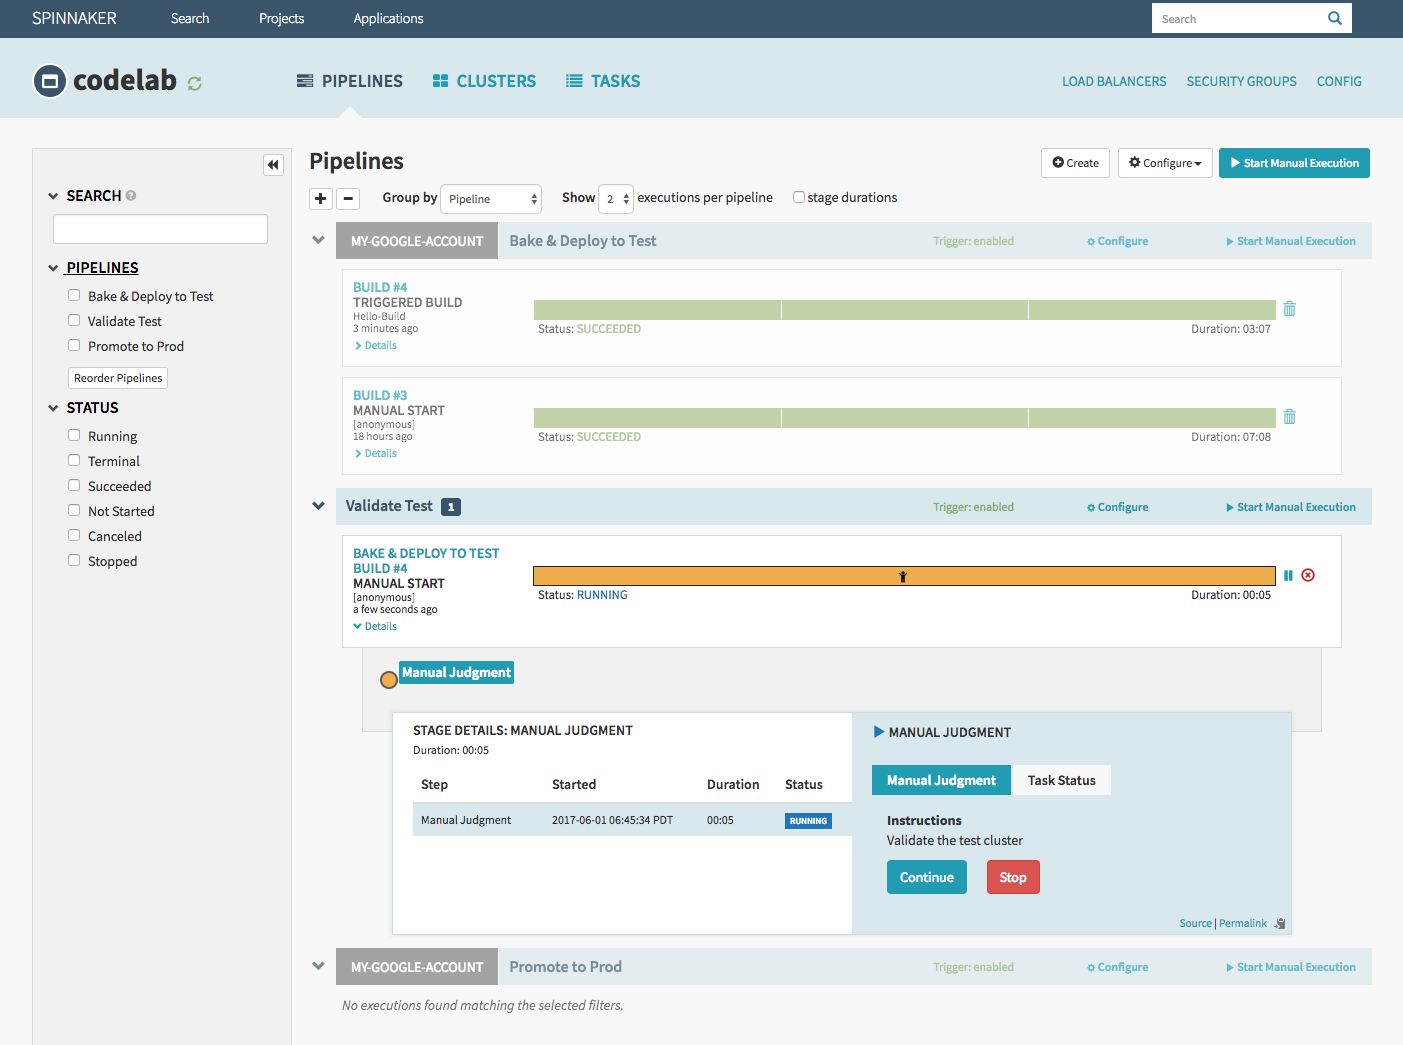
Try running it again, either by running another Build of the Jenkins job, or by manually triggering from the PIPELINES tab (click Start Manual Execution). It will succeed all the way, and your pipeline execution details will look like below:
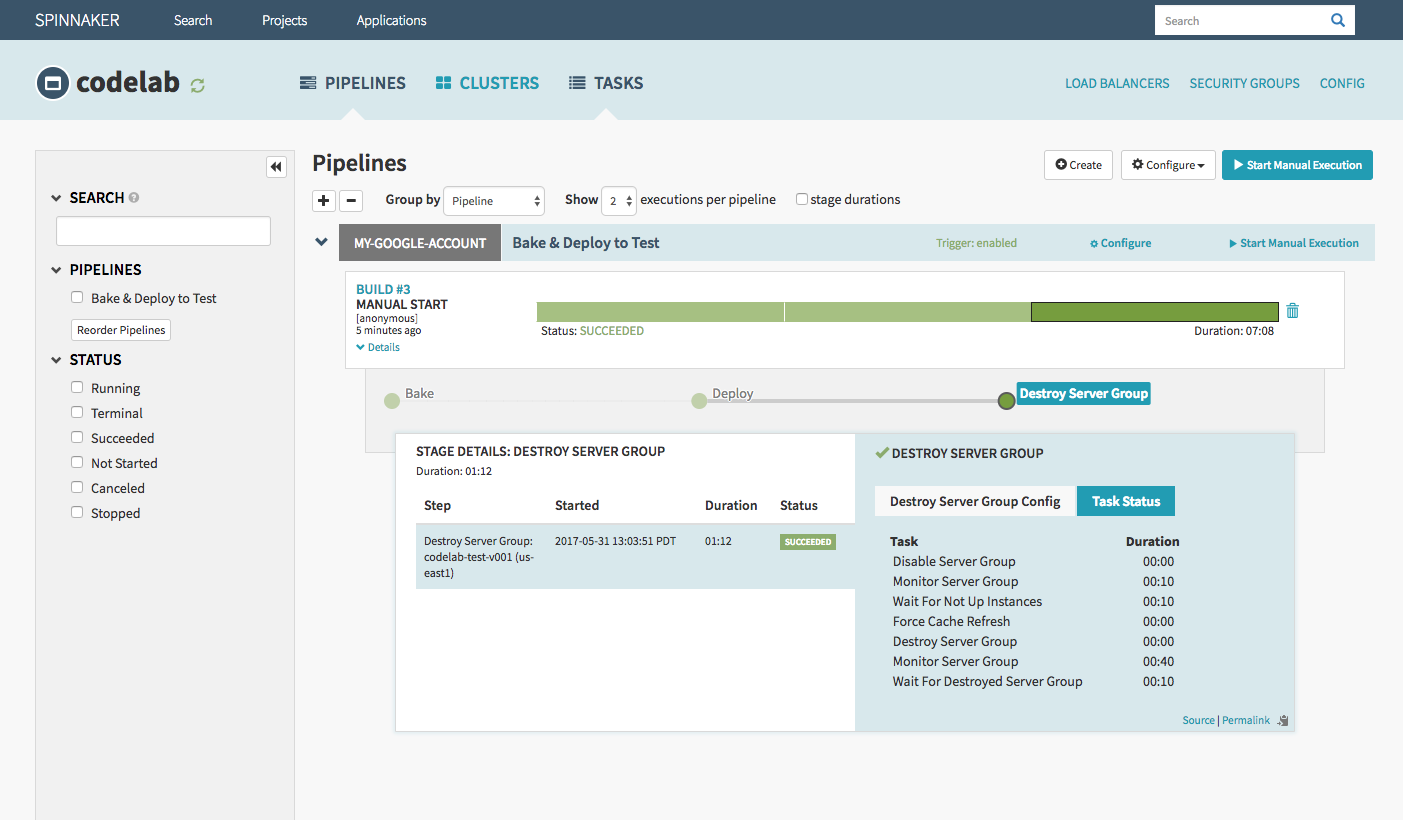
You can now see in the CLUSTERS tab that a new server group has been deployed to the test cluster, and the previous server group is destroyed (i.e. does not exist).
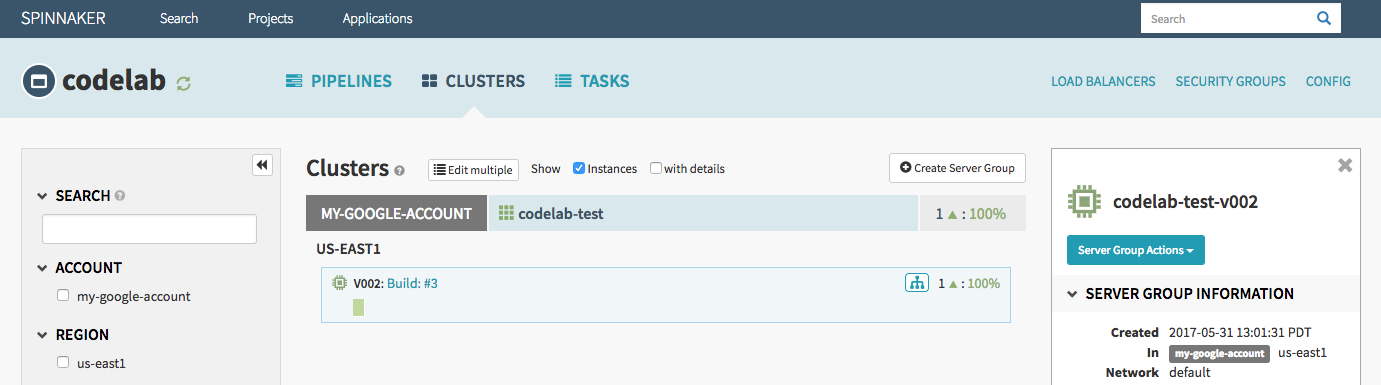
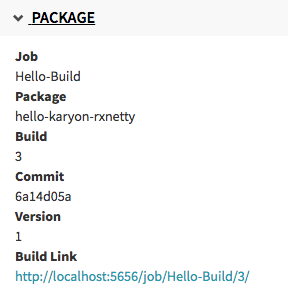
You can also introspect server group details by clicking on a server group. In the details panel on the right, you can see under the PACKAGE section details about how we built this server group. Information like package name, build number, down to commit hash and link to the Jenkins job.
Part 2: Validate test
The second pipeline, named “Validate Test”, is a simple one-stage placeholder to represent some gating function before pushing to prod.
Furthermore, we configure the prod deployment to implement the red/black strategy (a.k.a. blue/green), which means that upon verifying health of the new server group it will immediately disable the previous server group in the same cluster. Here we disable rather than destroy, so that rollbacks can be quickly accomplished simply by re-enabling the old server group.
Set up pipeline: “Validate Test” pipeline
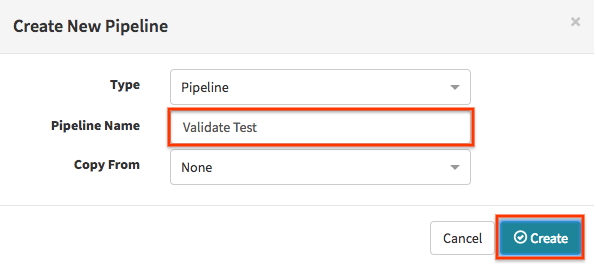
Create a new pipeline by navigating to the PIPELINES tab and clicking Configure, then Create New …
- Name the pipeline “Validate Test”.
- Click the Create button.
Configure the pipeline
We want this pipeline to kick off when the Bake & Deploy to Test pipeline completes.
- Click Add Trigger.
- Select “Pipeline” from the drop down menu for Type.
- Select your application.
- Select the “Bake & Deploy to Test” pipeline.
- Check “successful”.

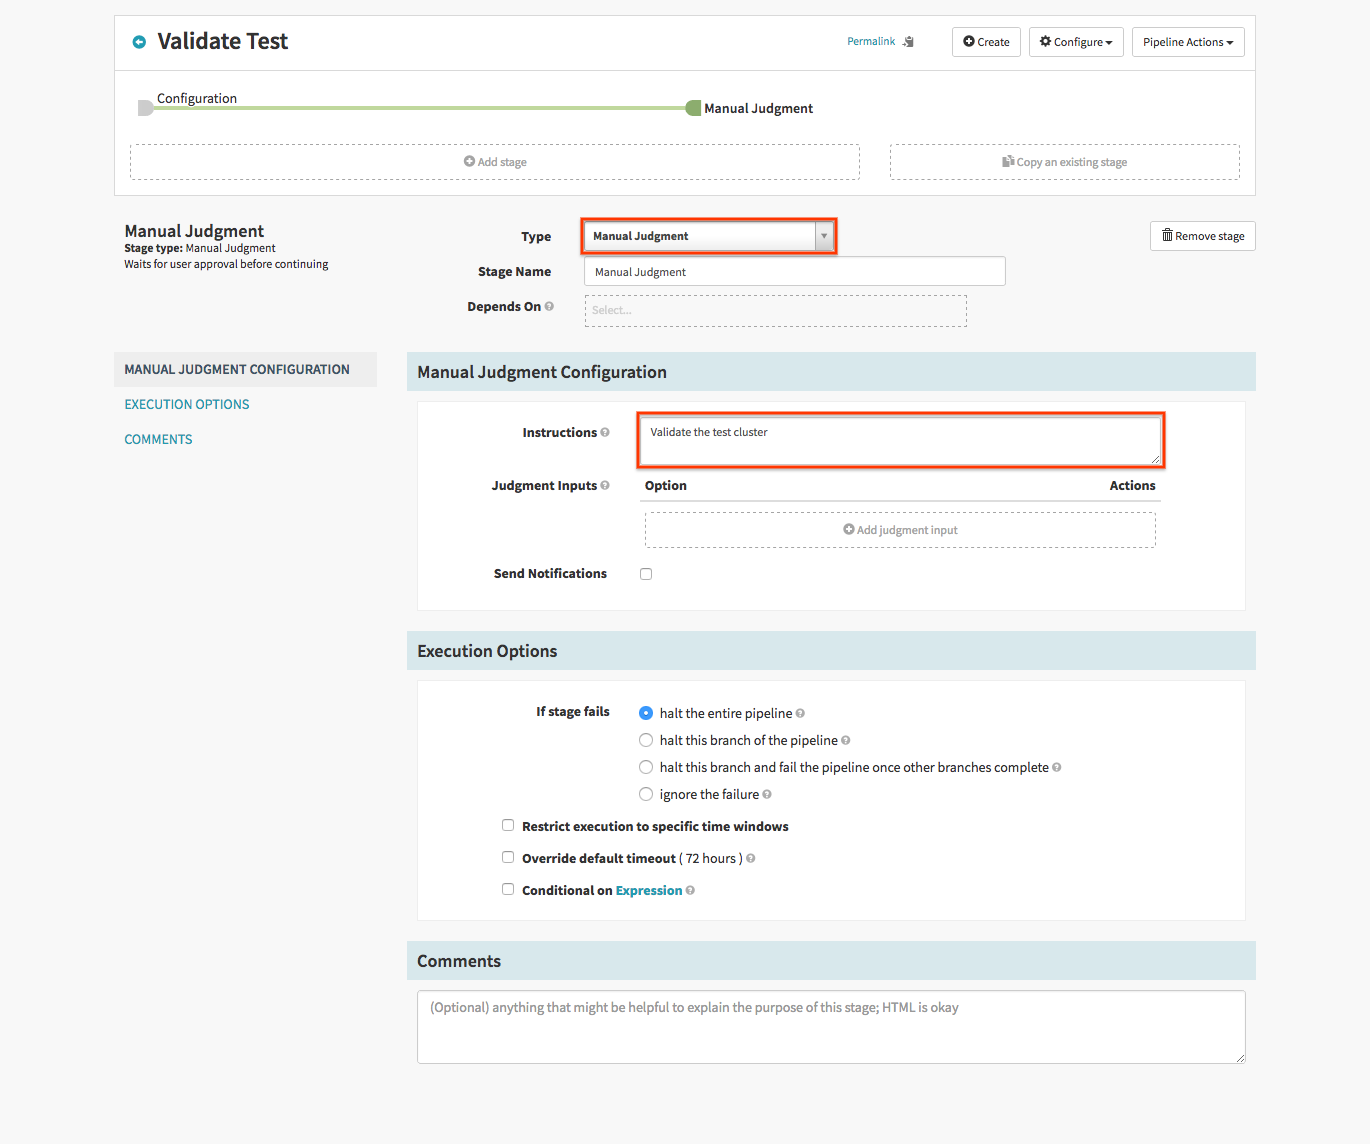
Set up Manual Judgment stage
We stop and wait for human confirmation to continue:
- Click Add stage.
- Select “Manual Judgment” in the Type drop down.
- Specify Instructions, for example “Validate the test cluster”.
- Click Save Changes.
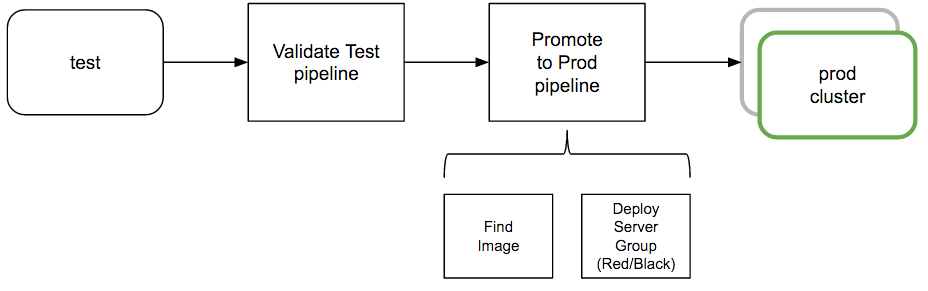
Part 3: Promote to prod
The third pipeline, “Promote to Prod”, takes the image that was deployed in the test cluster, and deploys that image to the prod environment, thereby promoting it.
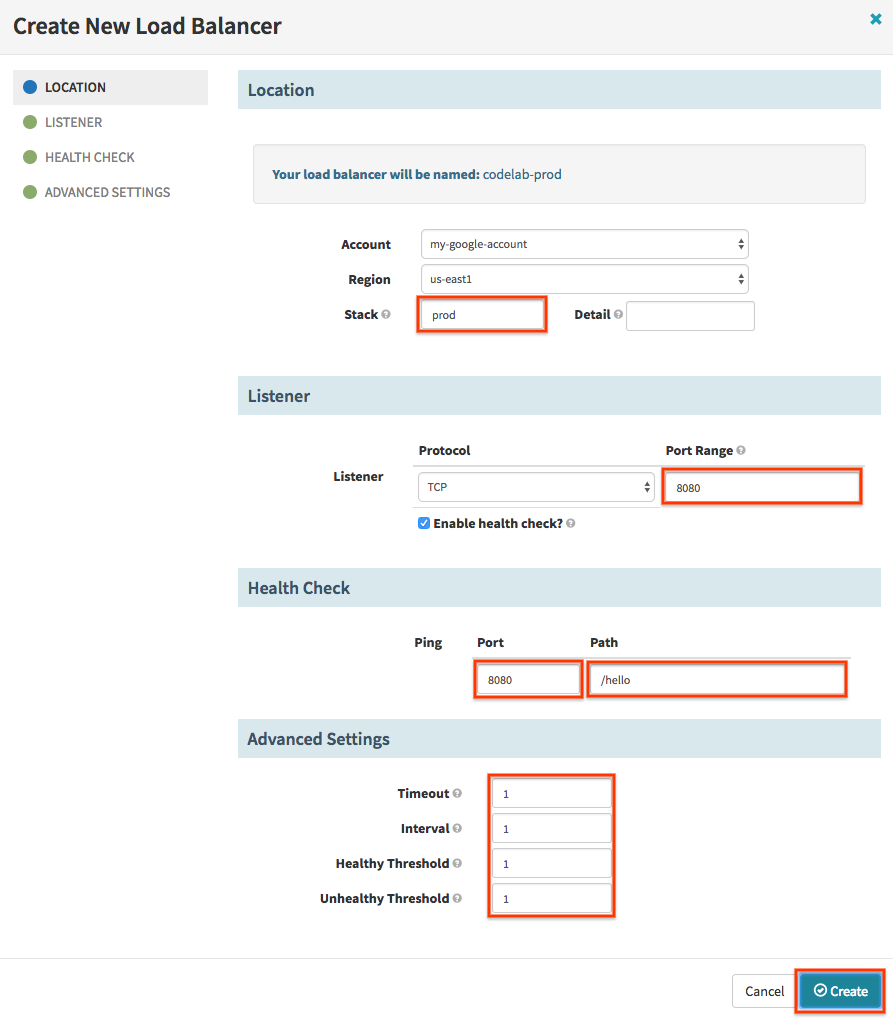
Create a load balancer
We create a load balancer for the prod cluster. Navigate to the LOAD BALANCERS tab and click the Create Load Balancer button:
- Enter “prod” for Stack.
- In the Listener section, set the Port Range to 8080.
- In the Health Check section, enter “8080” for Port and “/hello” for Path.
- Optionally, enter 1 for all health check values.
- Click the Create button.
Set up pipeline: “Promote to Prod” pipeline
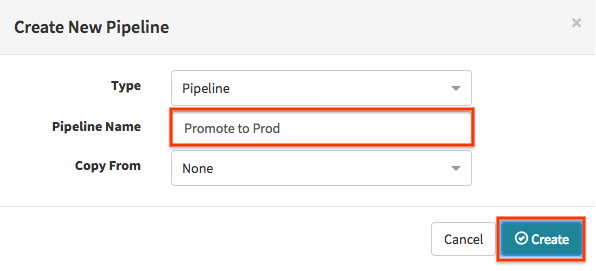
Create a new pipeline by navigating to the PIPELINES tab and clicking Configure, then Create New …
- Name the pipeline “Promote to Prod”.
- Click the Create button.
Configure the pipeline
We want this pipeline to kick off when the Validate Test pipeline completes.
- Click Add Trigger.
- Select “Pipeline” from the drop down menu for Type.
- Select your application.
- Select the “Validate Test” pipeline.
- Check “successful”.

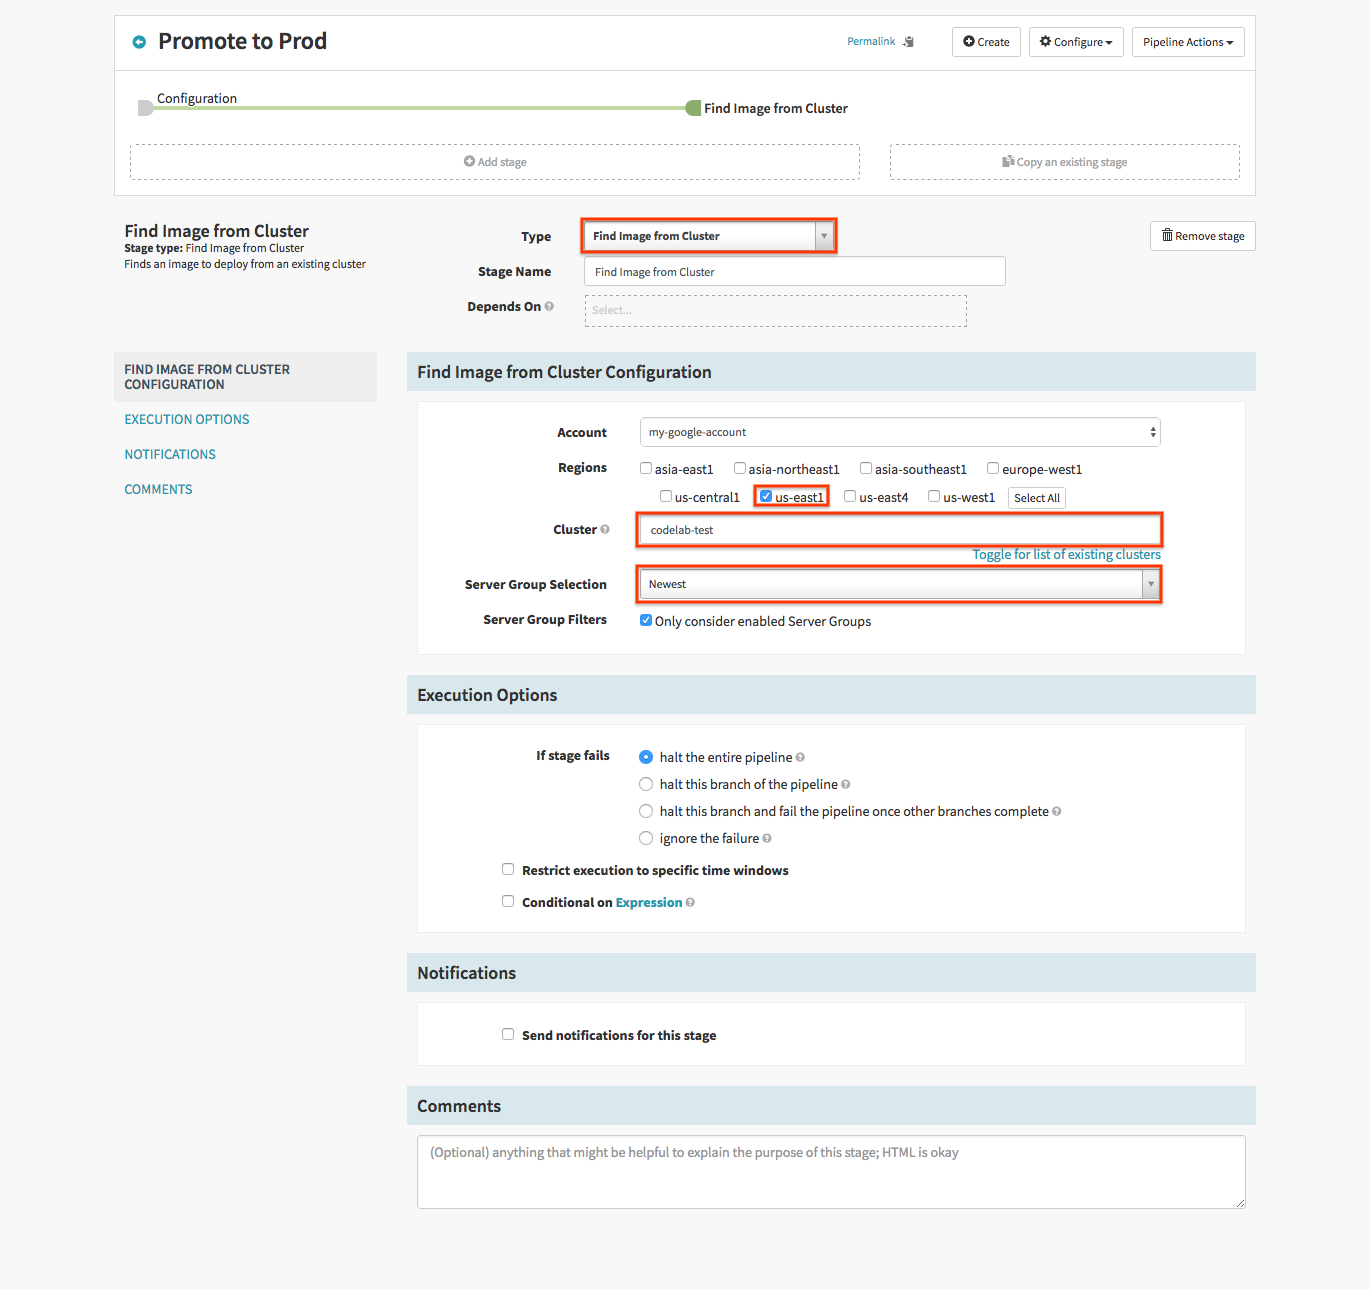
Set up Find Image stage
In the “Find Image” stage, we select the image that was deployed in the test cluster.
Click the Add stage button:
- Select “Find Image from Cluster” for the stage Type.
- Check the region of the test server group to pick the image from.
- Enter codelab-test for the Cluster.
- Choose “Newest” for the Server Group Selection.
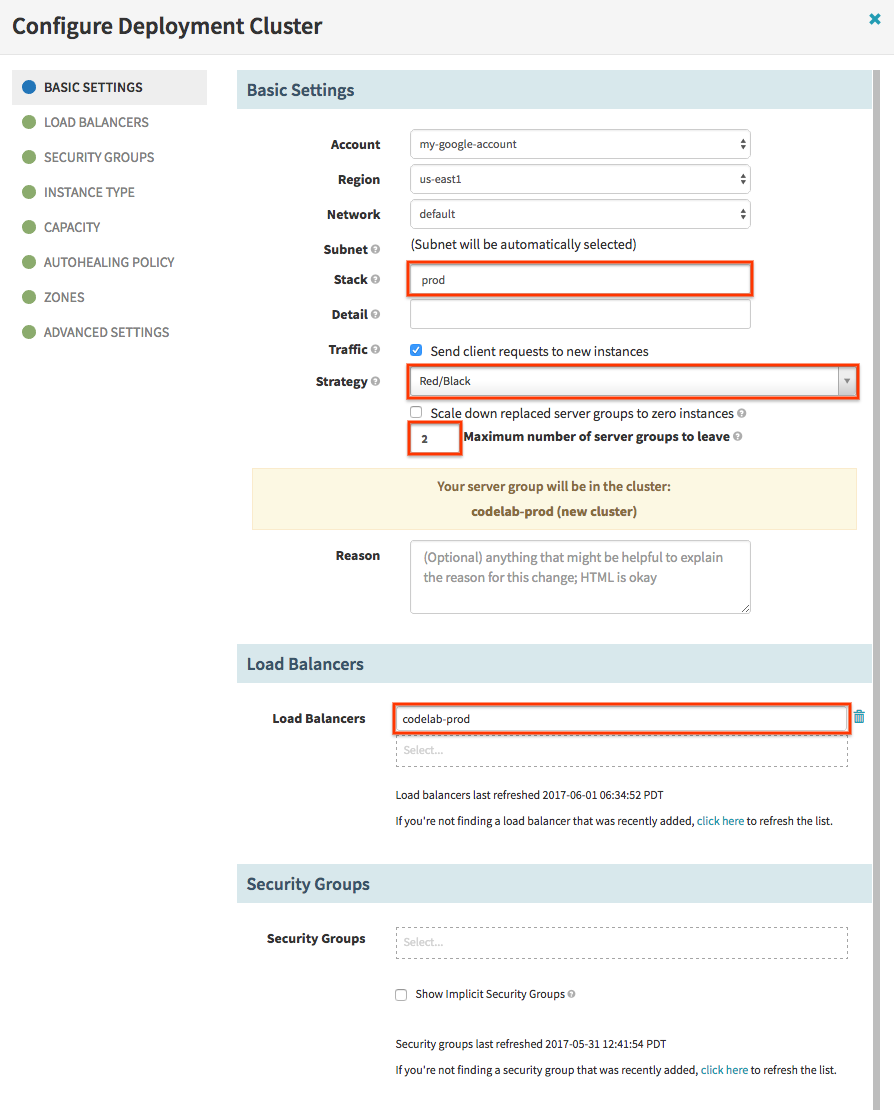
Set up the Deploy stage
We deploy the image that was picked, to the prod cluster.
- Click Add stage.
- Select “Deploy” in the Type drop down.
- In the Server group section, click Add server group.
- In the dialog that appears, click Continue without a template.
- In the Basic Settings section, enter “prod” in the Stack field.
- For Strategy, select “Red/Black”. Note: Blue/Green replaces Red/Black in Spinnaker v1.30+.
- Enter “2” as the Maximum number of server groups to leave
- In the Load Balancers section, add your load balancer (“codelab-prod”).
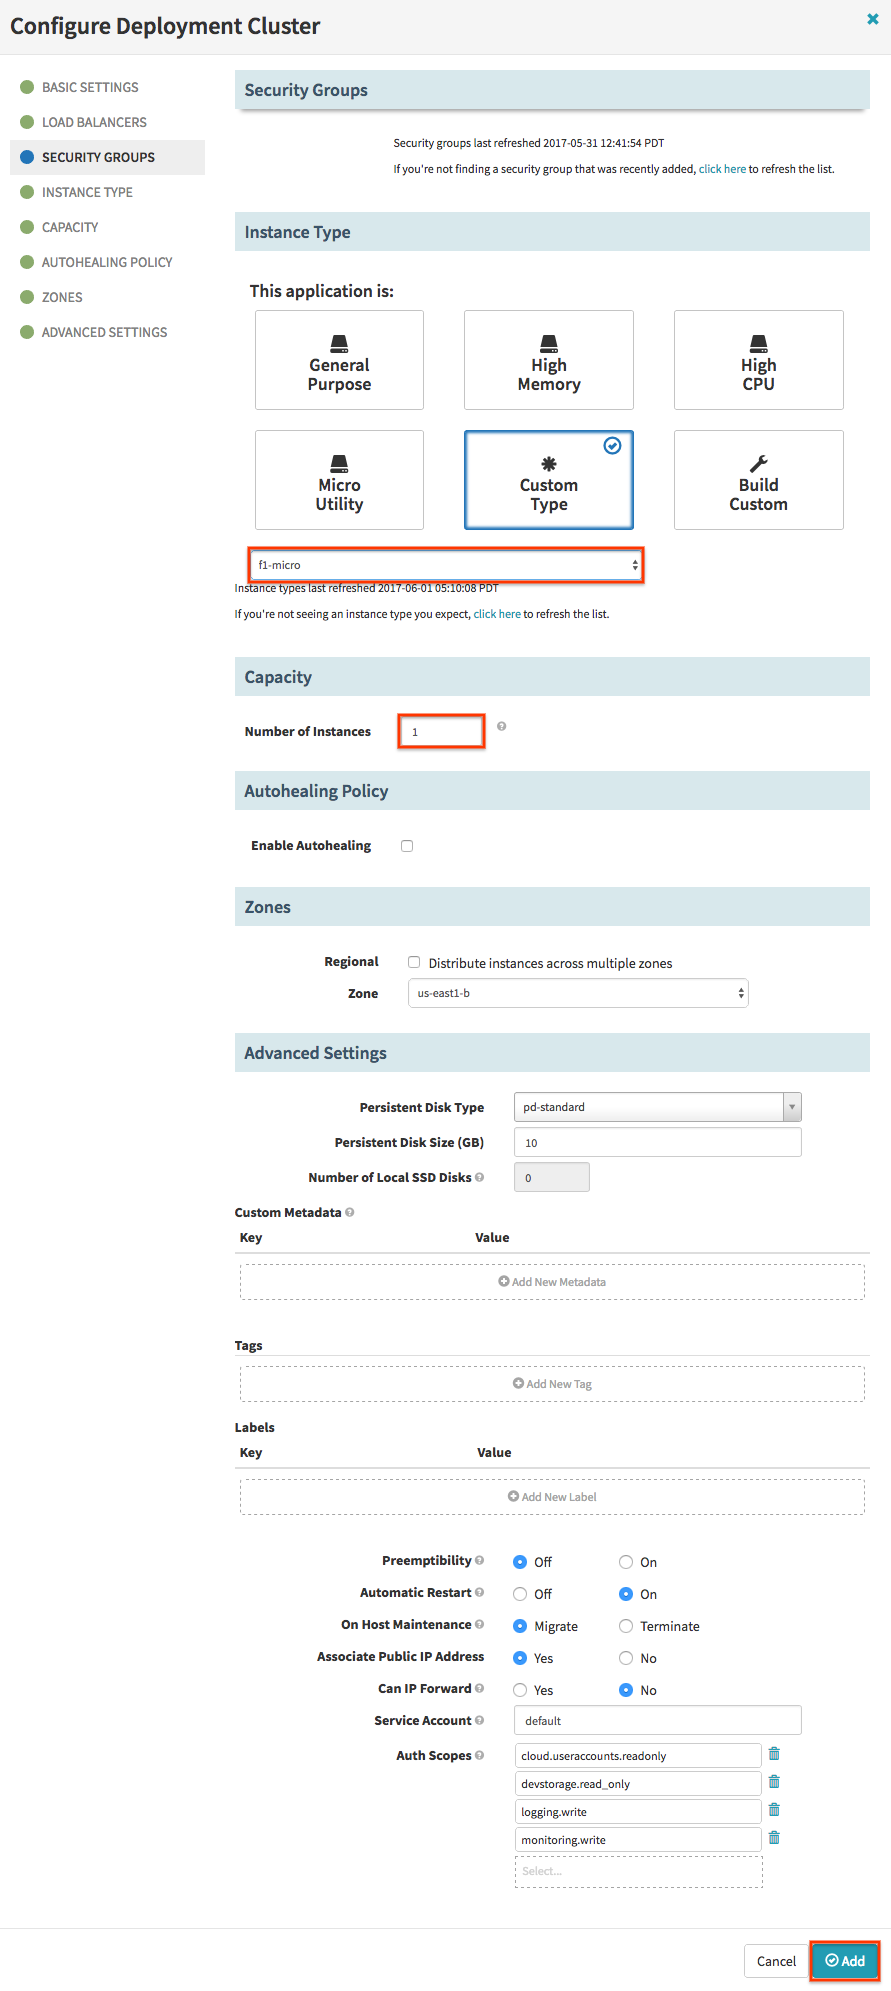
- and click the Instance Type tab on the left.
- In the Instance Type section, choose “f1-micro” in the drop down.
- In the Capacity section, leave 1 as the number of instances and click Add.
- Click Save Changes to save your prod pipeline.
Trying it out
Now let’s run through it all. Run a Build in Jenkins.
When the Bake & Deploy to Test pipeline completes, the Validate Test pipeline will trigger and wait for user input.
Click Continue. This will trigger the Promote to Prod pipeline:
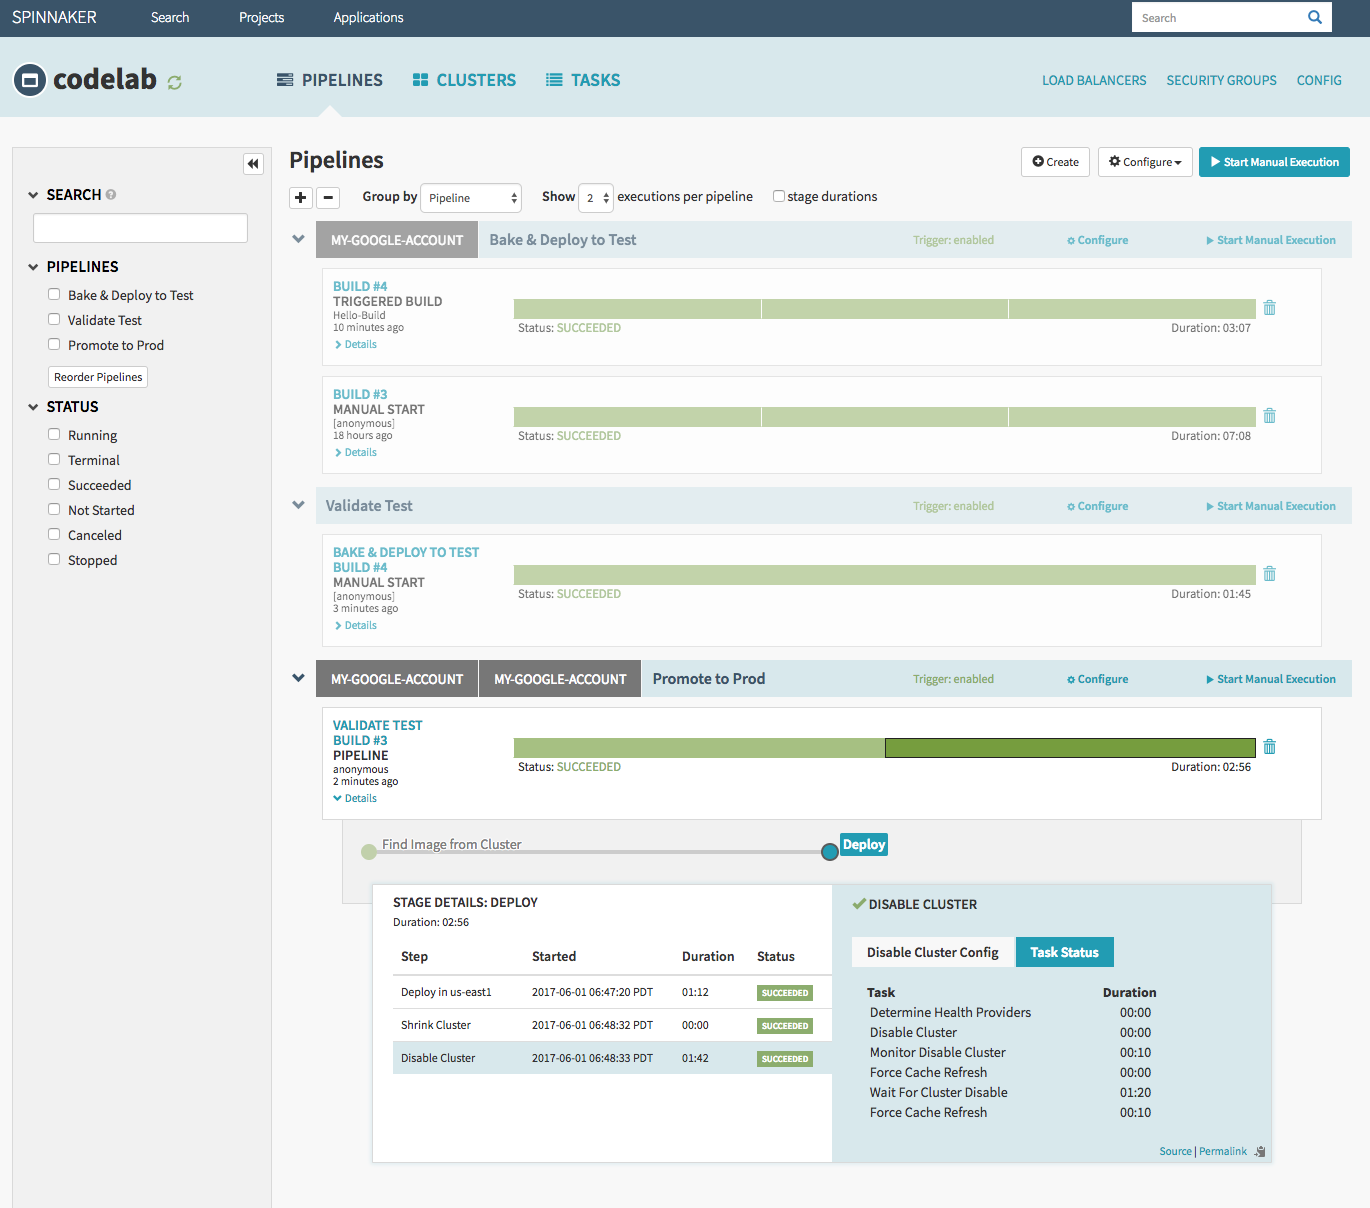
In the CLUSTERS tab, you can see that a server group has been deployed to the prod cluster.
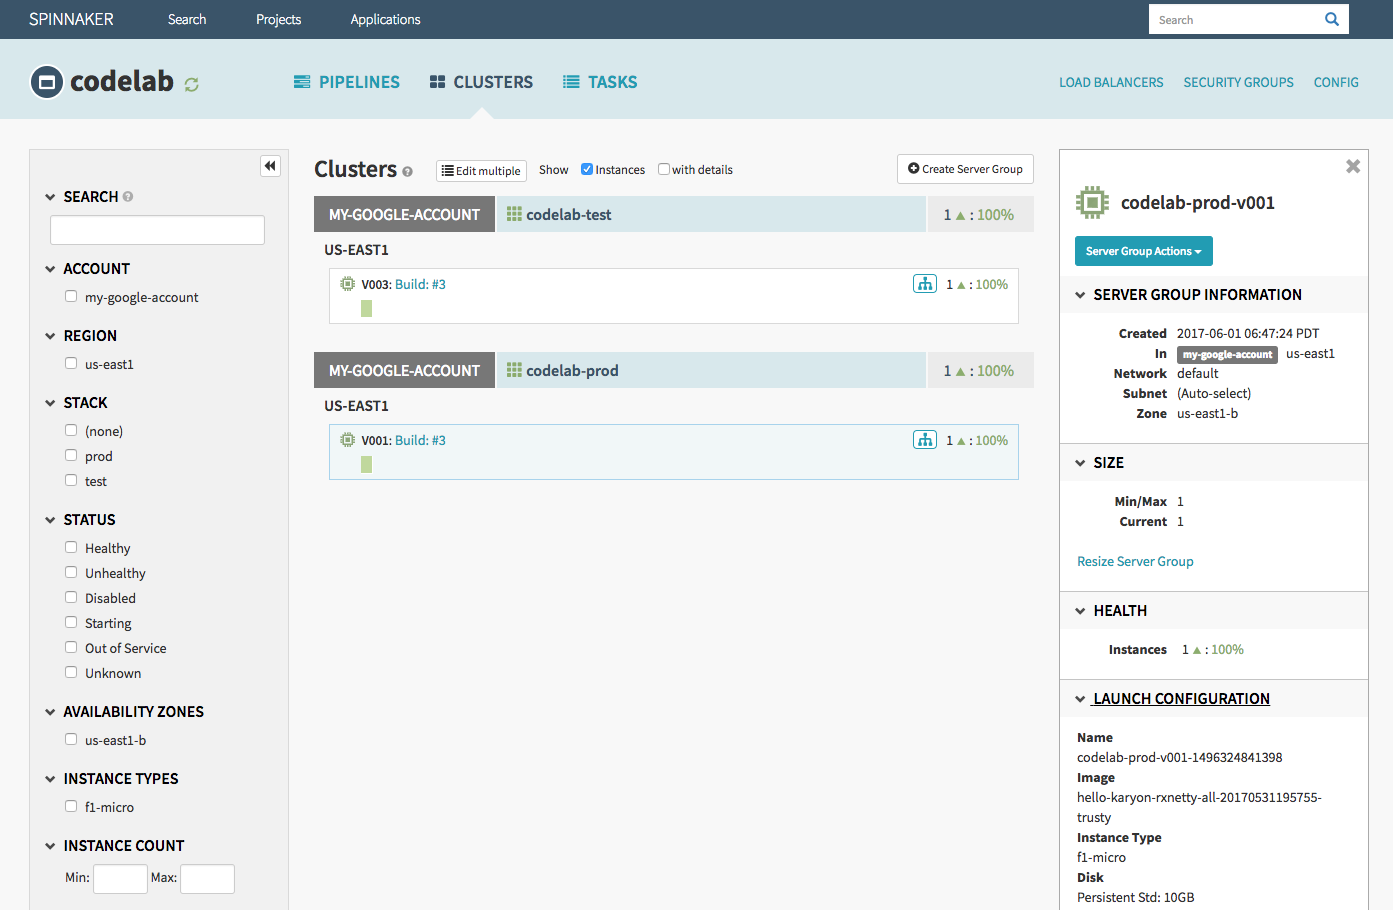
Because we selected the red/black (blue/green) deployment strategy for the deployment, there should always be only one enabled/active server group resident in the prod cluster cluster, with previous ones disabled (grey), even after successive runs of this pipeline. Try it out by manually invoking the promotion pipeline again.
Extra stuff
Roll back
Sometimes things go wrong and you need to roll prod back to the previous release. We employed the red/black (blue/green) strategy, which disables the previous server group. In practice, this is disassociating the server group from the load balancer so it takes no traffic, while keeping the nodes in the server group up, standing by.
To roll back back to the previous server group, first kick off another instance of the Promote to Prod pipeline so that you have a previous disabled server group in the PROD cluster to roll back to. When this pipeline completes, navigate to the CLUSTERS tab and click the active server group.
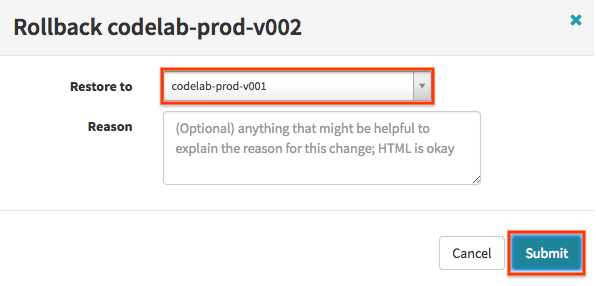
- In the Server Group Actions drop down on the right, click Rollback.
- In the dialog that appears, select the server group you would like to restore (that is, the server group you would like to roll back to).
- Click Submit.
When the task completes (you can check progress in the TASKS tab), you will see that the specified server group is now the active one, while the previous one is disabled (grey).
Triggering the Jenkins job by changing source
So far you’ve been triggering the Jenkins job manually over unchanging source code. Consequently, you’ll notice that all server groups point back to the same Jenkins job. This is because Spinnaker can detect whether a re-bake is necessary, and because there were no changes, it simply returned the same image.
The image you’re using does have Jenkins polling for updates to the local git repo. If you trigger the Jenkins job as a result of a code change, the image that’s built will be different, and you’ll see the build info change throughout the entire pipeline chain.
You can update source by doing the following from your ssh terminal:
sudo su jenkins
cd /var/lib/jenkins/hello-karyon-rxnetty
Now change the number on the “release” line:
vi build.gradle
Finally, commit your changes to trigger a new Jenkins build:
git commit -a -m "Bump release number"
You’ll see the whole sequence again, but with a key difference: a new image will be baked, and the server groups deployed as a result will show different build info.