Azure VM Scale Sets: Source to Prod
In this codelab, you will create a source-to-prod continuous delivery pipeline for a simple java based application targeting VM Scale Sets in Azure.
After completing this lab the following workflow will happen:
- A developer pushes a commit to Github
- Jenkins automatically builds a Debian package and pushes it to an Aptly repository
- Spinnaker bakes the new package into an image
- Spinnaker deploys to a test environment and disables the previous deployment
- Spinnaker waits for a manual judgement of the test environment
- Spinnaker deploys the image to the production environment and disables the previous deployment.
This codelab will walk through the following steps to implement this scenario:
- Deploy Spinnaker and Jenkins on Azure
- Verify Jenkins
- Prepare your environments
- Create the Continuous Delivery pipeline
- Trigger your pipeline
- Clean up the environment
1. Deploy Spinnaker and Jenkins on Azure
You need the following resources to perform the codelab:
- Azure subscription: You can create one for free using the Azure Free trial .
- Spinnaker and Jenkins VM:
From a shell run the following command that will walk you through all the steps necessary to deploy Jenkins and Spinnaker in Azure.
NOTE: When running the following script, ensure that you type
vmsswhen asked to select the target.
bash <(curl -sL https://aka.ms/DeployDevOps)
In the output of the above script you will find the command to open an SSH tunnel to the DevOps VM that has just been deployed. The command should look like this:
ssh -L 8080:localhost:8080 -L 9000:localhost:9000 -L 8084:localhost:8084 -L 8087:localhost:8087 username@fqdn_of_your_devops_vm
NOTE: You will have to enter the password that you have specified in the previous step.
2. Verify Jenkins
-
After you have started your ssh tunnel, navigate to http://localhost:8080/ on your local machine.
-
The instance should already be unlocked and your first account setup. Login with the credentials you specified when deploying the template.
-
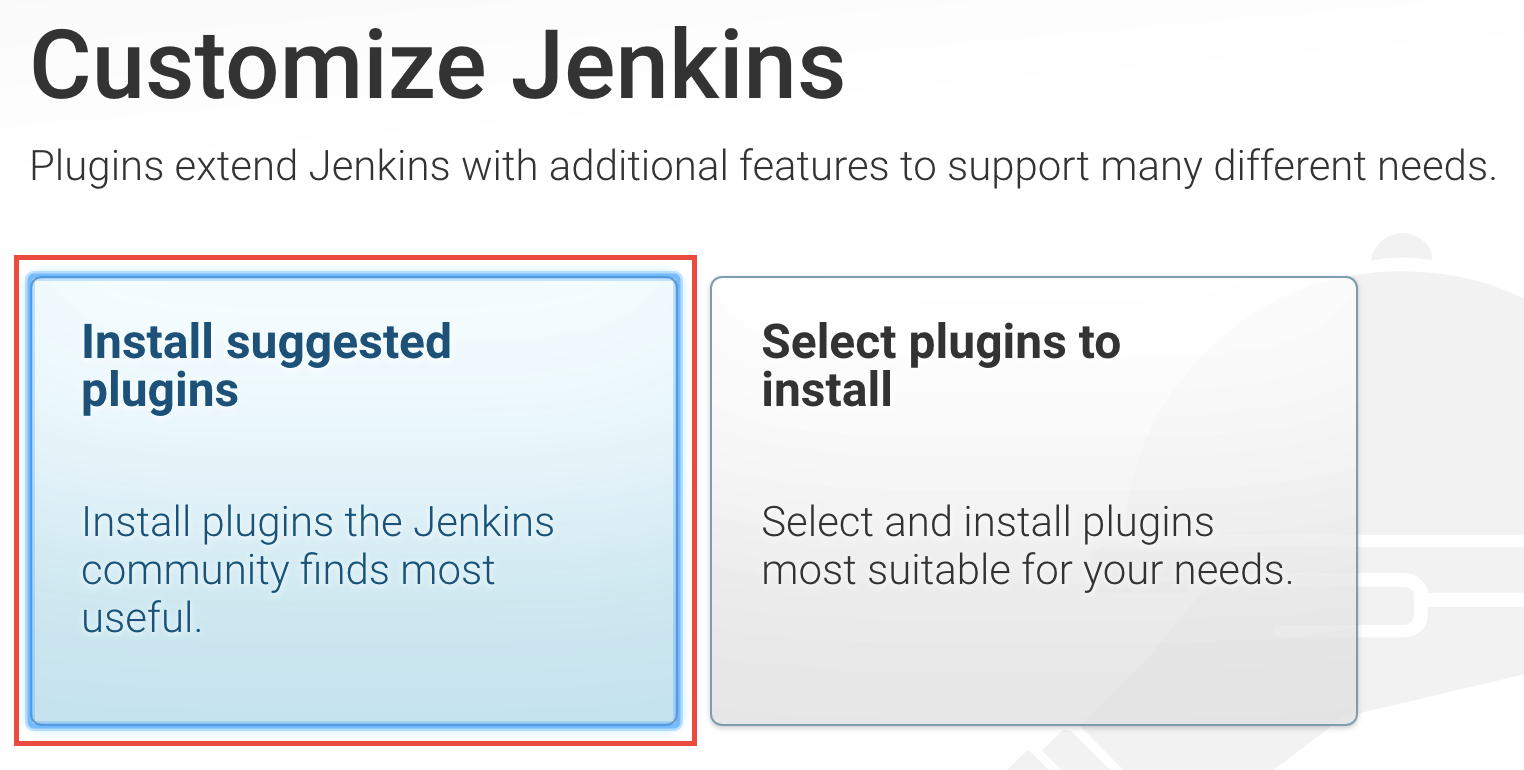
Click Install suggested plugins:
-
Your Jenkins instance is now ready to use!
-
Run the
Sample Aptly Jobby clicking on the run button for the job. Verify that the job completes successfully.
3. Prepare your environments
I. Create the “codelab” application
-
Navigate to your Spinnaker dashboard by using http://localhost:9000 on your local machine.
-
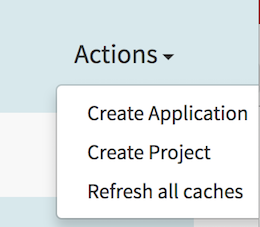
Click on the Actions menu on the right
-
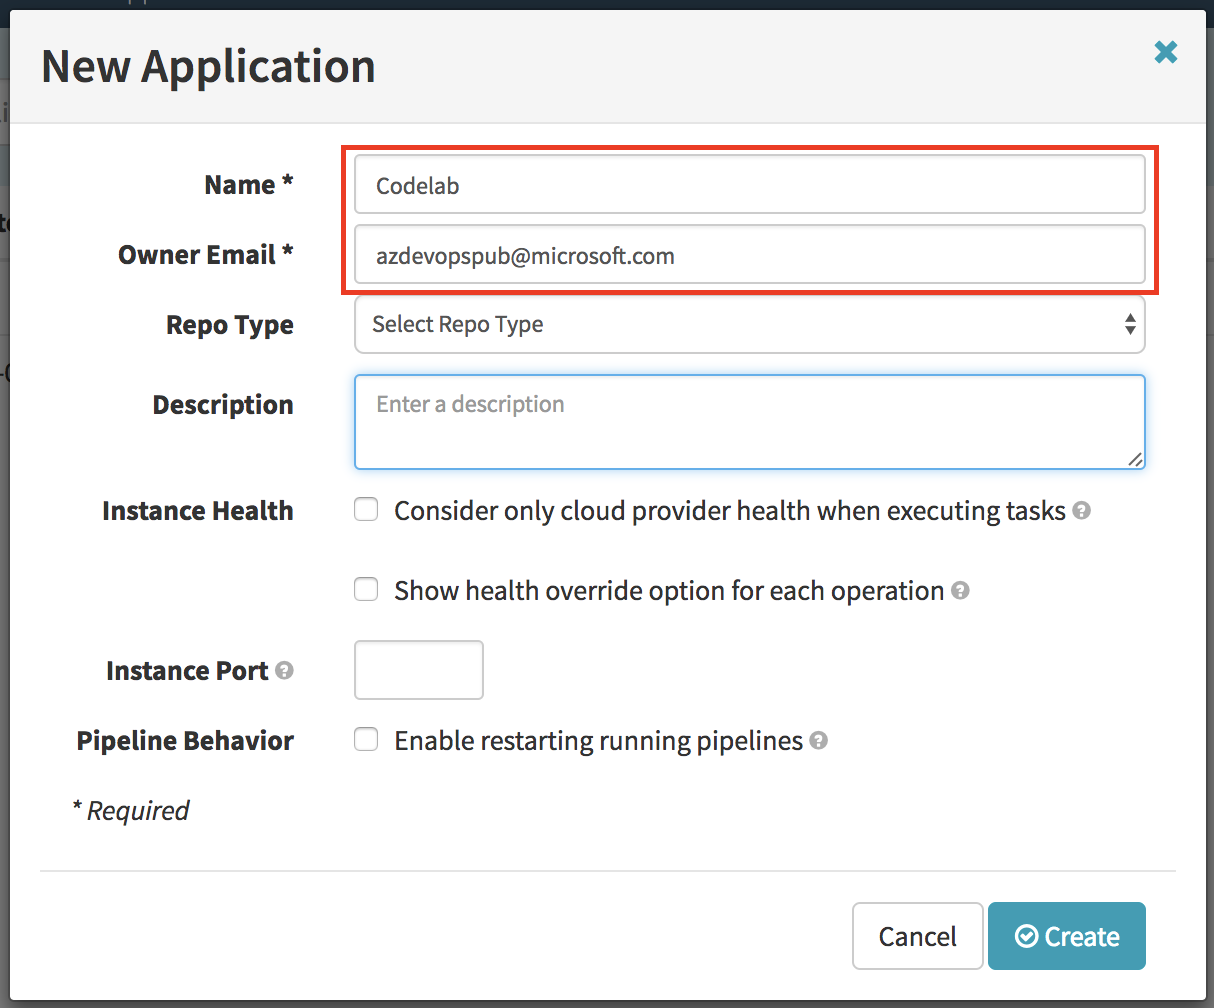
In the New Application window, enter the following values:
-
Name: codelab
-
Owner Email: Enter your email
And click Create
You can read more how the Spinnaker application matches to Azure resources in the Azure reference for Spinnaker
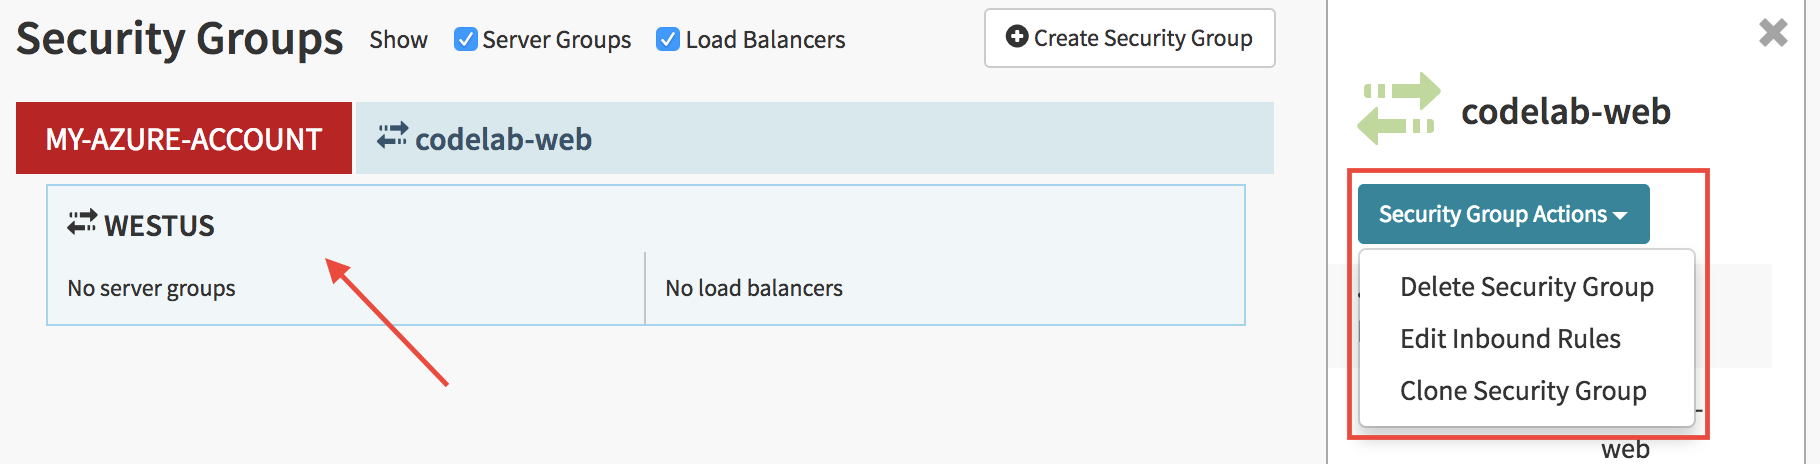
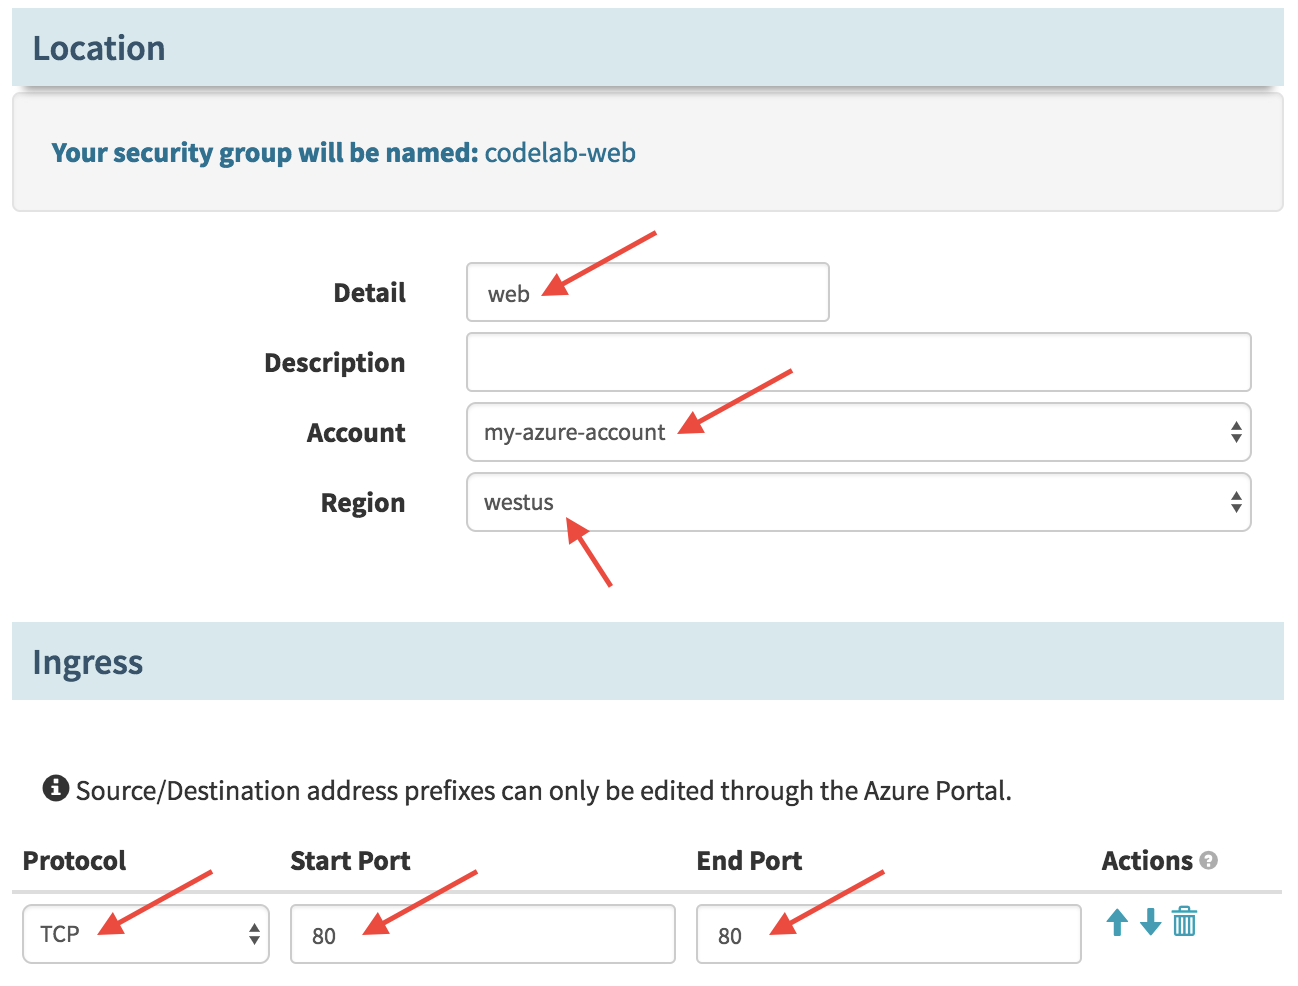
II. Create a firewall
- Navigate to the FIREWALLS page and click on the Create Firewall button.
- Provide the following values in the Create New Firewall dialog:
-
Detail: web
-
Account: my-azure-account (should be selected by default)
-
Region: westus (select the region that is closest to your location)
Ingress (click Add new Firewall Rule):
-
Protocol: TCP
-
Start Port: 80
-
End Port: 80
And click Create, if the loadbalancer does not appear in the page once the creation is complete, refresh your browser.
Note: We are using westus for the region but you can select any other region that is closer to your location. Be careful to match the region in the following steps.
You can read more about the implementation of Network Security Groups in Azure in the Azure reference for Spinnaker
III. Create a load balancer
- Navigate to the LOAD BALANCERS page and click the Create Load Balancer button.
- Provide the following values in the “Create New Load Balancer” dialog:
-
Account: my-azure-account
-
Region: westus (unless you have selected a different region previously)
-
Virtual Network: devopsVnet
-
Subnet: devopsSubnet1
-
Stack: test
-
Detail: frontend
Verify that the Listener is configured as follows:
-
Protocol: HTTP
-
External Port: 80
-
Internal Port: 8080
And click Create.
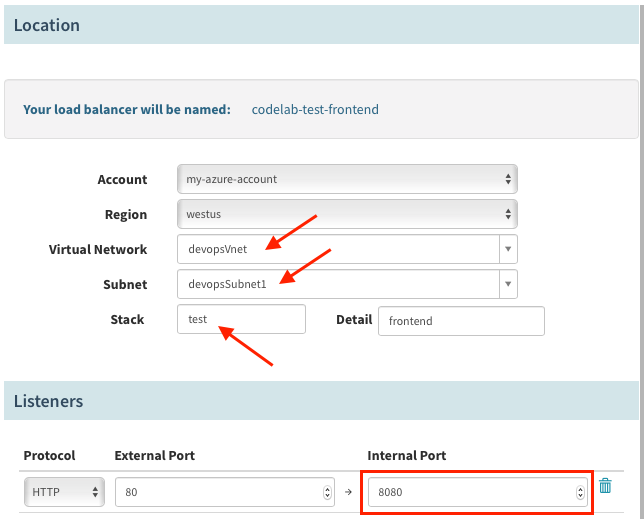
The virtual network devopsVnet and the subnets devopsSubnet# were created for you by the script that you ran in the Deploy Spinnaker and Jenkins on Azure step.
You can learn more about the implementation of the Spinnaler Load Balancer in the Azure reference for Spinnaker .
- Repeat the above steps to create a second load balancer for production. Use the same parameters but the following change:
-
Stack: prod

NOTE: It will take approximately 15 minutes to provision the two loadbalancers.
4. Create the continuous delivery pipeline
In this section you will create a Spinnaker pipeline that will bake the image from a Jenkins build then deploy it to test.
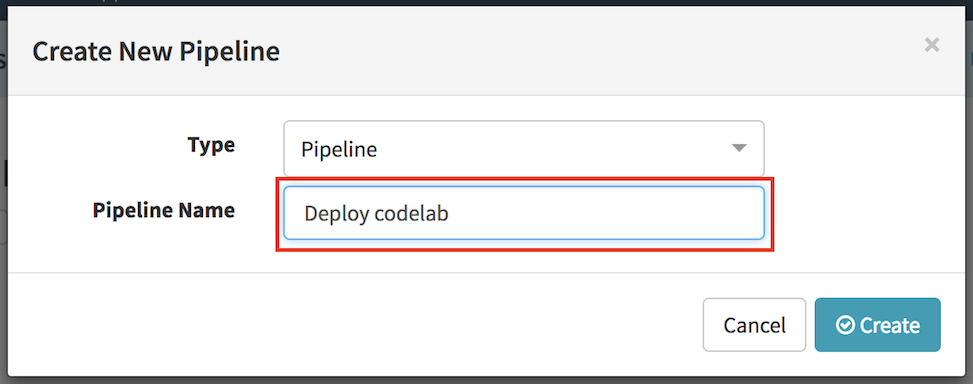
I. Create a new pipeline
-
Navigate to the PIPELINES page and click on the New button (+ sign) on the right to create a new pipeline.
-
Name your pipeline: “Deploy codelab” and click Create.
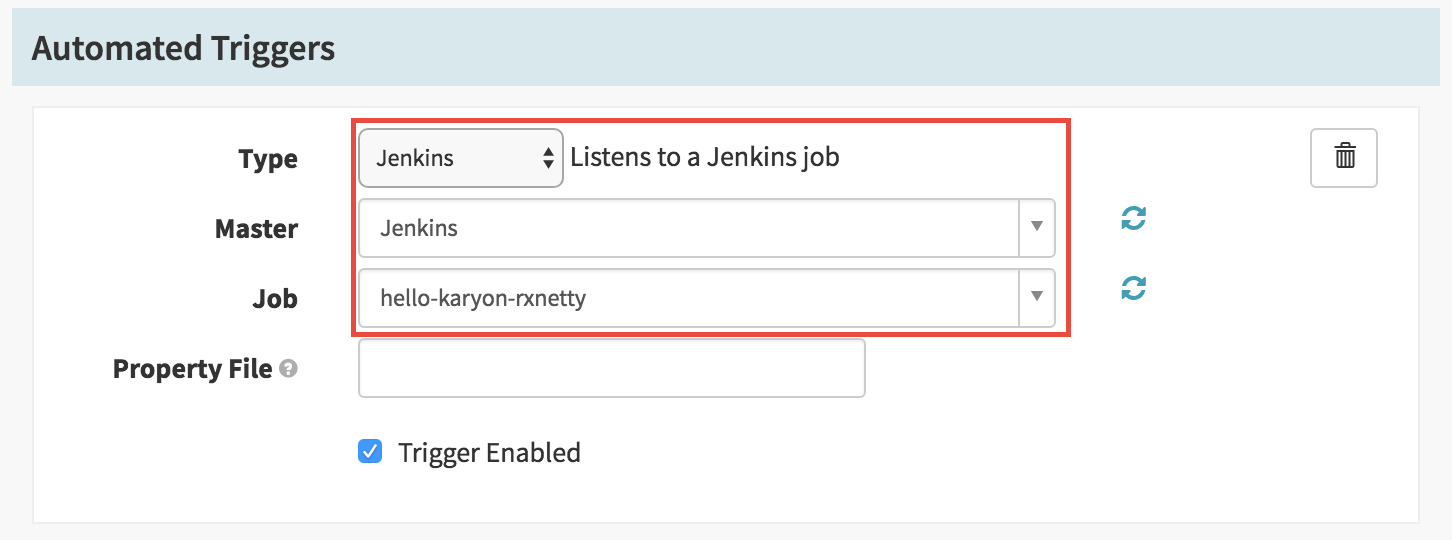
II. Add a trigger for the pipeline
- Click Add Trigger in the Deploy codelab window.
- Select the following options:
-
Type: “Jenkins”
-
Master: “Jenkins”
-
Job: “hello-karyon-rxnetty”
-
Property File: leave empty
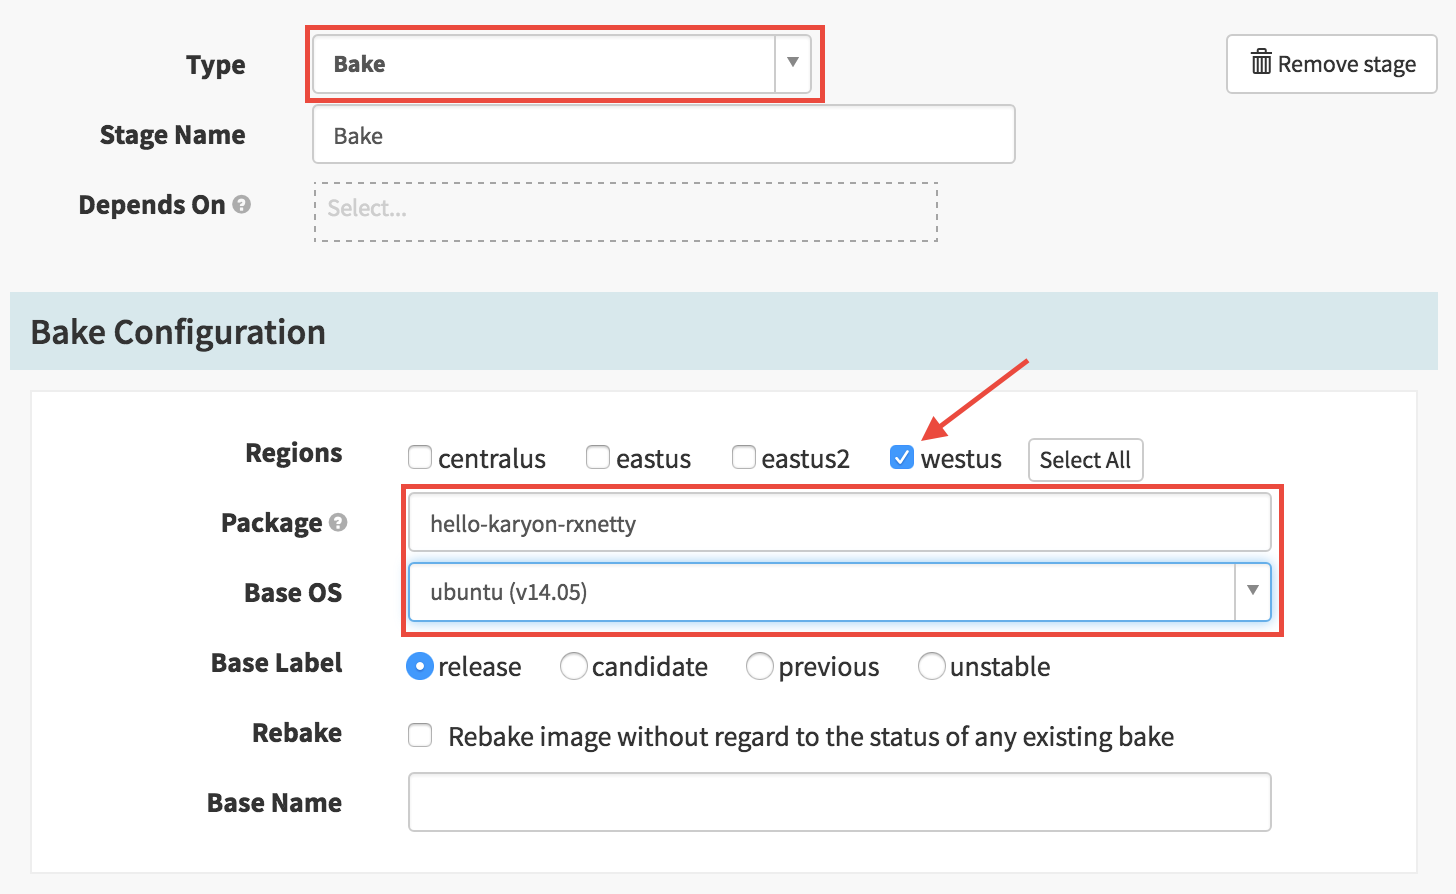
III. Add Bake stage
- Click Add stage in the Deploy codelab window.
- Enter the following values:
-
Type: Bake
-
Stage Name: Bake
-
Regions: westus (or select the region that you have selected when creating the Firewall)
-
Package:
hello-karyon-rxnetty -
Base OS: ubuntu (v14.05)
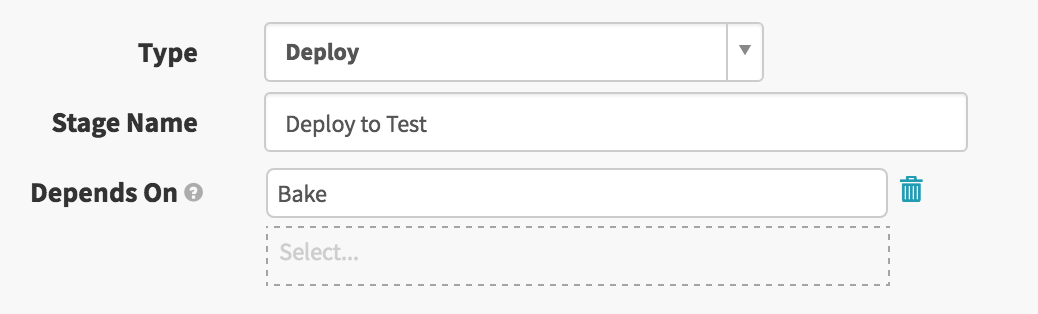
IV. Add Deploy to test stage
- Click Add stage
- Enter the following values:
-
Type: Deploy
-
Stage Name: Deploy to Test
-
Depends On: Bake
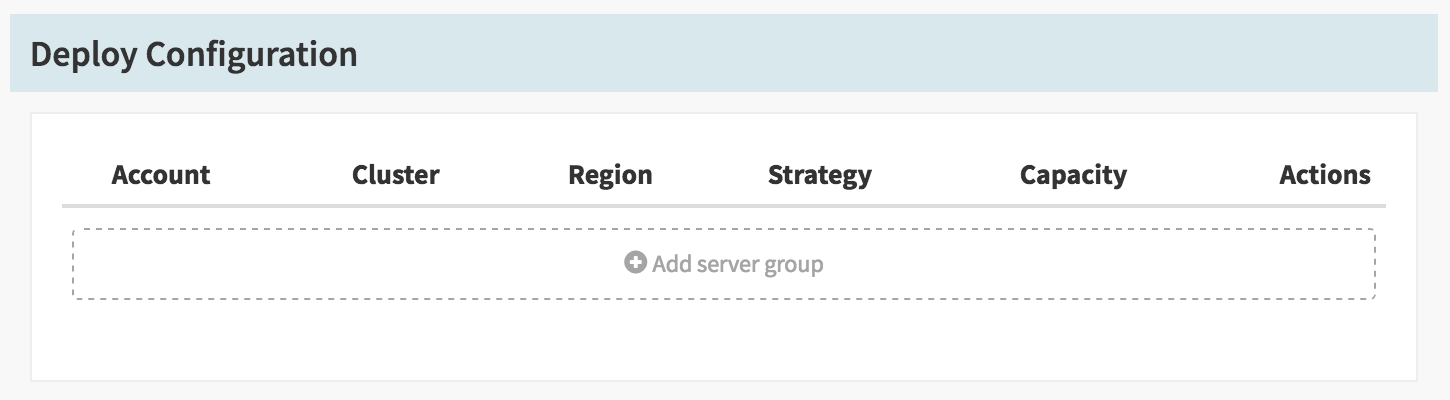
V. Create test deployment configuration
-
Click Add server group in the Deploy Configuration section.
-
Click “Continue without a template”
-
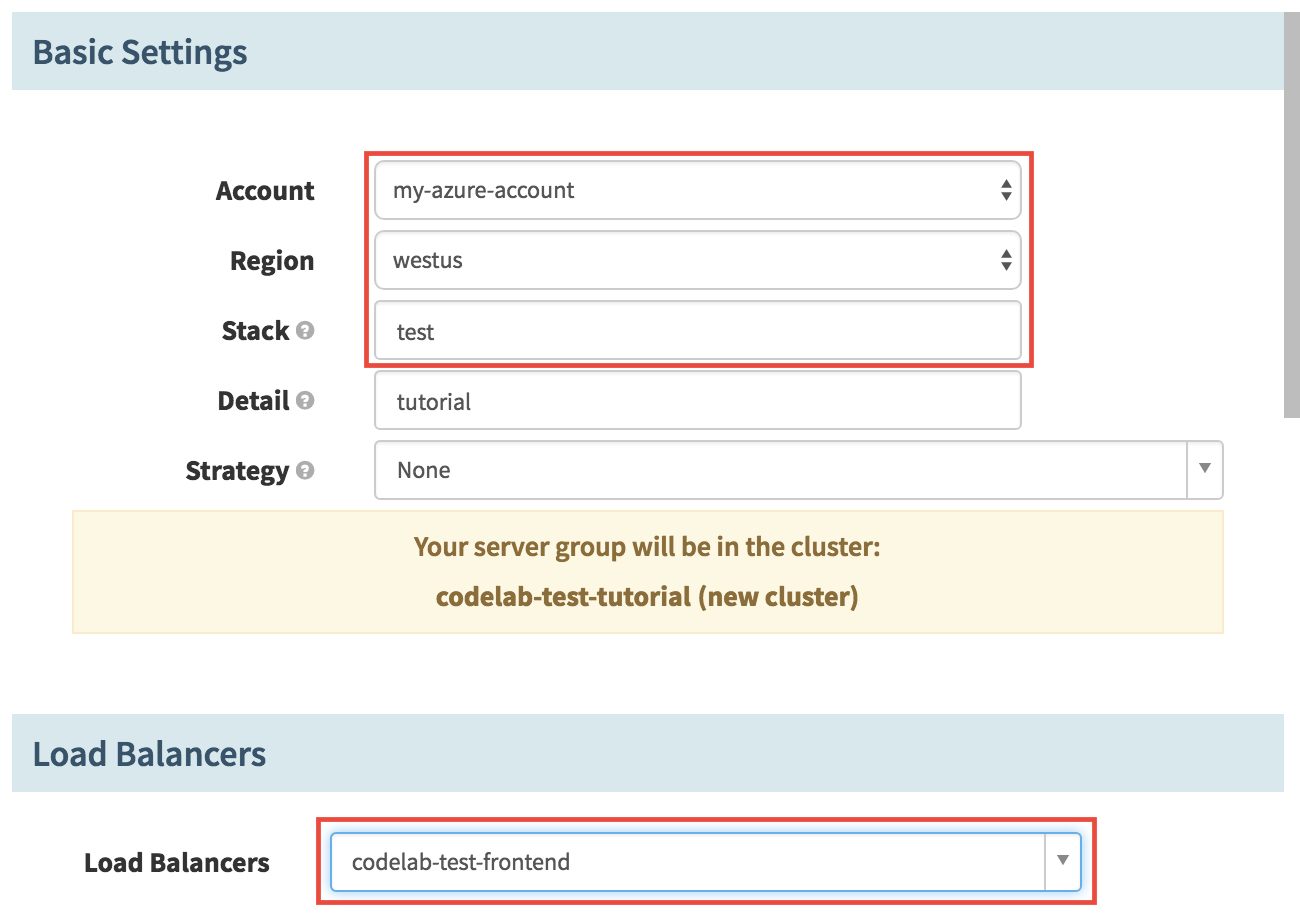
In the “Configure Deployment Cluster” enter the following values:
-
Account: my-azure-account
-
Region: westus (or select the region that you have selected when creating the Firewall)
-
Stack: test
-
Details: tutorial
-
Load Balancers: codelab-test-frontend
-
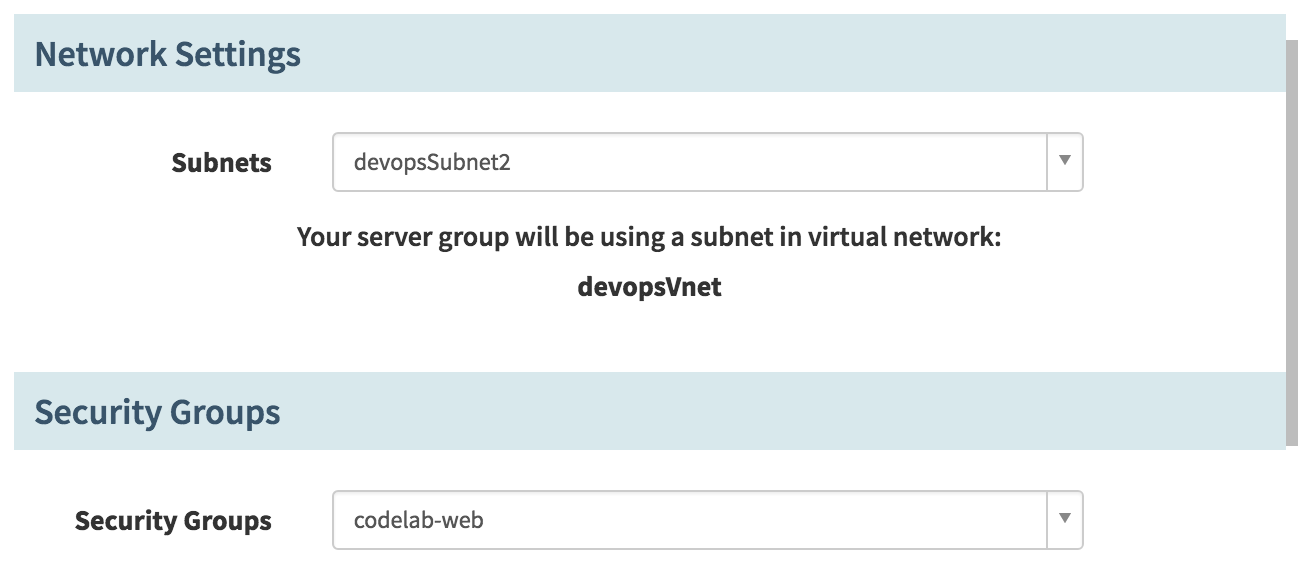
Subnets: devopsSubnet2
-
Firewalls: codelab-web
-
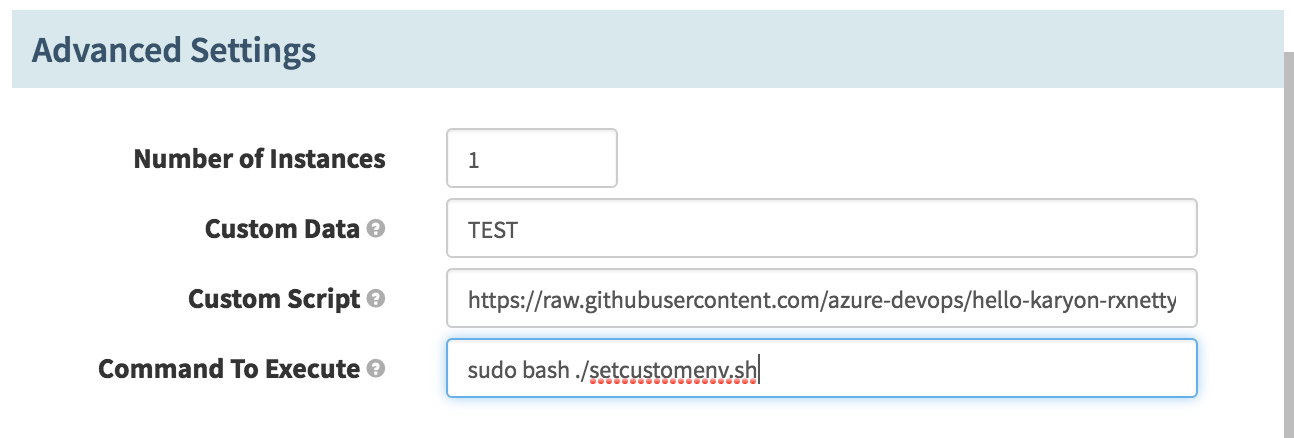
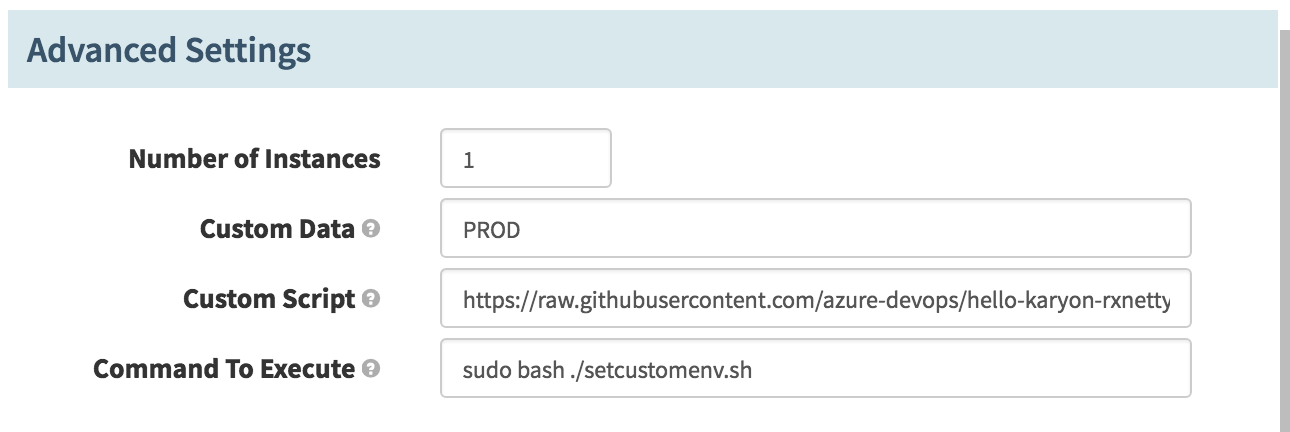
“Advanced Settings”:
-
Custom Data: TEST
-
Custom Script: https://raw.githubusercontent.com/azure-devops/hello-karyon-rxnetty/master/scripts/setcustomenv.sh
-
Command To Execute: sudo bash ./setcustomenv.sh
-
-
Click Add
NOTE: Record the name of the cluster. it will be used in the next step.
VI. Enable test deployment
- Click Add stage in the Deploy codelab section.
- Enter the following values:
-
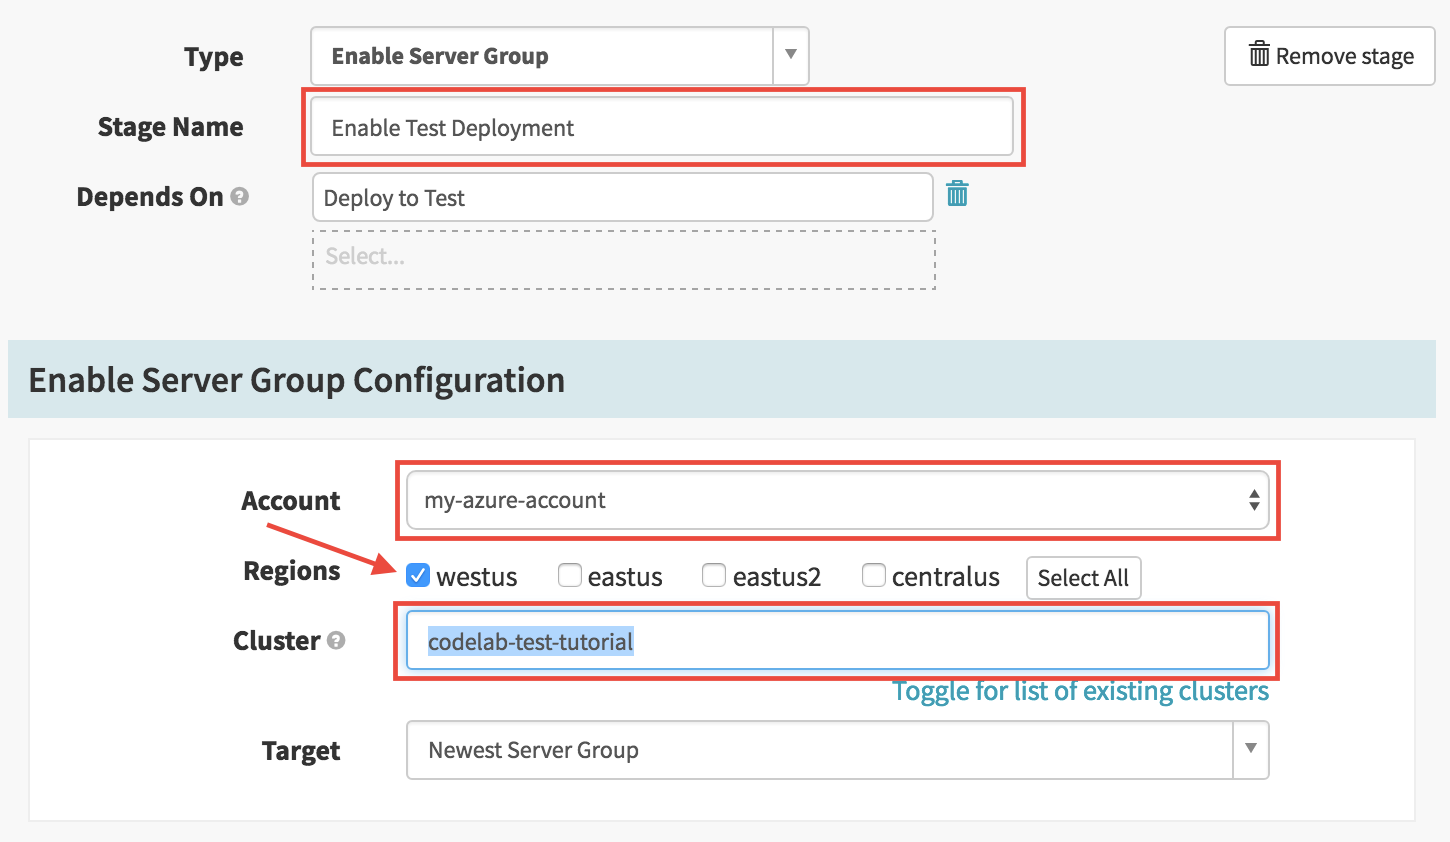
Type: Enable Server Group
-
Stage Name: Enable Test Deployment
-
Depends On: Deploy to Test
-
Account: my-azure-account
-
Regions: westus (or select the region that you have selected when creating the Firewall)
-
Cluster: codelab-test-tutorial (or the name of your cluster if you have used different values)
-
Target: Newest Server Group
VII. Manual judgment
- Click Add stage in the Deploy codelab section.
- Use the following values:
- Type: Manual Judgment
- Name: Manual Judgment
- Depends On: Enable Test Deployment
- Instructions: Validate test cluster
VIII. Add Deploy to Prod stage
- Click Add stage in the Promote to Prod section.
- Use the following values to configure the stage:
- Type: Deploy
- Stage Name: Deploy to Prod
- Depends On: Manual Judgment
IX. Create production deployment configuration
- Click Add server group in the Deploy Configuration section.
- Click Continue without a template
- In the Configure Deployment Cluster enter the following values:
-
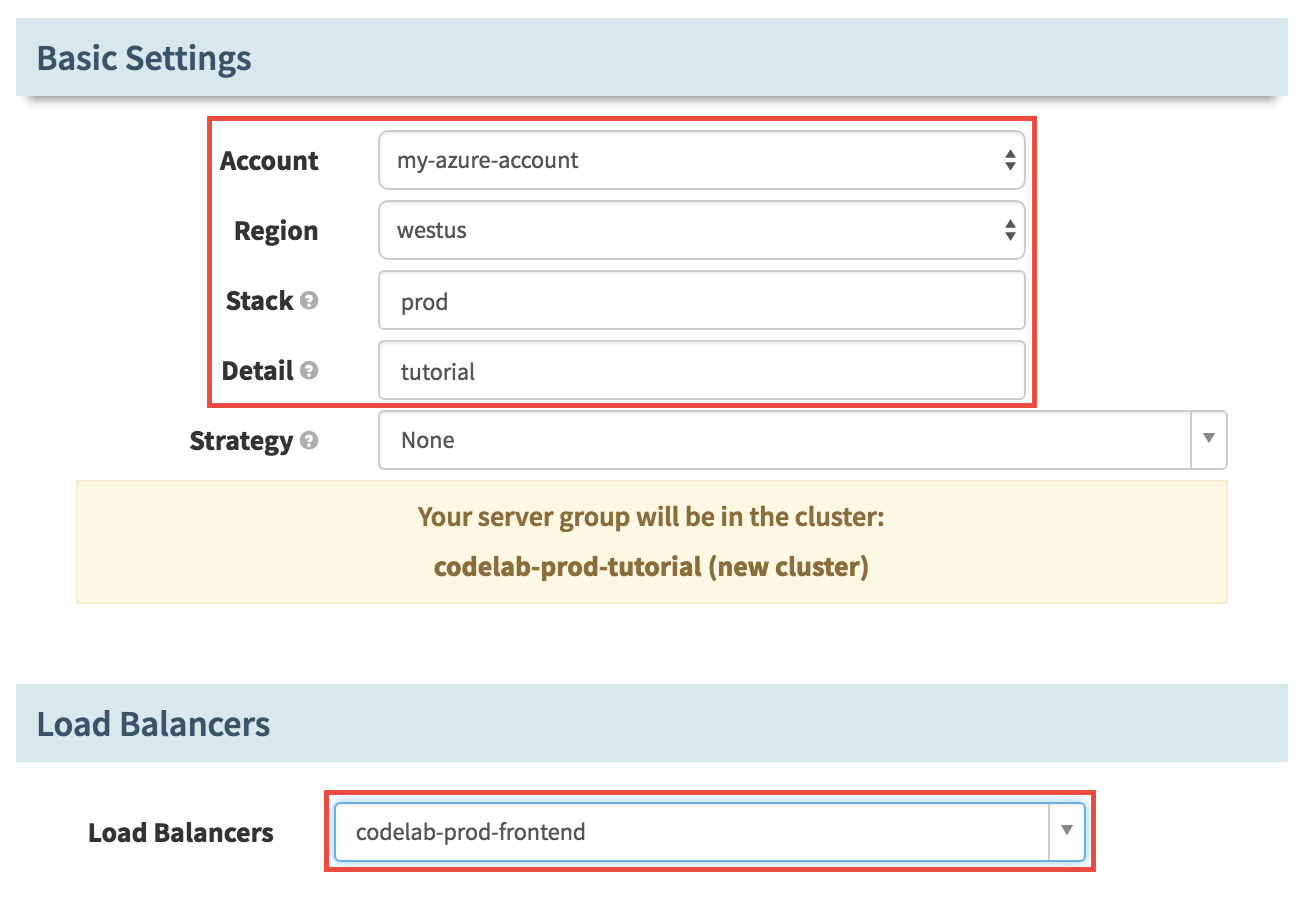
Account: my-azure-account
-
Region: westus (or select the region that you have selected when creating the Firewall)
-
Stack: prod
-
Details: tutorial
-
Load Balancers: codelab-prod-frontend
-
Subnets: devopsSubnet2
-
Firewalls: codelab-web
-
“Advanced Settings”:
-
Custom Data: PROD
-
Custom Script: https://raw.githubusercontent.com/azure-devops/hello-karyon-rxnetty/master/scripts/setcustomenv.sh
-
Command To Execute: sudo bash ./setcustomenv.sh
-
-
Click Add
NOTE: Record the name of the cluster. it will be used in the next step.
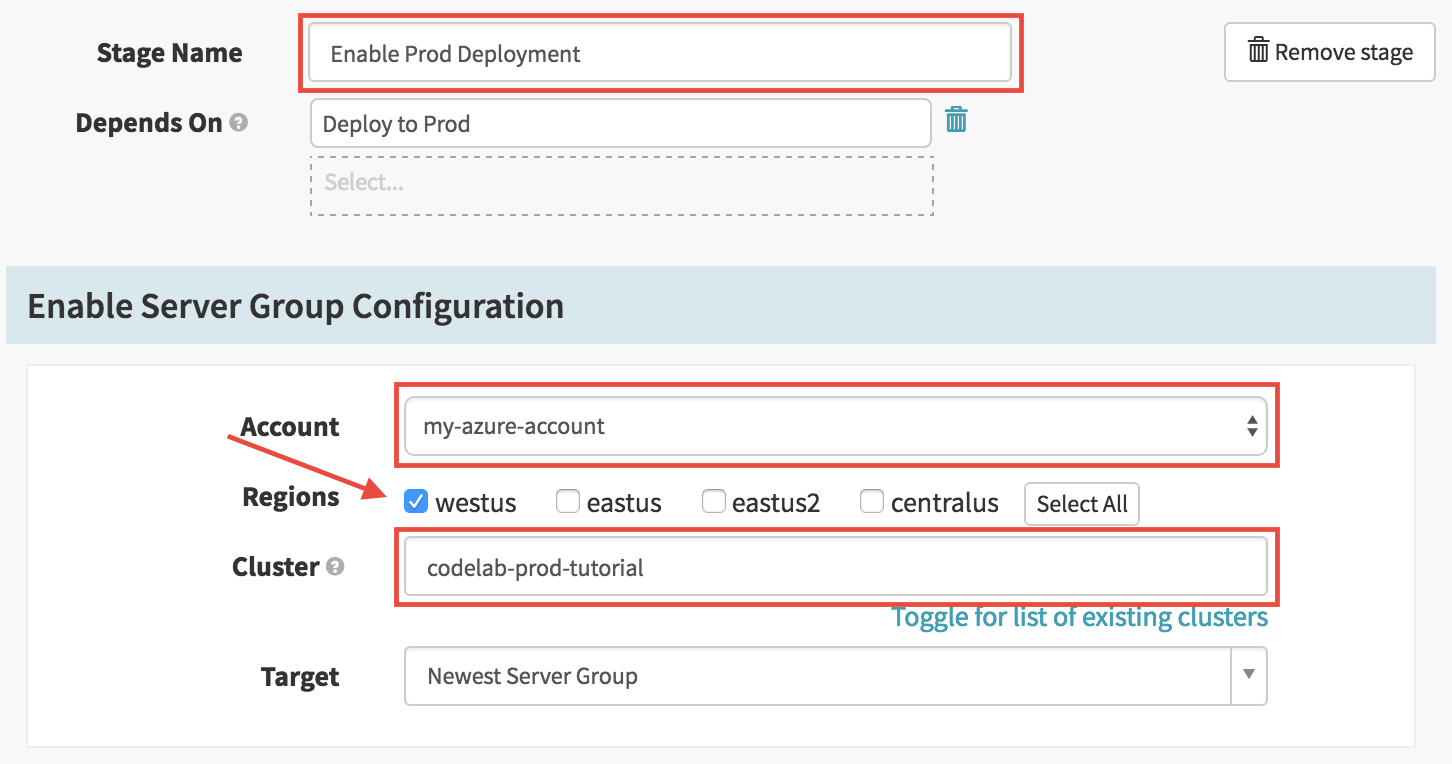
X. Enable prod deployment
- Click Add stage in the Deploy codelab section.
- Use the following values to configure this stage:
-
Type: Enable Server Group
-
Stage Name: Enable Prod Deployment
-
Depends On: Deploy to Prod
-
Account: my-azure-account
-
Regions: westus (or select the region that you have selected when creating the Firewall)
-
Cluster: codelab-prod-tutorial
-
Target: Newest Server Group
-
Click Save Changes
5. Trigger your pipeline
In this step you will try out the pipeline that you have just built.
-
Go to Jenkins and start a new build of the “Sample Aptly Job” like you did in the section “ Verify Jenkins ”. You should see your Spinnaker pipeline running soon after your Jenkins job finishes.
-
Navigate to the PIPELINES tab
-
Click on Details to get more information about the status of your deployment
-
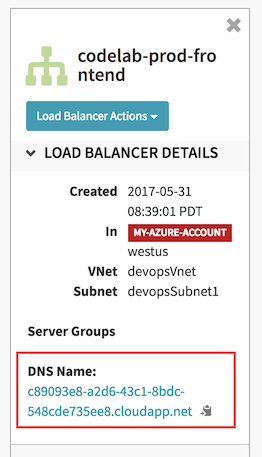
Connect to your application. You can find the public name of your application by looking at the DNS Name that has been assigned to your load balancer.
6. Tear Down
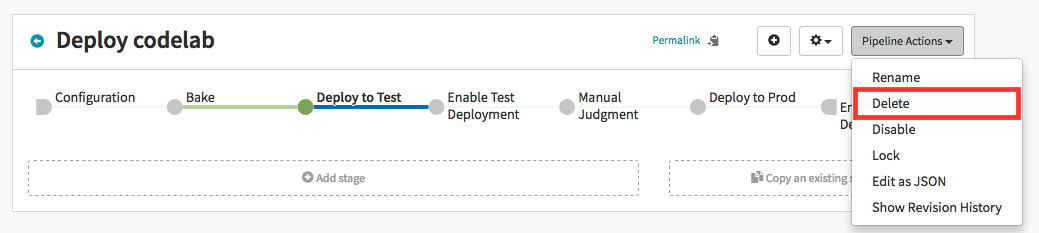
I. Delete your pipeline
-
In the configuration of your pipeline, click on Pipeline Actions then click on Delete
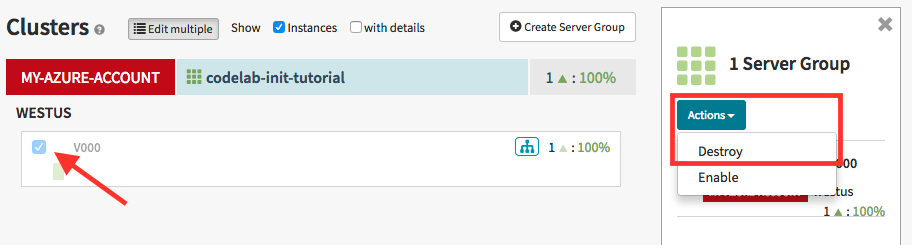
II. Delete your server groups
-
Navigate to the CLUSTERS section.
-
Select each Server Group in the list and select Destroy for each of them.
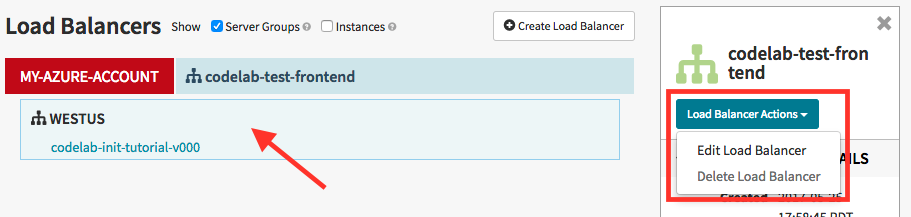
III. Delete your load balancers
-
Navigate to the LOAD BALANCERS section.
-
Select each Load Balancer in the list then in the Load Balancer Actions select Delete Load Balancer
IV. Delete your firewall
-
Navigate to the FIREWALL section.
-
Select each Firewall in the list then in the Firewall Actions select Delete Firewall